
Use your browser’s Print dialog and choose “Save as PDF”.
Privileged Access Management
Keycyte PAM 3.2
Deployment Guide
About This Guide
This guide describes how to plan, install and configure Keycyte PAM, and how to upgrade and back it up.
The guide applies to Keycyte PAM 3.2. Keycyte PAM runs as a set of Docker containers that are started with Docker Compose on a Linux host.
Intended Audience
The guide is intended for system administrators and IT engineers who deploy and maintain Keycyte PAM. You should be familiar with Linux administration, Docker, TLS certificates and your network environment.
Contents
| Section | Description |
|---|---|
| Architecture | Keycyte PAM components and the paths that user connections take. |
| Planning and Preparation | System requirements, network ports, certificates and licensing. |
| Installation | Preparing the installation package, running the installer and signing in for the first time. |
| Initial Configuration | Licence, Web TLS certificate, notifications, directory services and service access keys. |
| High Availability | Running several Keycyte PAM nodes with one master node. |
| Backup and Restore | Backing up the configuration database and restoring it. |
| Configuration Reference | config.yaml settings and KEYCYTE_* environment variables. |
| Troubleshooting | Service logs, certificate reset and common issues. |
Document Conventions
Note
Notes give additional information about the topic.
Important
Important notes describe conditions that must be met before you continue; ignoring them can cause data loss or service interruption.
Tip
Tips describe an easier or better way of doing something.
Warning
Warnings describe actions that can cause data loss or a security risk.
Architecture
A Keycyte PAM deployment is a set of Docker containers on one Linux host, started and managed with Docker Compose. The PAM server is the central component: it serves the web interfaces, stores the configuration in PostgreSQL, applies roles and policies, and controls every privileged session. The other components handle specific protocols or tasks and talk to the PAM server over an internal Docker network.
Users never receive the passwords of target accounts. They connect to Keycyte PAM, and Keycyte PAM opens the connection to the target system with the credential stored in the Password Vault.
In This Section
| Topic | Description |
|---|---|
| Components | The containers in a deployment, what each one does and which ports it uses. |
| Connection Paths | How browser sessions and native SSH and RDP clients reach target systems. |
Components
A Keycyte PAM deployment consists of the containers described below. All containers are attached to one internal Docker bridge network (keycyte-net) and reach each other by service name. Only the ports listed as published are reachable from outside the host.
Component Overview
| Component | Compose service | Image | Published port | Purpose |
|---|---|---|---|---|
| PAM server | pam | keycyte-pam | 443/tcp | Web interfaces, REST API, policy engine, session control, scheduled jobs. |
| SSH proxy | ssh-proxy | keycyte-ssh-proxy | 2222/tcp | SSH sessions from native SSH clients, web terminal and SFTP sessions. |
| RDP proxy | rdp-proxy | keycyte-rdp-proxy | 3389/tcp | RDP sessions from native RDP clients (for example Microsoft Remote Desktop Connection). |
| Gateway (guacd) | guacd | guacamole/guacd | — | Protocol gateway for graphical and terminal sessions opened in the browser. |
| Password Manager | password-manager | keycyte-password-manager | — | Changes and verifies passwords on target systems (password rotation). |
| RADIUS server | radius | keycyte-radius-server | 1812/udp | RADIUS authentication for network devices and applications against Keycyte PAM users. |
| TACACS+ server | tacacs | keycyte-tacacs-server | 49/tcp | TACACS+ authentication, authorization and accounting for network devices. |
| Database | postgres | postgres:17 | — | PostgreSQL database that stores the configuration, vault, logs and session history. |
PAM Server
The PAM server (pam container) is the core of Keycyte PAM. It:
- serves the Client Panel (at
https://<pam-address>/) and the Admin Panel (athttps://<pam-address>/admin) over HTTPS on port 443; - stores all data in the PostgreSQL database and creates or updates the database schema at startup;
- encrypts secrets (vault passwords, keys, provider credentials, backups and session recordings) with the encryption key that is set in its environment;
- authenticates users (local, LDAP/Active Directory, RADIUS, Microsoft Entra ID) and applies MFA, roles and access policies;
- controls sessions: it asks the gateway, SSH proxy or RDP proxy to open the connection, records the session and writes the audit logs;
- runs scheduled jobs: password rotation, scheduled reports and scheduled backups (on the master node only, see High Availability);
- lists and manages the other containers on Settings > Services through the read-only Docker socket that is mounted into the container.
SSH Proxy
The SSH proxy (ssh-proxy container) handles SSH traffic:
- Native SSH clients connect to it on port 2222. The SSH proxy asks the PAM server whether the user may use the requested account, and then opens the SSH connection to the target system.
- Web terminal (SSH) and SFTP sessions that are opened in the Client Panel are relayed by the PAM server to the SSH proxy over the internal network (WebSocket, port 8443 inside the network).
The SSH proxy writes SSH session recordings to the recordings directory.
RDP Proxy
The RDP proxy (rdp-proxy container) accepts connections from native RDP clients on port 3389 (port 13389 inside the container). When a user chooses to connect with a native client, the PAM server pushes a single-use connection token and the credentials to the RDP proxy, and gives the user an .rdp file. The RDP proxy then opens the RDP connection to the target system.
Gateway (guacd)
The gateway (guacd container) is an Apache Guacamole proxy daemon. The PAM server uses it, on port 4822 inside the network, for sessions that run in the browser: RDP, VNC, Telnet, Kubernetes, RemoteApp, web application and 3rd party application sessions. The gateway has access to the file transfer directory (/drive) and the recordings directory.
Password Manager
The Password Manager service (password-manager container) changes and verifies passwords on target systems, for example Windows local accounts and Active Directory accounts. The PAM server calls it, on port 1453 inside the network, during manual and scheduled password changes. It reads the LDAP CA file from the shared application directory.
RADIUS Server
The RADIUS server (radius container) listens on port 1812/udp. It authenticates RADIUS clients (for example network devices or VPN gateways) against Keycyte PAM users by calling the PAM server’s internal API. Its settings are managed on Settings > Radius Server in the Admin Panel.
TACACS+ Server
The TACACS+ server (tacacs container) listens on port 49/tcp. It authenticates administrators of network devices against Keycyte PAM, returns authorization decisions and sends accounting records to the PAM server. Its settings are managed on Settings > TACACS+ Server in the Admin Panel.
Database
The PostgreSQL database (postgres container, PostgreSQL 17) stores all Keycyte PAM data. Its data is kept in the Docker volume postgres-data. The database port is not published on the host; only the containers on the internal network can reach it.
Note
The PAM server can also use an external PostgreSQL server. In that case, set the database connection variables to the external server (see Configuration Reference).
Host Directories
The installer creates three directories in the home directory of the user who runs it and mounts them into the containers:
| Host directory | Mounted as | Used by | Contents |
|---|---|---|---|
~/keycyte | /app (PAM server, Password Manager), /base (SSH proxy) | PAM server, SSH proxy, Password Manager | Certificate files, optional config.yaml, local backup files (backups/) and the master node marker file. |
~/drive | /drive | PAM server, gateway | Files transferred in browser sessions. |
~/record | /record | PAM server, SSH proxy, gateway | Session recordings. |
Important
Session recordings can grow quickly. Place ~/record on a file system with enough free space, and monitor it. See System Requirements.
Connection Paths
Users reach target systems through Keycyte PAM in one of three ways. In every case the user authenticates to Keycyte PAM, Keycyte PAM checks the user’s roles and policies, and the connection to the target system is opened by a Keycyte PAM component with the credential from the Password Vault.
| Path | User side | Entry point | Component that connects to the target |
|---|---|---|---|
| Browser session (graphical or terminal) | Web browser, Client Panel | PAM server, 443/tcp (HTTPS and WebSocket) | Gateway (guacd) |
| Browser SSH terminal and SFTP | Web browser, Client Panel | PAM server, 443/tcp (HTTPS and WebSocket) | SSH proxy |
| Native SSH client | Any SSH client | SSH proxy, 2222/tcp | SSH proxy |
| Native RDP client | RDP client with an .rdp file | RDP proxy, 3389/tcp | RDP proxy |
Browser Sessions
Browser sessions need no client software. The user opens a server in the Client Panel and the session runs in a browser tab.
- The browser connects to the PAM server on port 443 over HTTPS.
- The user selects a server and an account. The PAM server checks the roles, MFA and approval requirements.
- The PAM server opens a WebSocket from the browser and connects to the target system:
- For RDP, VNC, Telnet, Kubernetes, RemoteApp, web application and 3rd party application sessions, the PAM server asks the gateway (guacd, port 4822 on the internal network) to connect to the target. The gateway connects to the target system on the port configured for the server.
- For SSH terminal and SFTP sessions, the PAM server relays the WebSocket to the SSH proxy (port 8443 on the internal network). The SSH proxy connects to the target system over SSH.
- The PAM server records the session if the server role requires it.
Web application and 3rd party application sessions run on a jump server: the gateway opens an RDP session to the jump server that is configured on Settings > Connection, and the application starts there.
Native SSH Clients
Users who prefer their own SSH client connect to the SSH proxy on port 2222. The Client Panel shows the command to copy, in this form:
ssh <vault_id>@<server_id>@<pam_user>@pam.example.com -p 2222- The SSH client connects to the SSH proxy on port 2222 and authenticates the user.
- The SSH proxy asks the PAM server, over its internal API, whether the user may use the requested account on the requested server. The request is signed with the SSH proxy’s access key (see Service Access Keys).
- The SSH proxy connects to the target system with the vault credential and records the session if required.
Native RDP Clients
Native RDP access requires the RDP proxy (see Components).
- The user selects a server and an account in the Client Panel and chooses to connect with a native RDP client.
- The PAM server pushes a single-use connection token and the credentials to the RDP proxy over the internal network, signed with the RDP proxy access key.
- The user receives an
.rdpfile and a single-use password. The.rdpfile points to the public address of the RDP proxy, which is set inKEYCYTE_RDP_PROXY_PUBLIC_ADDRESS. - The RDP client connects to the RDP proxy on port 3389. The RDP proxy validates the token and opens the RDP connection to the target system.
The token expires after 120 seconds by default (KEYCYTE_RDP_LAUNCH_TOKEN_TTL_SECS). If the RDP proxy URL, public address or access key is not configured, native RDP launch is disabled.
Service-to-Service Traffic
Besides user connections, the components talk to each other on the internal network:
| From | To | Purpose |
|---|---|---|
| SSH proxy, RADIUS server, TACACS+ server | PAM server (https://pam) | Authentication, authorization, configuration and session events, signed with access keys. |
| PAM server | SSH proxy | Session control (for example terminating a session), signed with the PAM access key. |
| PAM server | RDP proxy | Pushing connection tokens and credentials for native RDP launch. |
| PAM server | Password Manager | Password change and verification on target systems. |
| PAM server, SSH proxy | PostgreSQL | Database access. |
Planning and Preparation
Before you install Keycyte PAM, prepare a Linux host that meets the system requirements, open the required network ports, obtain the TLS certificate files and plan the licence.
In This Section
| Topic | Description |
|---|---|
| System Requirements | Hardware, operating system, Docker and browser requirements. |
| Network Ports | Ports to open for users, network devices, target systems and internal traffic. |
| Certificates | The PKCS#12 keystore used at startup and the CA files for LDAP. |
| Licensing | How the licence is bound to the system and what a licence key contains. |
System Requirements
Keycyte PAM runs all of its components as Docker containers on one Linux host. Make sure that the host meets the following requirements before you install Keycyte PAM.
Hardware
| Resource | Requirement |
|---|---|
| CPU | 8 cores |
| Memory | 16 GB RAM |
| Disk | 500 GB |
The disk holds the container images, the PostgreSQL database volume, session recordings (~/record), transferred files (~/drive) and local backup files (~/keycyte/backups). Session recordings usually take the most space. If you record many sessions or keep recordings for a long time, plan additional disk space for ~/record.
Operating System
- A 64-bit Linux distribution that is supported by Docker Engine.
bash,sudoand the standard GNU tools (tar,getent,timeout). The installer is a bash script and must be run withsudo.
Docker
| Software | Requirement |
|---|---|
| Docker Engine | Installed and running. The installer stops if docker info fails. |
| Docker Compose | Compose v2 (the docker compose plugin). |
The installer checks both before it does anything else. To install Docker Engine and the Compose plugin, see the Docker documentation: https://docs.docker.com/engine/install/ and https://docs.docker.com/compose/install/.
The host must have a docker group. The installer reads its group ID and gives the PAM server read-only access to the Docker socket, which the Settings > Services page uses.
Note
During installation, Docker Compose pulls the PostgreSQL image (postgres:17) from Docker Hub. On hosts without internet access, load the postgres:17 image before you run the installer.
Time Zone and DNS
- The containers use the time zone that is set in the
TZvariable of the installation package’s.envfile. - The containers use the DNS servers that you enter during installation. They must resolve the names of your target systems, directory servers and mail server.
Browsers
Users work with Keycyte PAM in a web browser; no client software is needed for browser sessions. Use a current version of Google Chrome, Microsoft Edge, Mozilla Firefox or Apple Safari.
Network Ports
Open the following ports in the firewalls between users, network devices, target systems and the Keycyte PAM host.
Inbound Ports
These ports are published on the Keycyte PAM host.
| Port | Protocol | Source | Component | Purpose |
|---|---|---|---|---|
| 443 | TCP | User browsers, API clients | PAM server | Client Panel, Admin Panel, REST API, WebSocket traffic of browser sessions. |
| 2222 | TCP | User workstations | SSH proxy | Native SSH client connections. |
| 3389 | TCP | User workstations | RDP proxy | Native RDP client connections. Only when the RDP proxy is deployed. |
| 1812 | UDP | RADIUS clients (network devices, VPN gateways) | RADIUS server | RADIUS authentication. |
| 49 | TCP | Network devices | TACACS+ server | TACACS+ authentication, authorization and accounting. Only when the TACACS+ server is deployed. |
Outbound Ports
These connections start from the Keycyte PAM host. The exact ports depend on your environment and on the port configured for each server.
| Destination | Typical port | Protocol | Component | Purpose |
|---|---|---|---|---|
| Target systems (RDP, RemoteApp, jump servers) | 3389 | TCP | Gateway, RDP proxy | RDP sessions. |
| Target systems (SSH, SFTP) | 22 | TCP | SSH proxy | SSH and SFTP sessions. |
| Target systems (VNC, Telnet, Kubernetes, databases) | Configured per server | TCP | Gateway | Sessions of other protocols. |
| Windows and Active Directory targets | Depends on the change method | TCP | Password Manager | Password change and verification. |
| LDAP / Active Directory servers | 389 or 636 | TCP | PAM server, Password Manager | Directory authentication, user synchronization, discovery. |
| Mail server | Configured on Settings > Notification | TCP | PAM server | E-mail notifications and reports. |
| SMS gateway | Configured on Settings > Notification | TCP | PAM server | SMS notifications and one-time passwords. |
| Syslog servers | Configured on Settings > Syslog Settings | As configured | PAM server | Forwarding audit records to SIEM. |
| SFTP backup target | Port in the backup configuration (SSH, usually 22) | TCP | PAM server | Copying backup files. |
| DNS servers | 53 | UDP, TCP | All containers | Name resolution. |
| Docker Hub | 443 | TCP | Docker Engine | Pulling postgres:17 during installation, if it is not loaded in advance. |
Internal Ports
These ports are used only on the internal Docker network keycyte-net and are not published on the host. You do not need to open them in a firewall.
| Port | Component | Used by | Purpose |
|---|---|---|---|
| 443 | PAM server | SSH proxy, RADIUS server, TACACS+ server | Internal API (https://pam). |
| 4822 | Gateway (guacd) | PAM server | Browser sessions. |
| 8443 | SSH proxy | PAM server | Web terminal and SFTP WebSocket relay, session control. |
| 7171 | RDP proxy | PAM server | Pushing native RDP connection tokens. |
| 13389 | RDP proxy | Docker (published as 3389) | RDP listener inside the container. |
| 1453 | Password Manager | PAM server | Password change and verification requests. |
| 5432 | PostgreSQL | PAM server, SSH proxy | Database. |
Certificates
Keycyte PAM serves its web interfaces only over HTTPS and connects to LDAP directories over TLS. Prepare the following files before you run the installer and place them in the installation package folder.
| File | Required | Purpose |
|---|---|---|
localhost.p12 | Yes | PKCS#12 keystore with the server certificate and private key that the PAM server uses for HTTPS at startup. |
cacerts.pem | Yes | PEM file with the CA certificates that the PAM server and the Password Manager trust for LDAP over TLS. |
keycyte-ca.crt | No | Additional CA certificate. Copied by the installer if present. |
The installer copies the files to ~/keycyte, which is mounted into the PAM server as /app. It warns if localhost.p12 or cacerts.pem is missing after the copy.
HTTPS Certificate
At startup, the PAM server loads the HTTPS certificate in the following order:
- The certificate that a MASTER administrator applied on Settings > Web TLS Certificate in the Admin Panel. It is stored in the database.
- The PKCS#12 keystore from
KEYCYTE_SERVER_TLS_KEYSTORE(in the installation package:/app/localhost.p12), opened with the password inKEYCYTE_SERVER_TLS_PASSWORD. - A temporary self-signed certificate that the PAM server generates at every start. Browsers show a trust warning for it.
The third level makes sure that the PAM server always starts listening on HTTPS, even if the configured certificate is missing, expired or damaged. You can then sign in, accept the browser warning, and upload a valid certificate.
The localhost.p12 keystore is used only until you apply a certificate in the Admin Panel. After installation, manage the HTTPS certificate on Settings > Web TLS Certificate. See Configuring the Web TLS Certificate.
Requirements for the HTTPS Certificate
Plan a certificate that:
- is issued for the DNS name that users type in the browser (for example
pam.example.com); - uses an RSA key of at least 2048 bits, or an ECDSA key on the P-256 or P-384 curve;
- is issued by a CA that user workstations trust, together with any intermediate certificates.
Keycyte PAM refuses Ed25519, DSA and ECDSA P-521 keys, because browsers cannot complete a TLS handshake with them.
LDAP CA File
cacerts.pem holds the CA certificates that are used to verify LDAP servers over LDAPS or StartTLS. Its path is set in LDAP_CA_CERT in the installation package’s .env file (/app/cacerts.pem). The PAM server adds these certificates to the system CA store.
You can also add LDAP server certificates later from the Admin Panel, when you configure a directory connection. See the Administrator Guide, section Settings > Authentication.
Warning
Do not set LDAP_INSECURE (KEYCYTE_LDAP_INSECURE_SKIP_VERIFY) to true in production. It disables verification of LDAP server certificates.
Licensing
A valid license is required.
A Keycyte PAM licence key is issued for one specific system. You generate a Secret Key on the installed system, send it to Keycyte, and receive a licence key that you enter in the Admin Panel. The steps are described in Activating the Licence.
How the Licence Is Bound to the System
The Secret Key shown on Settings > License identifies the system on which the PAM server runs. It is calculated from:
- the host name of the PAM server container;
- the operating system and CPU architecture of the PAM server;
- the number of CPUs available to the PAM server.
When you save a licence key, Keycyte PAM checks that it was generated for the same values. If it was not, the key is rejected with the message license key not generated for this system.
Important
Generate the Secret Key only after the system is in its final form: final host, final number of CPUs, and the PAM server container created by the installer. If one of these values changes later, a licence key generated for the old values can no longer be saved, and you need a new licence key.
Licence Fields
After a licence key is saved, Settings > License shows the following fields:
| Field | Description |
|---|---|
| Company Name | The company the licence is issued to. |
| Create Date | The date the licence key was created. |
| Total User | The number of users the licence covers. |
| Version | The product version the licence is issued for. |
Licensed Features
A licence key also carries flags for the following features. Each flag is either enabled or disabled in the key.
| Feature | Description |
|---|---|
| Session recording | Recording of privileged sessions. |
| Directory service | Integration with LDAP / Active Directory directories. |
| TACACS+ | The TACACS+ server. |
| Password manager | Automatic password change and verification on target systems. |
Contact Keycyte to change the number of users or the licensed features. You receive a new licence key, which replaces the current one.
Installation
Keycyte PAM is delivered as an installation package that contains the container images, a Docker Compose file, an environment file and an installer script. The installer loads the images, asks for the DNS servers, prepares the host directories, starts the containers and creates the first administrator account.
To install Keycyte PAM, complete the following steps in order:
- Prepare the installation package: copy the package to the host and add the certificate files.
- Run the installer.
- Sign in for the first time with the master account and change its password.
After installation, continue with Initial Configuration.
Before You Begin
- The host meets the system requirements, and Docker Engine and Docker Compose v2 are installed.
- The required ports are open.
- You have the certificate files
localhost.p12andcacerts.pem. - You have an account on the host that can run commands with
sudo.
Preparing the Installation Package
Before you run the installer, copy the installation package to the Keycyte PAM host and add the certificate files to it.
Package Contents
The installation package is one folder with the following files:
| File | Description |
|---|---|
install.sh | Installer script. |
docker-compose.yml | Docker Compose file that defines the containers. |
.env | Environment file with the settings and secrets of the deployment. The installer adds the values it collects to this file. |
keycyte-pam.tar.gz | Archive with the container images of the PAM server, SSH proxy, Password Manager, RADIUS server and gateway (guacd). |
initdb/10-master-user.sql | Script that creates the first administrator account (master). |
localhost.p12 | PKCS#12 keystore for HTTPS. It can be delivered with the package, or you add your own. |
Note
.env is a hidden file. Use ls -la to see it. The installer stops if .env, docker-compose.yml or keycyte-pam.tar.gz is missing.
Warning
The .env file contains the database password, the encryption key for stored secrets, the session secret and the service access keys. Restrict access to it (for example chmod 600 .env), and keep a secure copy outside the host. Without the encryption key, encrypted data in the database and in backup files cannot be decrypted.
Preparing the Package
To prepare the installation package:
-
Copy the installation package folder to the Keycyte PAM host, for example to the home directory of the user who will run the installer.
The host directories (
~/keycyte,~/drive,~/record) are created in the home directory of the user who runssudo ./install.sh, not in the home directory ofroot. -
Copy the certificate files to the package folder, next to
install.sh:localhost.p12— the PKCS#12 keystore for HTTPS (if you use your own instead of the delivered one);cacerts.pem— the CA certificates for LDAP over TLS;keycyte-ca.crt— optional.
For details, see Certificates.
-
If you use your own
localhost.p12, make sure that its password matches the keystore password in.env(TLS_KEYSTORE_PASSWORD). -
Check the time zone in
.env(TZ), for exampleTZ=Europe/Istanbul. -
If the host has no internet access, load the PostgreSQL image on the host:
docker load -i postgres-17.tarThe image must be available as
postgres:17. You can create the archive on a host with internet access withdocker pull postgres:17anddocker save -o postgres-17.tar postgres:17. -
Make the installer executable:
chmod +x install.sh
The package is ready. Continue with Running the Installer.
Running the Installer
The installer install.sh installs Keycyte PAM on the host from the prepared installation package. It is a bash script and must be run with sudo from the package folder.
Before You Begin
- Prepare the installation package as described in Preparing the Installation Package.
- Know the IP address of the primary DNS server that the containers will use, and optionally of a secondary DNS server.
Installer Options
| Option | Description |
|---|---|
--dns <ip> | Sets the primary DNS server and skips the DNS prompts. The secondary DNS server is set to the same address. --dns=<ip> is also accepted. |
--skip-load | Skips loading the images from keycyte-pam.tar.gz. Use it when you run the installer again and the images are already loaded. |
-h, --help | Shows the usage text. |
What the Installer Does
The installer runs the following steps:
- Prerequisites. Checks that Docker is installed, that the Docker daemon is running and accessible, and that Docker Compose is available. Checks that
keycyte-pam.tar.gz,docker-compose.ymland.envare in the package folder. - Images. Extracts
keycyte-pam.tar.gzand loads every image in it withdocker load. Then checks that the imageskeycyte-pam:latest,keycyte-ssh-proxy:latest,keycyte-password-manager:latest,keycyte-radius-server:latestandguacamole/guacd:latestexist. The check also runs with--skip-load. - DNS. Asks for the primary and secondary DNS servers and writes them to
.env(PRIMARY_DNS,SECONDARY_DNS). - Docker group. Finds the group ID of the host’s
dockergroup and writes it to.env(DOCKER_GID), so that the PAM server can read the Docker socket. - Host directories. Creates
~/keycyte,~/driveand~/recordin the home directory of the user who ransudo, makes that user their owner, and writes the paths and the user and group IDs to.env(KEYCYTE_BASE,KEYCYTE_DRIVE,KEYCYTE_RECORD,RUN_UID,RUN_GID). The containers run with this user and group ID. - Certificates. Copies
localhost.p12,cacerts.pemandkeycyte-ca.crt(those that exist) to~/keycyte. Warns iflocalhost.p12orcacerts.pemis missing. - Database check. If
.envpoints to an external database server by IP address, checks that its port is reachable. - Start. Starts all containers with
docker compose up -d, waits a few seconds, shows the container status and the last log lines of any container that is not running. - Master account. Waits until PostgreSQL is ready and the PAM server has created the database schema, then runs
initdb/10-master-user.sqlto create themasteraccount. If the account already exists, it is left unchanged.
Running the Installer
To run the installer:
-
Open a shell on the host and go to the installation package folder.
-
Run the installer:
sudo ./install.shTo set the DNS server without prompts:
sudo ./install.sh --dns 10.0.0.53 -
When prompted, enter the IP address of the primary DNS server, and press Enter.
The prompt shows the current value from
.envin brackets. Press Enter without typing to keep it. The installer accepts only an IPv4 address and asks again if the value is not valid. -
When prompted, enter the IP address of the secondary DNS server, or press Enter to skip it.
If you skip it, the secondary DNS server is set to the primary one.
-
Wait until the installer finishes.
The installer prints the status of every container. If all containers run, it prints a message that the installation is complete and all services are up. It then applies the master account script and prints the commands for viewing logs and stopping the services.
Keycyte PAM is installed. Continue with Signing In for the First Time.
Checking the Installation
To check the containers after installation, run the following command in the package folder:
sudo docker compose --env-file .env -f docker-compose.yml psAll containers (pam, ssh-proxy, guacd, password-manager, radius, postgres-db) should be in the running state.
To follow the PAM server log:
sudo docker compose --env-file .env -f docker-compose.yml logs -f pamIf the Master Account Was Not Created
If PostgreSQL or the database schema was not ready in time, the installer skips the master account script and prints a warning with the command to run. In that case, wait until the PAM server has started, then run the script manually in the package folder:
sudo docker exec -i postgres-db psql -U <db-user> -d <db-name> < initdb/10-master-user.sqlUse the database user and database name from .env (DB_USER, DB_NAME). The installer prints the command with these values filled in.
Running the Installer Again
You can run the installer again, for example after you add a missing certificate file. The installer updates the values it manages in .env and leaves existing directories and the existing master account unchanged. Use --skip-load if the images are already loaded.
Note
If a required certificate file was missing, you can also copy it to ~/keycyte and restart the PAM server:
sudo docker compose --env-file .env -f docker-compose.yml restart pamStopping the Services
To stop and remove the containers, run in the package folder:
sudo docker compose --env-file .env -f docker-compose.yml downThe database volume and the host directories are kept. Run sudo docker compose --env-file .env -f docker-compose.yml up -d to start the services again.
Signing In for the First Time
The installer creates one administrator account, master, with the MASTER role. MASTER administrators have unrestricted access to the Admin Panel, including all settings. Use this account to sign in for the first time and to complete the initial configuration.
The initial password of the master account is provided with the installation package.
Before You Begin
- The installer finished and all containers are running.
- You know the address of the Keycyte PAM host, and port 443 is reachable from your workstation.
Signing In
To sign in for the first time:
-
In a web browser, open
https://<pam-address>/admin, for examplehttps://pam.example.com/admin.If the PAM server uses the keystore delivered with the package or a self-signed certificate, the browser shows a certificate warning. Check that you opened the correct address, and continue to the page. You replace the certificate in a later step.
-
On the sign-in page, enter
masterin Username, enter the initial password in Password, and click Sign in.If the Client Panel opens instead of the Admin Panel, open
https://<pam-address>/adminagain. The Admin Panel opens with the Dashboard.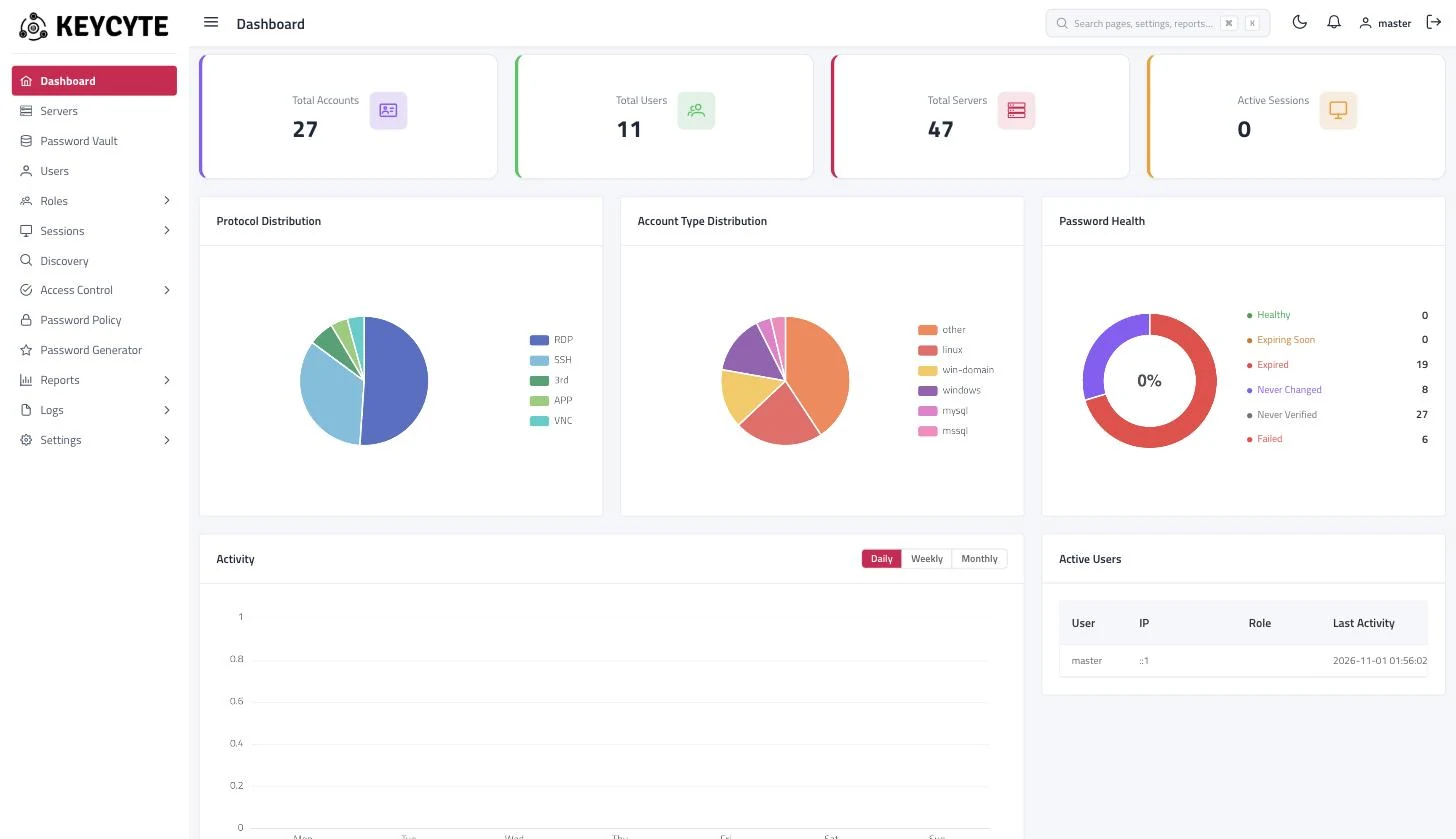
-
Change the password of the
masteraccount.
Warning
Change the initial password of the master account at first sign-in. The initial password is the same for every installation from the package, so anyone who knows it could sign in with full rights.
After the First Sign-In
Continue with the initial configuration:
- Activate the licence.
- Configure the Web TLS certificate so that browsers trust Keycyte PAM.
- Configure e-mail and directory services, and check the service access keys.
Tip
Set an e-mail address for the master account and configure e-mail notifications early. Keycyte PAM e-mails MASTER administrators, for example when the Web TLS certificate is about to expire.
Initial Configuration
After you sign in for the first time, configure the settings below before users start working with Keycyte PAM. All of them are on the Settings menu of the Admin Panel and require the MASTER role.
In This Section
| Topic | Description |
|---|---|
| Activating the Licence | Generating the secret key and entering the licence key. |
| Configuring the Web TLS Certificate | Uploading, validating and applying the HTTPS certificate; expiry warnings. |
| Configuring E-Mail and SMS | Mail server and SMS gateway for notifications and one-time passwords. |
| Connecting Directory Services | LDAP / Active Directory, RADIUS and Microsoft Entra ID authentication. |
| Service Access Keys | Keys that the Keycyte PAM services use to authenticate to each other. |
Activating the Licence
A valid license is required. To activate it, you send the Secret Key of your system to Keycyte, receive a licence key for that system, and enter the licence key in the Admin Panel.
For how the licence is bound to the system and what it contains, see Licensing.
Before You Begin
- You are signed in to the Admin Panel with the MASTER role.
- The system is in its final form (host, number of CPUs, PAM server container). See How the Licence Is Bound to the System.
Getting the Secret Key
To get the secret key of the system:
-
In the Admin Panel, open Settings > License.
-
Click Secret Key.
The Secret Key dialog shows the key of this system.
-
Copy the key, and click Close.
-
Send the key to Keycyte together with your order details.
You receive a licence key that is generated for this system.
Entering the Licence Key
To enter the licence key:
- Open Settings > License.
- Click Add.
- In the Add Licence dialog, paste the licence key into Licence Key.
- Click Save.
The licence appears in the list with its Company Name, Create Date, Total User and Version.
If the key cannot be saved, the Admin Panel shows an Error message and the licence list does not change. The most common causes are:
- The key is incomplete or was changed while copying. Copy the whole key again.
- The key was generated for a different secret key, for example before the system was changed. Send the current secret key to Keycyte.
Replacing or Removing the Licence
Keycyte PAM holds one licence at a time. When you save a new licence key, it replaces the current one.
- To replace the licence, click the edit icon in the Action column, paste the new key, and click Save. You can also click Add and save the new key.
- To remove the licence, click the delete icon in the Action column and confirm.
Configuring the Web TLS Certificate
The Web TLS certificate is the HTTPS certificate that browsers see when they open the Client Panel or the Admin Panel. You manage it on Settings > Web TLS Certificate. A new certificate takes effect immediately for new connections; you do not need to restart Keycyte PAM.
Before You Begin
- You are signed in to the Admin Panel with the MASTER role.
- You have the certificate, its private key and any intermediate certificates as PEM text files.
- The private key is not protected with a password. To remove the password, use for example
openssl pkey -in key.pem -out key-plain.pem. - The key is RSA with at least 2048 bits, or ECDSA on the P-256 or P-384 curve.
Tip
If you have a PFX/PKCS#12 file, convert it to PEM first:
openssl pkcs12 -in cert.pfx -nokeys -out cert.pem
openssl pkcs12 -in cert.pfx -nocerts -nodes -out key.pem
Viewing the Current Certificate
Open Settings > Web TLS Certificate. The Current Certificate card shows the certificate that the PAM server uses now:
| Field | Description |
|---|---|
| Source | Where the certificate comes from: a certificate applied on this page, the PKCS#12 keystore from the installation, or a temporary self-signed certificate. |
| Days Remaining | Days until the certificate expires. |
| Subject | Subject of the certificate. |
| Issuer | Issuer of the certificate. |
| Valid From, Valid Until | Validity period. |
| Subject Alt Names | DNS names and IP addresses the certificate covers. |
| SHA256 Fingerprint | Fingerprint of the certificate. |
| Uploaded By, Uploaded At | Administrator who applied the certificate, and when. |
A status message above the details shows, for example, that the certificate is healthy, expires soon, is self-signed, or that the server runs on the installation keystore or on a temporary self-signed certificate.
Applying a New Certificate
To apply a new certificate:
-
Open Settings > Web TLS Certificate.
-
In the Upload New Certificate card, fill in the fields. You can paste the PEM text, or click Load from file next to a field to read it from a file.
Field Description Certificate (PEM) The server certificate. If you paste a full chain (server certificate followed by intermediates), Keycyte PAM separates the server certificate from the chain. Private Key (PEM) The unencrypted private key of the certificate. Intermediate Chain (PEM, optional) The intermediate certificates of your CA, if they are not in the certificate field. -
Click Validate.
The Validation Preview shows the parsed certificate and any warnings. Validation fails if, for example, the certificate and the key do not match, the certificate is expired or not yet valid, the key type is not supported, or the chain does not belong to the certificate.
Warnings do not stop you from applying the certificate. Typical warnings are: the certificate is self-signed, it expires soon, it does not cover the host name, it is issued by a CA but no chain was supplied, or the chain ends at an internal intermediate whose root is not trusted by the server.
-
Check the preview, and click Apply Certificate.
-
In the Apply Web TLS Certificate? dialog, confirm.
The certificate is applied. Existing browser sessions are not affected; new connections use the new certificate. Keycyte PAM sends the intermediate chain to browsers in issuer order, without the root certificate.
Important
Make sure that the certificate covers the DNS name users type in the browser, and that user workstations trust the issuing CA. If browsers cannot connect after you apply a certificate, see Resetting the Web TLS Certificate.
Upload History
The Upload History table lists the certificates that were applied on this page, with Subject, Issuer, Valid Until, Uploaded By and Uploaded At. The Active column marks the certificate in use.
Fallback Certificates
If no applied certificate can be loaded at startup, the PAM server falls back to the PKCS#12 keystore from the installation (KEYCYTE_SERVER_TLS_KEYSTORE), and if that also fails, to a temporary self-signed certificate that is regenerated at every start. The PAM server therefore always serves HTTPS, and you can sign in (after accepting the browser warning) to apply a valid certificate.
When an applied certificate has expired, the fallback keeps the listener online. Upload a renewed certificate as soon as possible.
Expiry Warnings
Keycyte PAM checks the active certificate once a day and e-mails all MASTER administrators when it has 30, 14, 7 and 1 days left. Each warning is sent once; the next e-mail is sent when the certificate reaches the next threshold.
E-mail warnings require:
- a working mail server configuration on Settings > Notification;
- an e-mail address for each MASTER administrator. For domain users without an e-mail address in Keycyte PAM, the address is read from the directory.
Expiry warnings are sent only for certificates applied on this page, not for the installation keystore or the self-signed fallback.
Configuring E-Mail and SMS
Keycyte PAM uses e-mail and SMS to deliver notifications, one-time passwords and reports. Configure them right after installation, because several functions depend on them:
- e-mail and SMS one-time passwords for MFA;
- notifications to administrators, for example access requests and Web TLS certificate expiry warnings;
- scheduled reports sent by e-mail.
You configure both on Settings > Notification in the Admin Panel:
| Card | Purpose |
|---|---|
| Email Configuration | Mail server connection and sender. Email Test sends a test message to an address you enter. |
| Sms Configuration | SMS gateway (Provider), sender and credentials, and the text of the one-time password message. Phone Test sends a test message to a number you enter. |
Mail server and SMS gateway credentials are stored encrypted.
For a description of every field, see the Administrator Guide, section Settings > Notification.
Before You Begin
- The Keycyte PAM host can reach the mail server and the SMS gateway on the required ports. See Network Ports.
- The DNS servers you set during installation resolve the names of the mail server and the SMS gateway.
After you save the settings, send a test e-mail and a test SMS to make sure that delivery works.
Connecting Directory Services
Keycyte PAM can authenticate users against your existing directories instead of, or in addition to, local accounts. You configure the connections on Settings > Authentication in the Admin Panel:
| Card | Purpose |
|---|---|
| LDAP Configuration | LDAP or Active Directory servers for domain user sign-in, user and group lookup, synchronization and discovery. Also used by password rotation for Active Directory accounts. |
| RADIUS Configuration | An external RADIUS server for RADIUS user sign-in. |
| Entra ID Configuration | Microsoft Entra ID for sign-in with a Microsoft account. |
For a description of every field and for the user synchronization options, see the Administrator Guide, section Settings > Authentication.
Note
Settings > Authentication configures the directories that Keycyte PAM uses as a client. The RADIUS and TACACS+ servers that Keycyte PAM itself provides to network devices are configured on Settings > Radius Server and Settings > TACACS+ Server.
Deployment Prerequisites
Before you configure a directory connection, check the following:
- Network. The Keycyte PAM host can reach the LDAP servers (usually port 389 for LDAP with StartTLS, or 636 for LDAPS) and, if used, the RADIUS server and Microsoft Entra ID. See Network Ports.
- DNS. The DNS servers you set during installation resolve the names of the domain controllers.
- LDAP certificates. The PAM server and the Password Manager verify LDAP server certificates against the CA certificates in
cacerts.pemand the system CA store. You can also add certificates from the Admin Panel: the LDAP certificate dialog offers Auto Discovery (reads the certificate from the server) and Manual Upload. See Certificates. - Service account. A directory account that Keycyte PAM can use to search users and groups. For password rotation of Active Directory accounts, the account needs the rights to reset passwords.
Service Access Keys
The Keycyte PAM services authenticate to each other with access keys. Each key is a pair of an access key ID and a secret. A service signs every request to another service with an HMAC-SHA256 HTTP signature made with the secret, and the receiving service verifies the signature with the same pair.
Access keys are set in the environment of the containers, in the installation package’s .env file. The PAM server reads them at startup and keeps them in memory. You cannot create or change access keys in the Admin Panel.
Access Keys in a Deployment
| Key | Signed by | Verified by | Variable in .env | Variable in the PAM server | Variable in the other service |
|---|---|---|---|---|---|
| SSH proxy key | SSH proxy | PAM server | SSH_PROXY_ACCESS_KEY_ID, SSH_PROXY_ACCESS_KEY_SECRET | KEYCYTE_SSH_PROXY_ACCESS_KEY_ID, KEYCYTE_SSH_PROXY_ACCESS_KEY_SECRET | KEYCYTE_ACCESS_KEY_ID, KEYCYTE_ACCESS_KEY_SECRET (SSH proxy) |
| RADIUS server key | RADIUS server | PAM server | RADIUS_ACCESS_KEY_ID, RADIUS_ACCESS_KEY_SECRET | KEYCYTE_RADIUS_SERVER_ACCESS_KEY_ID, KEYCYTE_RADIUS_SERVER_ACCESS_KEY_SECRET | KEYCYTE_ACCESS_KEY_ID, KEYCYTE_ACCESS_KEY_SECRET (RADIUS server) |
| PAM key | PAM server | SSH proxy | PAM_ACCESS_KEY_ID, PAM_ACCESS_KEY_SECRET | KEYCYTE_PAM_ACCESS_KEY_ID, KEYCYTE_PAM_ACCESS_KEY_SECRET | KEYCYTE_PAM_ACCESS_KEY_ID, KEYCYTE_PAM_ACCESS_KEY_SECRET (SSH proxy) |
| RDP proxy key | PAM server | RDP proxy | RDP_PROXY_ACCESS_KEY_ID, RDP_PROXY_ACCESS_KEY_SECRET | KEYCYTE_RDP_PROXY_ACCESS_KEY_ID, KEYCYTE_RDP_PROXY_ACCESS_KEY_SECRET | KEYCYTE_ACCESS_KEY_ID, KEYCYTE_ACCESS_KEY_SECRET (RDP proxy) |
The docker-compose.yml file passes the same .env value to both sides, so the pair always matches as long as you change it only in .env.
If a key is missing, the PAM server still starts and logs a warning for the service. The affected service cannot authenticate: for example, without the SSH proxy key native SSH and web terminal sessions fail, and without the RDP proxy key native RDP launch is disabled.
Note
Service access keys are different from the API keys of service identities, which applications use to read secrets through the Secrets API. Those are managed per user in the Admin Panel. See the Administrator Guide, section Users.
Viewing the Access Keys
To view the access keys that the PAM server loaded:
-
In the Admin Panel, open Settings > Services.
-
Find the Service AccessKeys card.
For each Service, the card shows the Access Key ID and the last four characters of the Secret. Services without a key are shown as not configured.
The access keys are stored in the .env file of the installation. To rotate a key, follow the procedure below.
Rotating an Access Key
Rotate an access key if you suspect that its secret was disclosed, or according to your security policy.
To rotate an access key:
-
On the host, open the
.envfile in the installation package folder. -
Set a new value for the key’s secret, for example a random value created with
openssl rand -hex 32. You can also set a new access key ID. -
Save the file.
-
In the package folder, recreate the containers so that they read the new values:
sudo docker compose --env-file .env -f docker-compose.yml up -d
Docker Compose recreates the containers whose environment changed. The new key is used after the containers start.
Warning
Recreating the containers interrupts the active sessions that run through them. Rotate keys in a maintenance window.
Warning
Never copy access key secrets into tickets, e-mails or chat. Anyone with a secret can call the internal API as that service.
High Availability
You can run more than one Keycyte PAM node so that users can keep working when one node is unavailable. The nodes use the same PostgreSQL database and are placed behind a load balancer. One node is the master node; the others are replica nodes.
Master and Replica Nodes
Every node serves users in the same way. The difference is in the scheduled jobs:
| Job | Master node | Replica node |
|---|---|---|
| Scheduled password rotation | Runs | Does not run |
| Scheduled reports | Runs | Does not run |
| Scheduled backups | Runs | Does not run |
This makes sure that a scheduled job runs only once, even though all nodes share the database. A node is a replica unless it is set as master. At startup, each node writes to its log whether it runs as a master or a replica node.
Important
Set exactly one node as master. If no node is master, scheduled password rotation, reports and backups do not run. If more than one node is master, scheduled jobs can run more than once.
The master setting is stored per node as the file master in the application directory of the node (~/keycyte/master on the host, /app/master in the PAM server container).
Note
“Master node” is a property of a Keycyte PAM node. It is not related to the MASTER administrator role.
Requirements
All nodes must:
- connect to the same PostgreSQL database (see the database variables in Configuration Reference);
- use the same encryption key (
KEYSTORE_KEY_HEXin.env,KEYCYTE_KEYSTORE_KEY_HEXin the PAM server). Otherwise a node cannot decrypt the secrets that another node stored; - use the same session secret (
SESSION_SECRET_KEYin.env,KEYCYTE_SESSION_SECRET_KEYin the PAM server). Otherwise a session cookie issued by one node is rejected by another; - use the same service access keys;
- not set a cookie domain (
KEYCYTE_SESSION_COOKIE_DOMAINempty). The session cookie uses the__Host-prefix, which does not allow a domain.
The load balancer must:
- forward HTTPS (443) to the nodes, and, if used, SSH (2222) and RDP (3389);
- use session affinity (sticky sessions by cookie or source IP), so that all requests of one browser go to the same node.
Session affinity is required because some short-lived data is kept in the memory of each node and is not shared: connection tokens, MFA one-time passwords, active session and spectator registries. Without affinity, opening a session, MFA verification or joining a shared session can fail intermittently.
Setting the Master Node
To set a node as master:
-
Sign in to the Admin Panel of that node with the MASTER role. Use the node’s own address, not the load balancer address, so that you reach the correct node.
-
Open Settings > Replication.
The Replication Settings card shows the Hostname, Ip Address and Mac Address of the node you are connected to.
-
Turn on the Master switch.
The message
Master mode enabledappears. The node runs the scheduled jobs from the next scheduler cycle.
To make a node a replica, turn off the Master switch on that node.
Tip
To change the master node, first turn off Master on the old master node, then turn it on on the new one.
Replicated Servers
The Replicated Servers card lists other Keycyte PAM nodes. To add an entry, click Add, and fill in Type, Address, Status and Master, then click Save.
Backup and Restore
Keycyte PAM creates application-level backups of its database: servers, vault entries, users, roles, policies, settings and, optionally, logs. You configure backups on Settings > Backup. Only MASTER administrators can open this page.
What a Backup Contains
A backup is one encrypted file with the extension .keycyte (for example backup_20261101_020000.keycyte). Keycyte PAM serializes the database content, compresses it and encrypts it with the encryption key of the deployment (KEYCYTE_KEYSTORE_KEY_HEX).
| Included | Not included |
|---|---|
| Servers, Password Vault and Private Vault entries, password history | Session recordings (~/record) |
| Users, roles, permission profiles, policies, access control rules, tags | Transferred files (~/drive) |
| Settings (authentication, notification, connection, syslog, RADIUS and TACACS+ server, licence) | Certificate files and .env in the installation package |
| Logs, if Logs is selected in the backup configuration | Container images |
Warning
A backup can only be restored on a deployment that uses the same encryption key. Keep a secure copy of the .env file, or at least of KEYSTORE_KEY_HEX, separately from the backups. Without the key, backups cannot be decrypted.
Back up ~/record, ~/drive and the installation package folder with your own file backup tools.
Where Backup Files Are Stored
Every backup is first written to the backups folder of the application directory: ~/keycyte/backups on the host (/app/backups in the PAM server container). If the backup configuration uses SFTP, the file is then copied to the SFTP server.
Tip
Plan disk space for backup files: archive or remove old files in ~/keycyte/backups regularly.
Configuring a Backup
To configure a backup:
-
In the Admin Panel, open Settings > Backup.
-
Click Add.
-
In the Backup Configuration dialog, fill in the fields:
Field Description Method SFTPorSMB.Address Host name or IP address of the backup server. Port SSH port of the SFTP server. Shown for SFTP only. Path Folder on the backup server where the file is stored. Username User name on the backup server. Password Password of the user. For SFTP, you can use a private key instead. Private Key Private key for SFTP authentication. Shown for SFTP only. Passphrase Passphrase of the private key, if it has one. Shown for SFTP only. Period Interval of scheduled backups, in minutes. 0or empty disables scheduled backups for this configuration.Description Free text that helps you identify the configuration. Logs Include the log tables in the backup. Backups with logs can be much larger. Status Enables the configuration. Scheduled backups run only for enabled configurations. -
Click Save.
The configuration appears in the list with its Method, Address, Path and Status.
Scheduled Backups
The backup scheduler checks the enabled configurations every minute and starts a backup when the Period of a configuration has passed since its last run. The first scheduled backup of a configuration runs shortly after the PAM server starts.
Scheduled backups run only on the master node. See High Availability.
Running a Backup Now
To run a backup immediately, click the run icon in the Action column of a configuration.
The backup is created with the settings of that configuration. A Success message appears when it finishes.
Downloading a Backup
To download a backup file, click the download icon in the Action column.
You can also copy backup files directly from ~/keycyte/backups on the host.
Restoring a Backup
Restoring replaces the database content of Keycyte PAM with the content of the backup file.
Warning
A restore deletes all current data in the tables that the backup contains, and then inserts the data from the backup. Changes made after the backup was created are lost. Create a new backup before you restore.
Before You Begin
- You are signed in with the MASTER role.
- The backup file was created by a deployment that uses the same encryption key.
- Users are informed; active sessions can be affected.
To restore a backup:
-
Open Settings > Backup.
-
Click Restore.
-
Select the
.keycytebackup file.The restore starts immediately after you select the file. A Success message appears when it finishes.
-
Sign out and sign in again, and check the restored data.
If a backup taken before permission profiles existed is restored, Keycyte PAM assigns the built-in full permission profile to every ADMIN account after the restore.
Configuration Reference
The PAM server reads its settings from environment variables and, optionally, from a config.yaml file. In a deployment from the installation package, the settings are environment variables that docker-compose.yml passes to the pam container, mostly from the .env file.
How Settings Are Read
- Environment variables. Every setting has an environment variable:
KEYCYTE_followed by the setting path in upper case, with dots replaced by underscores. For example,session.timeoutisKEYCYTE_SESSION_TIMEOUT. config.yaml. The PAM server looks forconfig.yamlin its working directory (/appin the container, which is~/keycyteon the host) and in/etc/keycyte/. The file is optional; if it is not found, the PAM server logs a warning and uses environment variables and defaults.- Precedence. Environment variables take precedence over
config.yaml, andconfig.yamltakes precedence over the built-in defaults.
To change a setting in a deployment from the installation package, edit the value in .env (or in docker-compose.yml if it is set there), and recreate the containers in the package folder:
sudo docker compose --env-file .env -f docker-compose.yml up -dWarning
The .env file contains secrets. Never copy secret values into tickets, documentation or chat, and keep a secure copy of the file.
In the tables below, Default is the built-in default of the PAM server. Package shows the value that the installation package sets, where it differs. Settings marked Required must be set; the PAM server does not start without them.
Server and TLS
| Variable | config.yaml key | Default | Description |
|---|---|---|---|
KEYCYTE_SERVER_PORT | server.port | 8443 | HTTPS port inside the container. Package: 443. |
KEYCYTE_SERVER_TLS_ENABLED | server.tls.enabled | true | Serve HTTPS. |
KEYCYTE_SERVER_TLS_KEYSTORE | server.tls.keystore | empty | Path of the PKCS#12 keystore used when no certificate was applied in the Admin Panel. Package: /app/localhost.p12 (from TLS_KEYSTORE_PATH). |
KEYCYTE_SERVER_TLS_PASSWORD | server.tls.password | empty | Password of the PKCS#12 keystore (from TLS_KEYSTORE_PASSWORD). |
KEYCYTE_SERVER_TLS_SUPPRESS_CLIENT_ERRORS | server.tls.suppress_client_errors | true | Do not log TLS handshake errors caused by clients. |
KEYCYTE_SERVER_CORS_ALLOWED_ORIGINS | server.cors.allowed_origins | empty | Comma-separated list of origins (for example https://portal.example.com) allowed to call the API from another site. Empty disables cross-origin requests. * is not allowed. |
Database
| Variable | config.yaml key | Default | Description |
|---|---|---|---|
KEYCYTE_DATABASE_HOST | database.host | 127.0.0.1 | PostgreSQL host. Package: postgres (the database container), from DB_HOST. |
KEYCYTE_DATABASE_PORT | database.port | 5432 | PostgreSQL port (from DB_PORT). |
KEYCYTE_DATABASE_NAME | database.name | keycytedb | Database name (from DB_NAME). |
KEYCYTE_DATABASE_USERNAME | database.username | empty | Required. Database user (from DB_USER). |
KEYCYTE_DATABASE_PASSWORD | database.password | empty | Required. Database password (from DB_PASSWORD). |
KEYCYTE_DATABASE_SSLMODE | database.sslmode | disable | PostgreSQL SSL mode, for example disable, require, verify-full (from DB_SSLMODE). |
KEYCYTE_DATABASE_MAX_OPEN_CONNS | database.max_open_conns | 25 | Maximum open connections per PAM node. |
KEYCYTE_DATABASE_MAX_IDLE_CONNS | database.max_idle_conns | 10 | Maximum idle connections per PAM node. |
Tip
In a deployment with several nodes, the connection limits apply to each node. Make sure that the total stays below the max_connections setting of PostgreSQL.
Encryption Key
The encryption key protects secrets stored in the database (vault passwords, keys, provider credentials), backup files and session recordings. Required: set exactly one of the following sources. The PAM server does not start without a key.
| Variable | config.yaml key | Default | Description |
|---|---|---|---|
KEYCYTE_KEYSTORE_KEY_HEX | keystore.key_hex | empty | AES key as a hexadecimal string. Package: from KEYSTORE_KEY_HEX. |
KEYCYTE_KEYSTORE_KEY_BASE64 | keystore.key_base64 | empty | AES key as a Base64 string. |
KEYCYTE_KEYSTORE_KEY_FILE | keystore.key_file | empty | Path of a file that contains the raw key (16, 24 or 32 bytes). |
KEYCYTE_KEYSTORE_PATH | keystore.path | empty | Path of a Java PKCS#12 keystore that holds the key (for keys migrated from earlier versions). |
KEYCYTE_KEYSTORE_PASSWORD | keystore.password | empty | Password of the keystore in keystore.path. |
KEYCYTE_KEYSTORE_ALIAS | keystore.alias | keycyte | Alias of the key in the keystore. |
If more than one source is set, the PAM server uses the first one in the order of the table.
Warning
Never change the encryption key of an existing deployment. Data encrypted with the old key, including backups and recordings, can no longer be decrypted. All nodes of a deployment must use the same key.
Session
| Variable | config.yaml key | Default | Description |
|---|---|---|---|
KEYCYTE_SESSION_SECRET_KEY | session.secret_key | built-in value | Required. Secret that signs session cookies. Must be at least 32 bytes long and must not be the built-in value; otherwise the PAM server refuses to start. Create one with openssl rand -base64 48. Package: from SESSION_SECRET_KEY. |
KEYCYTE_SESSION_TIMEOUT | session.timeout | 30m | Idle timeout of a sign-in session. Every request extends it. Package: from SESSION_TIMEOUT. |
KEYCYTE_SESSION_COOKIE_NAME | session.cookie_name | KEYCYTESESSION | Base name of the session cookie. With the host prefix enabled, the cookie is sent as __Host-<name>. Package: from SESSION_COOKIE_NAME. |
KEYCYTE_SESSION_USE_HOST_PREFIX | session.use_host_prefix | true | Add the __Host- prefix to the cookie name. This forces a secure cookie and clears the cookie domain. |
KEYCYTE_SESSION_COOKIE_SECURE | session.cookie_secure | true | Send the cookie only over HTTPS. |
KEYCYTE_SESSION_COOKIE_SAME_SITE | session.cookie_same_site | lax | SameSite attribute: lax, strict or none. none requires a secure cookie. Package: none. |
KEYCYTE_SESSION_COOKIE_DOMAIN | session.cookie_domain | empty | Cookie domain. Ignored while the host prefix is enabled. |
KEYCYTE_SESSION_SINGLE_DEVICE | session.single_device | false | Allow only one active sign-in session per user. A new sign-in signs the user out everywhere else. |
MFA Lockout
| Variable | config.yaml key | Default | Description |
|---|---|---|---|
KEYCYTE_MFA_MAX_FAILED_ATTEMPTS | mfa.max_failed_attempts | 5 | Failed MFA verifications after which the account is locked. |
KEYCYTE_MFA_LOCKOUT_DURATION_MIN | mfa.lockout_duration_min | 15 | Minutes the account stays locked after too many failed MFA verifications. Applies to all user types. |
Files, Recordings and Gateway
| Variable | config.yaml key | Default | Description |
|---|---|---|---|
KEYCYTE_UPLOAD_MAX_FILE_SIZE | upload.max_file_size | 4GB | Maximum size of a file transferred in a browser session. |
KEYCYTE_UPLOAD_STORAGE_PATH | upload.storage_path | /drive | Storage folder for transferred files. Package: /app/uploads. |
KEYCYTE_RECORDING_PATH | recording.path | /recordings | Folder for session recordings. Package: /record (the ~/record host directory). |
KEYCYTE_GATEWAY_ADDRESS | gateway.address | 127.0.0.1 | Address of the gateway (guacd). Package: guacd. |
KEYCYTE_GATEWAY_PORT | gateway.port | 4822 | Port of the gateway. |
LDAP TLS
| Variable | config.yaml key | Default | Description |
|---|---|---|---|
KEYCYTE_LDAP_CA_CERT | ldap.ca_cert | /app/certs/ldap-ca.pem | PEM file with the CA certificates trusted for LDAP over TLS. Certificates trusted from the Admin Panel are also stored here. Package: /app/cacerts.pem (from LDAP_CA_CERT). |
KEYCYTE_LDAP_INSECURE_SKIP_VERIFY | ldap.insecure_skip_verify | false | Skip verification of LDAP server certificates. Do not use in production (from LDAP_INSECURE). |
The Password Manager container receives the same two values as LDAP_CA_CERT and LDAP_INSECURE_SKIP_VERIFY.
Proxies and Access Keys
These variables have no config.yaml key; set them as environment variables. For their meaning and rotation, see Service Access Keys.
| Variable | Default | Description |
|---|---|---|
KEYCYTE_SSH_PROXY_ACCESS_KEY_ID, KEYCYTE_SSH_PROXY_ACCESS_KEY_SECRET | empty | Access key of the SSH proxy. |
KEYCYTE_RADIUS_SERVER_ACCESS_KEY_ID, KEYCYTE_RADIUS_SERVER_ACCESS_KEY_SECRET | empty | Access key of the RADIUS server. |
KEYCYTE_PAM_ACCESS_KEY_ID, KEYCYTE_PAM_ACCESS_KEY_SECRET | empty | Access key the PAM server uses toward the SSH proxy. |
KEYCYTE_SSH_PROXY_WS_URL | ws://ssh-proxy:8443 | Internal WebSocket address of the SSH proxy. |
KEYCYTE_DOCKER_PROJECT | empty | Docker Compose project name. When set, Settings > Services lists only the containers of this project; otherwise it lists all containers on the host. |
DOCKER_HOST | — | Docker socket used by Settings > Services. Package: unix:///var/run/docker.sock. |
Native RDP Launch
These variables have no config.yaml key. Native RDP launch is disabled unless the URL, public address and access key are all set.
| Variable | Default | Description |
|---|---|---|
KEYCYTE_RDP_PROXY_URL | empty | Internal address of the RDP proxy control API. Package: http://rdp-proxy:7171. |
KEYCYTE_RDP_PROXY_PUBLIC_ADDRESS | empty | host:port of the RDP proxy as user workstations reach it, written into the .rdp file, for example pam.example.com:3389. |
KEYCYTE_RDP_PROXY_ACCESS_KEY_ID, KEYCYTE_RDP_PROXY_ACCESS_KEY_SECRET | empty | Access key for the RDP proxy. |
KEYCYTE_RDP_LAUNCH_TOKEN_TTL_SECS | 120 | Lifetime of the single-use connection token, in seconds. |
Logging
| Variable | config.yaml key | Default | Description |
|---|---|---|---|
KEYCYTE_LOG_LEVEL | log.level | info | Log level at startup: debug, info, warn or error. A log level saved on Settings > General (Log Level) overrides it and can be changed without a restart. |
KEYCYTE_LOG_FORMAT | log.format | text | text (readable) or json (for log collectors). |
KEYCYTE_LOG_SOURCE | log.source | false | Add the source file and line to every log line. |
Installation Package Variables
The .env file of the installation package also contains variables that are used by docker-compose.yml and by the other containers, not directly by the PAM server.
| Variable | Set by | Description |
|---|---|---|
PRIMARY_DNS, SECONDARY_DNS | Installer | DNS servers of all containers. |
DOCKER_GID | Installer | Group ID of the host’s docker group. |
KEYCYTE_BASE, KEYCYTE_DRIVE, KEYCYTE_RECORD | Installer | Host directories ~/keycyte, ~/drive, ~/record. |
RUN_UID, RUN_GID | Installer | User and group ID the containers run as. |
TZ | Package | Time zone of all containers. |
SSH_IDLE_TIMEOUT | Package | Idle timeout of SSH proxy sessions. |
DB_HOST, DB_PORT, DB_NAME, DB_USER, DB_PASSWORD, DB_SSLMODE | Package | Database connection of the PAM server and the SSH proxy. |
Troubleshooting
This topic describes how to collect information about a problem and how to solve common deployment issues. Run the docker compose commands in this topic in the installation package folder.
Viewing Service Logs
In the Admin Panel
Settings > Services lists the Keycyte PAM containers with their Container, Service, State, CPU, Memory and Uptime. Only MASTER administrators can open this page.
To view the log of a container:
- In the Admin Panel, open Settings > Services.
- In the Keycyte Services table, click Logs in the row of the container.
The latest log lines of the container appear.
From the same table you can Restart, Stop and Start containers. Stopping or restarting a container interrupts the sessions that it handles. The PAM server cannot stop or start itself; only Restart is available for it.
If the page shows Docker socket not available, the Docker socket is not mounted into the PAM server container. The installation package mounts /var/run/docker.sock read-only; check that docker-compose.yml still contains this mount and that DOCKER_GID in .env matches the group ID of the host’s docker group.
On the Host
To view the logs of a service on the host, use docker compose logs:
sudo docker compose --env-file .env -f docker-compose.yml logs --tail 200 pamTo follow the log continuously, add -f. The service names are pam, ssh-proxy, guacd, password-manager, radius and postgres.
Each container keeps at most three log files of 5 MB each.
Changing the Log Level
To get more detail, set the log level to debug on Settings > General (Log Level). The change takes effect immediately, without a restart. Set it back to info when you have collected the information, because debug produces a large volume of log lines.
You can also set the startup log level with KEYCYTE_LOG_LEVEL. See Configuration Reference.
Resetting the Web TLS Certificate
If a certificate applied on Settings > Web TLS Certificate prevents browsers from connecting (for example, wrong host name together with HSTS, or a certificate that clients do not trust), you can deactivate it from the command line. The PAM server then falls back to the installation keystore or to a temporary self-signed certificate, and you can sign in again to apply a correct certificate.
To reset the Web TLS certificate:
-
On the host, run the reset command in the PAM server container:
sudo docker exec pam keycyte-pam cert resetThe command deactivates the active certificate in the database and prints how many rows it changed.
-
Restart the PAM server:
sudo docker compose --env-file .env -f docker-compose.yml restart pam -
Open the Admin Panel, accept the browser warning if one appears, and apply a correct certificate on Settings > Web TLS Certificate.
The applied certificate stays in Upload History; it is only no longer active.
Common Issues
A container does not start
The installer prints the last log lines of every container that is not running. You can show them again with docker compose logs <service>. Typical causes for the PAM server:
| Log message contains | Cause and solution |
|---|---|
session secret validation failed | SESSION_SECRET_KEY in .env is empty, shorter than 32 bytes, or the built-in value. Set a random value of at least 32 bytes and recreate the containers. |
No AES key configured | No encryption key is set. Check KEYSTORE_KEY_HEX in .env. |
Invalid key_hex value | KEYSTORE_KEY_HEX is not a valid hexadecimal string. |
Failed to run ent auto-migration | The PAM server could not update the database schema. Check the database connection and the rights of the database user. |
The installer reports missing images
The installer stops if an expected image is not loaded after extracting keycyte-pam.tar.gz. Check the loaded images with sudo docker images. The images must be tagged keycyte-pam:latest, keycyte-ssh-proxy:latest, keycyte-password-manager:latest, keycyte-radius-server:latest and guacamole/guacd:latest.
If the postgres container cannot start because the image cannot be pulled, the host has no access to Docker Hub. Load postgres:17 manually; see Preparing the Installation Package.
The master account was not created
If the installer printed a warning that the master account script was skipped, run the script manually. See If the Master Account Was Not Created.
The browser shows a certificate warning
The PAM server uses the installation keystore or a temporary self-signed certificate. Check the Source on Settings > Web TLS Certificate, and apply a certificate that is issued for the Keycyte PAM DNS name by a CA that user workstations trust.
LDAP sign-in fails with a certificate error
The LDAP server certificate is not trusted. Check that its CA is in ~/keycyte/cacerts.pem, or add the certificate from the LDAP configuration in the Admin Panel. After you change cacerts.pem on the host, restart the pam and password-manager services.
Native SSH or web terminal sessions fail
Check the Service AccessKeys card on Settings > Services. If the SSH proxy is shown as not configured, the SSH proxy access key is missing in the PAM server environment. Also check the ssh-proxy log for authentication errors toward the PAM server. See Service Access Keys.
Scheduled password rotation, reports or backups do not run
Scheduled jobs run only on the master node. Check the Master switch on Settings > Replication, or look for the line Running as MASTER node or Running as REPLICA node in the PAM server log after startup. See High Availability.
Users are signed out or sessions fail behind a load balancer
Check that all nodes use the same SESSION_SECRET_KEY and that the load balancer uses session affinity. See High Availability.
Certificate expiry e-mails are not received
Check the mail server settings with Email Test on Settings > Notification, and check that the MASTER administrators have e-mail addresses.