
Use your browser’s Print dialog and choose “Save as PDF”.
Privileged Access Management
Keycyte PAM 3.2
User Guide
About This Guide
Intended Audience
This document is intended for end users who connect to systems through Keycyte PAM.
It describes the Client Panel, the web portal that you use to open privileged sessions, request access and work with the credentials assigned to you. Configuring servers, roles, policies and users is described in the Administrator Guide.
What This Guide Covers
| Section | Description |
|---|---|
| Signing In | Signing in with a password or with Microsoft, multi-factor authentication (MFA), forced password change, choosing a panel and signing out. |
| Client Panel | The layout of the Client Panel: server tree, search, custom folders, tabs and the Dashboard. |
| Connecting to Systems | Opening browser sessions, requesting access, session tools, file transfer, session sharing and connecting with a native SSH client. |
| Password Vault and Private Vault | Copying the credentials assigned to you and keeping personal secrets. |
| Settings | Language, terminal appearance and custom folders. |
What You Can Do Depends on Your Roles
Your administrator decides which servers and accounts you see and what you can do with them. For example, copying passwords, transferring files, using the clipboard, sharing sessions and connecting without approval are controlled by roles. If an option described in this guide is missing or does not work for you, contact your Keycyte PAM administrator.
Conventions
| Convention | Meaning |
|---|---|
| Bold | Labels of user interface elements, exactly as they appear in the English interface. |
Monospace | Commands, file names, paths and values that you type. |
pam.example.com | A placeholder for the address of your Keycyte PAM server. |
Signing In
You sign in to Keycyte PAM on the sign-in page at https://pam.example.com/auth/login.html. Depending on how your account is configured, the sign-in can include accepting a user agreement, changing your password and entering a multi-factor authentication (MFA) code.
The sign-in page is shown in English or Turkish, according to the language of your browser.
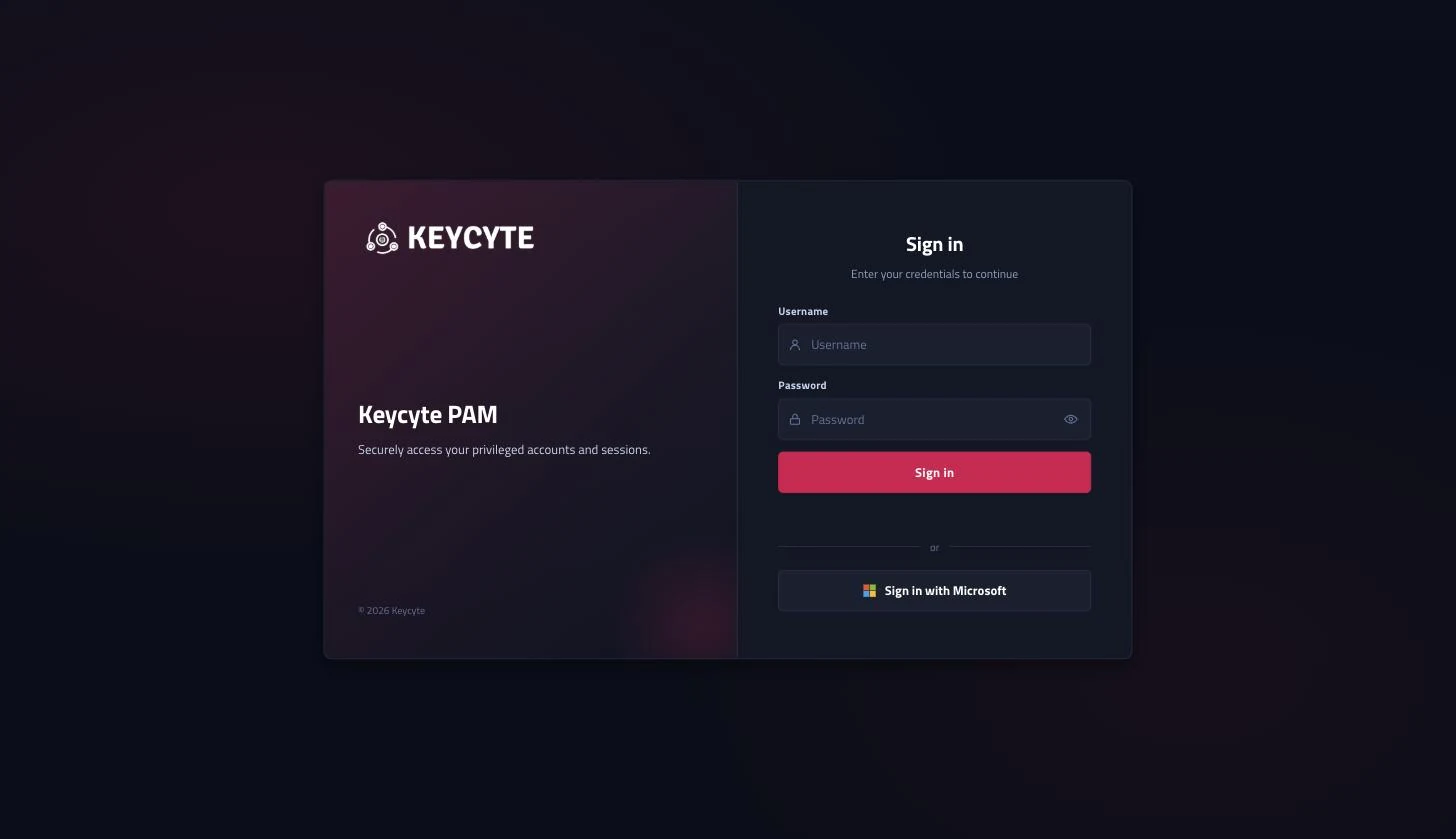
Signing In with a Password
Use this procedure for local Keycyte PAM accounts, directory (Active Directory/LDAP) accounts and RADIUS accounts.
To sign in with a password:
-
Open
https://pam.example.comin your browser. -
In the Username field, enter your user name.
-
In the Password field, enter your password.
Tip
A Caps Lock is on warning appears under the field when Caps Lock is active. Click the eye icon to show or hide the password.
-
If a user agreement is displayed, accept it. See Accepting the User Agreement.
-
Click Sign in.
-
Complete any additional step that the page displays:
The Client Panel opens.
If your password is about to expire, the page shows Your password expires in <n> day(s). Please change it soon. before it opens the panel.
Sign-In Errors
| Message | Cause |
|---|---|
Invalid username or password | The user name or password is wrong. |
User account is disabled | Your account is disabled. Contact your administrator. |
Account is locked / Account is temporarily locked. Try again in <n> minute(s). | Too many failed attempts. Wait, or contact your administrator. |
Access denied: IP restricted | You are not allowed to sign in from your current network address. |
Access denied: outside allowed schedule | You are not allowed to sign in at this time. |
No roles assigned to this user | No role is assigned to your account. Contact your administrator. |
This is a service account and cannot sign in | The account is a service identity and cannot be used interactively. |
Too many attempts. Try again in <n>s | Too many sign-in requests were sent. The Sign in button is available again when the countdown ends. |
Signing In with Microsoft
If your organization uses Microsoft Entra ID, the Sign in with Microsoft button appears under the sign-in form. The button is shown only when your administrator has enabled Entra ID sign-in.
To sign in with Microsoft:
- On the sign-in page, click Sign in with Microsoft.
- Complete the sign-in on the Microsoft page.
You are returned to Keycyte PAM. Users who have administrative rights are taken to the Admin Panel; other users are taken to the Client Panel.
Note
With Microsoft sign-in, password and MFA checks are performed by Microsoft Entra ID according to your organization’s policies. The Keycyte PAM user agreement, password change and MFA steps described on this page apply to password sign-in.
If the Microsoft sign-in fails, you return to the sign-in page with an error message.
Accepting the User Agreement
If your administrator has enabled a user agreement, a checkbox with the agreement link (by default I agree to the Terms of Service) appears above the Sign in button. You cannot sign in until you select it.
To accept the user agreement:
- Click the agreement link to read the agreement. The agreement opens in a window; click Close to return.
- Select the agreement checkbox.
The Sign in button becomes available.
Changing Your Password at First Sign-In
When an administrator creates your local account or resets your password, you may be required to set a new password before you continue. In this case the page shows You must change your password before continuing and displays the New Password and Confirm Password fields.
To change your password:
-
In the New Password field, enter a new password.
The rules under the field are marked as you type:
- At least 8 characters
- An uppercase letter
- A lowercase letter
- A number
-
In the Confirm Password field, enter the new password again.
-
Click Sign in.
If the password is accepted, the sign-in continues. If it is rejected, for example because it does not meet the password policy or matches a password you used before, the page shows the reason.
Note
This step applies to local Keycyte PAM accounts. Directory and Microsoft account passwords are changed in the directory, not in Keycyte PAM.
Entering an MFA Code
If MFA is enabled for your account, the page shows the MFA Code field after you enter a correct password.
To enter an MFA code:
- Get the code:
- Authenticator app: open your authenticator app and read the current code for Keycyte PAM.
- Email or SMS: Keycyte PAM sends a code to your email address or phone number when the field appears.
- In the MFA Code field, enter the code.
- Click Sign in.
If the code is wrong, the page shows Invalid MFA code. Repeated wrong codes lock your account temporarily.
Using a Backup Code
If your administrator gave you backup codes, you can enter a backup code in the MFA Code field instead of a code from your authenticator app. Each backup code can be used only once.
RADIUS Challenge
If your account is authenticated by a RADIUS server that asks for a second factor, the page shows the message returned by the RADIUS server and the MFA Code field. Enter the requested value and click Sign in.
Setting Up MFA for the First Time
If your administrator enabled authenticator-app MFA for your account without sending you the setup details, the page shows a QR code the first time you sign in.
To set up MFA:
-
Open an authenticator app on your phone, for example Microsoft Authenticator or Google Authenticator.
-
Scan the QR code shown on the sign-in page.
If you cannot scan it, click Can’t scan? Show secret and enter the displayed secret in the authenticator app manually.
-
In the MFA Code field, enter the 6-digit code that the app displays.
-
Click Sign in.
The setup is complete. On later sign-ins you enter a code from the app as described in Entering an MFA Code.
If the code is rejected, make sure the clock on your phone is correct and try again.
Choosing the Admin Panel or Client Panel
If your account has both administrative and end-user rights, the page shows Select Application after a successful password sign-in.
To choose a panel:
- Click Client Panel to connect to systems and use your vaults.
- Click Admin Panel to manage Keycyte PAM.
Users with only end-user rights go directly to the Client Panel. Users with only administrative rights go directly to the Admin Panel.
Signing Out
To sign out:
- At the bottom of the sidebar in the Client Panel, click the sign-out button. The button shows your user name.
You are signed out and the sign-in page opens. Signing out closes all sessions that are open in the Client Panel.
Session Timeout
Your sign-in session ends after a period of inactivity that is set by your administrator. Moving the mouse, typing, scrolling or clicking in the Client Panel counts as activity and keeps the session alive, also while a remote session is open.
When the session has expired, the next action in the Client Panel opens the sign-in page. Sign in again to continue.
You can also be signed out in the following cases:
- An administrator ends your sign-in session. A message is displayed and you are signed out after a few seconds.
- Your administrator allows only one active sign-in per user, and you sign in from another browser or device.
Client Panel
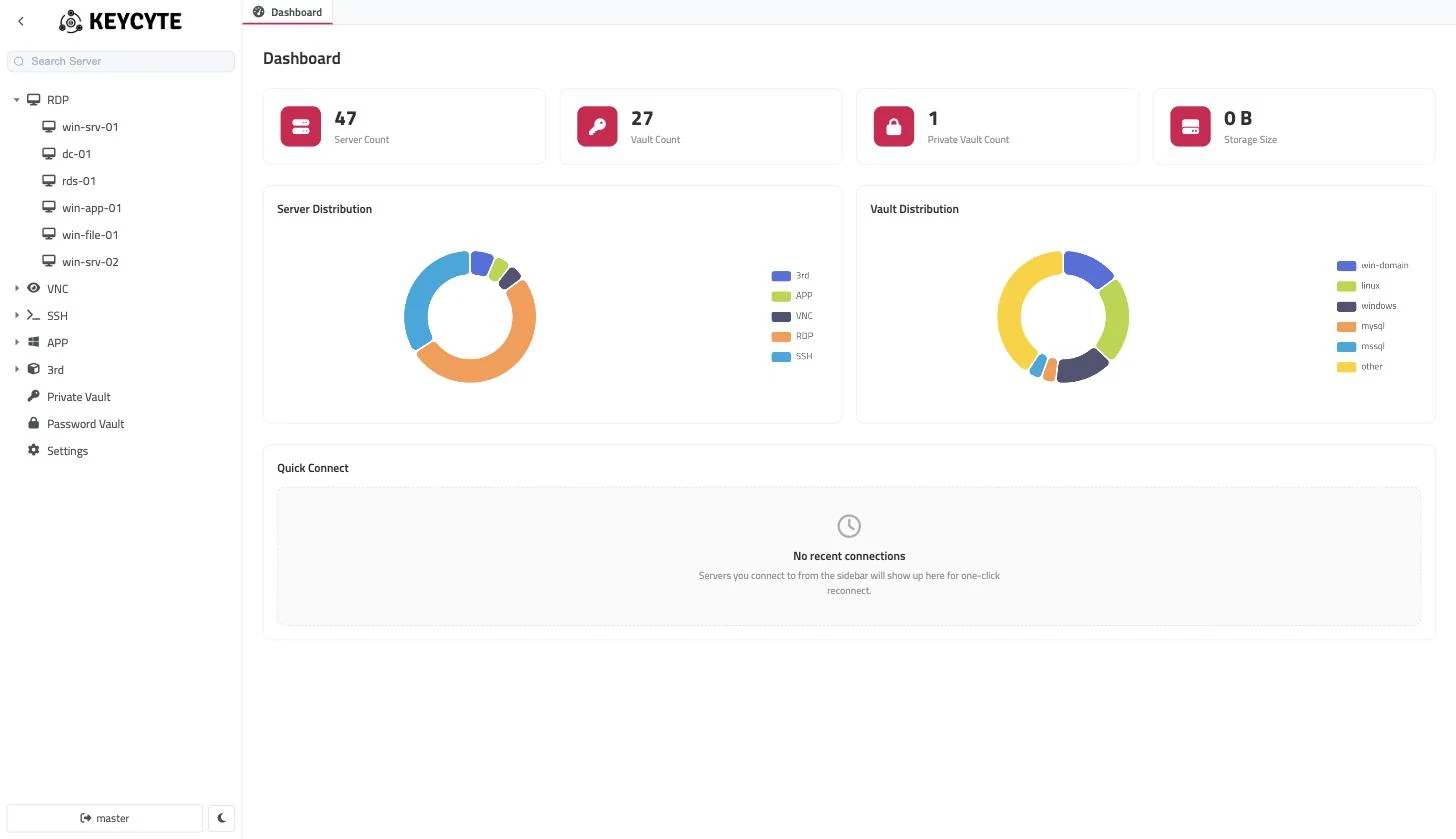
The Client Panel is the web portal in which you connect to the systems assigned to you. It consists of a sidebar on the left and a tabbed work area on the right.
Sidebar
The sidebar contains, from top to bottom:
| Element | Description |
|---|---|
| Collapse button | Hides or shows the sidebar menu. When the sidebar is collapsed, only the buttons remain visible. |
| Logo | The logo of your organization, if your administrator has uploaded one. |
| Search Server | Filters the server tree. See Searching for a Server. |
| Server tree | The servers you can connect to, grouped in folders. See Server Tree. |
| Sign-out button | Shows your user name. Click it to sign out. |
| Theme button | Switches the Client Panel between the dark and light theme. Your choice is saved for your account. |
Server Tree
The server tree shows only the servers that your roles allow you to access. It contains the following items, in this order:
- Custom folders — folders that you create yourself in Settings > Custom Menu. See Organizing Servers in Custom Folders.
- Protocol folders — servers are grouped automatically by connection type, in this order:
RDP,VNC,SSH,TELNET,APP,3rd,WEBAPP,MYSQL,POSTGRESQL,MSSQL,KUBERNETES. A folder appears only if it contains at least one server. Servers are sorted by name. - Shared Sessions — appears when another user has shared an active session with you. See Sharing Sessions.
- Static entries — always present at the end of the tree:
- Private Vault — your personal secrets. See Private Vault.
- Password Vault — the credentials assigned to you. See Password Vault.
- Settings — your personal settings. See Settings.
Click a folder to expand or collapse it. Click a server to open a new connection tab for it. Hover over a server to see its name and address.
The tree is refreshed automatically when your access changes, for example when a session is shared with you.
Searching for a Server
To search for a server:
- In the Search Server field at the top of the sidebar, type part of the server name, address or description.
The tree shows only the matching servers. The static entries are always shown. To show all servers again, clear the field.
Tabs
Every page and every connection opens in its own tab above the work area.
| Action | How |
|---|---|
| Switch to a tab | Click the tab. |
| Close a tab | Click × on the tab, or click the tab with the middle mouse button. Closing a connection tab ends that session. |
| Reorder tabs | Drag a tab to a new position. |
| See tab details | Hover over a connection tab to see the server name and the account you connected with. |
| Scroll the tab bar | When there are more tabs than fit, use the arrow buttons at the ends of the tab bar or the mouse wheel. |
The Dashboard tab is always the first tab and cannot be closed.
Clicking a server in the tree always opens a new tab, so you can open several sessions to the same server. Clicking Private Vault, Password Vault or Settings switches to the existing tab if it is already open.
Sessions in tabs that are not in front stay connected.
Dashboard
The Dashboard tab opens when you sign in. It shows a summary of your access and your recent connections.
| Element | Description |
|---|---|
| Server Count | The number of servers you can access. |
| Vault Count | The number of Password Vault entries you can access. |
| Private Vault Count | The number of entries in your Private Vault. |
| Storage Size | The total size of the files in your personal file storage on Keycyte PAM. See Transferring Files. |
| Server Distribution | A chart of your servers by connection type. |
| Vault Distribution | A chart of your vault entries by account type. |
| Quick Connect | Your most recent connections. See Quick Connect. |
Quick Connect
Quick Connect lists up to 10 servers that you connected to most recently, with the newest first. Each card shows the server name, the connection type and the server address.
To reconnect from Quick Connect:
- On the Dashboard tab, click a server card under Quick Connect.
A connection tab for the server opens, or comes to the front if it is already open. Continue as described in Opening a Browser Session.
If you have not connected to any server yet, the section shows No recent connections.
Connecting to Systems
Keycyte PAM connects you to target systems without showing you the passwords of the target accounts. The connection runs through Keycyte PAM, which applies your roles: which accounts you can use, whether approval or MFA is required, whether the session is recorded, and which tools are available in the session.
You can connect in two ways:
- In the browser — open a server from the Client Panel. Graphical connections (for example RDP and VNC) and terminal connections (SSH, Telnet, Kubernetes) open in a tab. No client software is needed.
- With a native client — connect with your own SSH client through the Keycyte PAM SSH proxy.
In This Section
| Topic | Description |
|---|---|
| Opening a Browser Session | Selecting an account, MFA prompts, accounts that are in use and connection errors. |
| Requesting Access | Sending an access request when a server or account requires approval. |
| Using Session Tools | Full screen, clipboard, on-screen keyboard, Ctrl+Alt+Del, pausing, terminal search and reconnecting. |
| Transferring Files | Uploading and downloading files with the Files panel. |
| Sharing Sessions | Inviting other users to a session, handling join requests and watching shared sessions. |
| Connecting with a Native Client | Copying the SSH command and connecting from your own SSH client. |
Opening a Browser Session
You open a session to a server from the server tree or from Quick Connect on the Dashboard. The session runs in a tab of the Client Panel.
Before You Begin
- The server must appear in your server tree. If it does not, ask your administrator for access.
- At least one account must be assigned to you for the server, unless automatic sign-in is enabled for it.
Opening a Session
To open a session:
-
In the server tree, expand the folder that contains the server, and click the server.
A new tab opens and shows the account selection card, with the server name and the line
<PROTOCOL> — Select Account.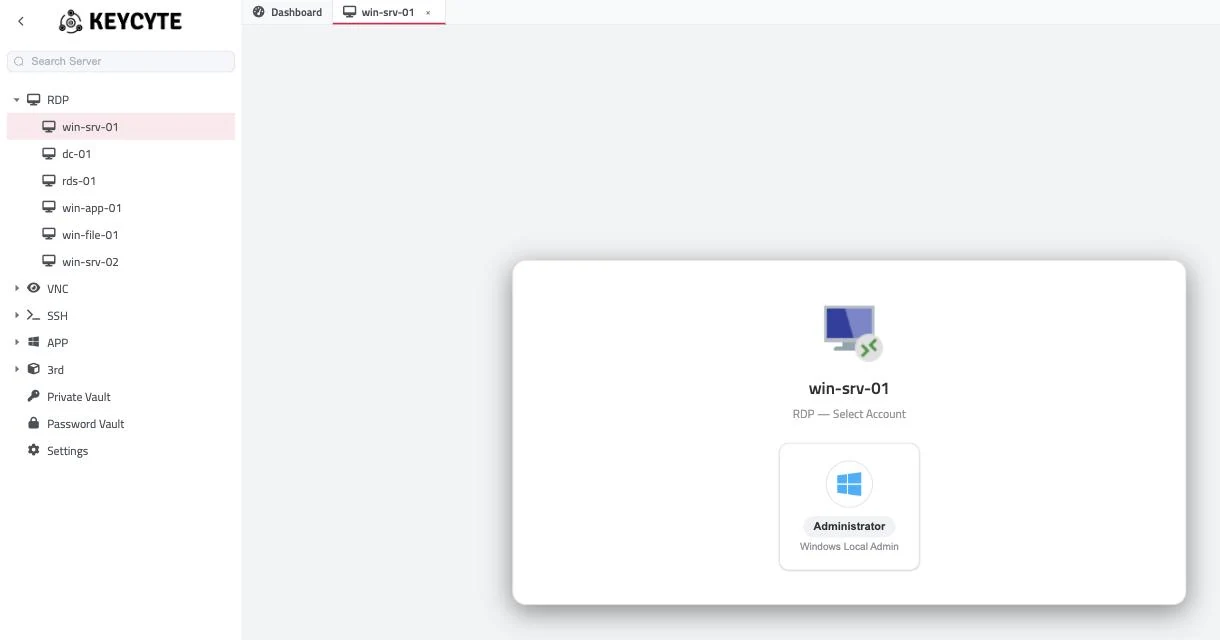
-
Click the account that you want to connect with.
Each account card shows the user name of the target account and the name of the vault entry. The list can contain:
- accounts from the Password Vault that your roles assign to you for this server;
- entries from your own Private Vault that are linked to this server, if your role allows Private Vault accounts on it;
- Private Vault entries that other users shared with you and linked to this server.
-
If Keycyte PAM asks for more information, complete the prompt:
- MFA Verification — see Completing the MFA Prompt.
- Send Request — the server or account requires approval. See Requesting Access.
- Session in use — someone is already using the account on this server. See Joining a Session That Is in Use.
The session starts in the tab. Graphical sessions (for example RDP and VNC) show the remote desktop; SSH, Telnet and Kubernetes sessions show a terminal.
Note
If you do not see the user name on an account card, your administrator has hidden the target user name from you. You can still connect with the account.
If no account is assigned to you, the card shows No accounts available. Ask your administrator for access.
Automatic Sign-In
For some servers, your administrator can enable automatic sign-in. In this case the account selection is skipped and the session starts as soon as you open the tab, using your own Keycyte PAM credentials.
Completing the MFA Prompt
Your administrator can require an MFA code for each connection to a server or account, in addition to the MFA code at sign-in. In this case the MFA Verification dialog opens after you click the account.
To complete the MFA prompt:
- Get the code. The dialog tells you where it comes from:
Enter the verification code from your authenticator app.A verification code has been sent to your email.A verification code has been sent to your phone.
- In the Verification Code field, enter the 6-digit code.
- Click Verify.
The session starts. If the code is wrong, the dialog shows Invalid verification code. Please try again.
Messages on the Account Selection Card
If the connection cannot start, the account selection card shows a message.
| Message | Cause |
|---|---|
This account is currently in use by <user>. | The account can be used by one user at a time, and another user has an active session with it. Try again after the other session ends. |
Access denied: Your IP address is not allowed. | You are not allowed to connect from your current network address. |
Access denied: Connection is not allowed at this time. | You are not allowed to connect at this time. |
Unauthorized | You do not have access to this account or server. |
When a Session Ends
When a session is closed or fails, the tab returns to the account selection card and shows the reason above the accounts. Click an account to connect again.
Common reasons:
| Message | Meaning |
|---|---|
The session was closed due to inactivity. | The session was idle longer than allowed. |
The session has exceeded the maximum allowed duration. | The maximum session duration was reached. |
Authentication failed. Please check your credentials. / Invalid credentials. Please check your username and password. | The target system rejected the account. Contact your administrator. |
Could not connect to the remote server. / The remote server is unreachable. | Keycyte PAM cannot reach the server. |
The target account is disabled or locked. | The account is disabled or locked on the target system. |
Too many active connections. Please close some and try again. | You have reached the limit of active connections. |
If the session has a time limit, a Session ends in banner with a countdown appears during the last minutes of the session.
For shared sessions and sessions with automatic sign-in, the tab shows the reason and a Reconnect button instead of the account selection card. See Reconnecting.
Note
Depending on the configuration, sessions can be recorded and administrators can watch active sessions. When an administrator starts or stops watching your session, a notification can appear in the Client Panel.
Closing a Session
To close a session, close its tab. See Tabs.
Requesting Access
Your administrator can configure a server, an account, or both, so that you need approval before you connect (just-in-time access). When you select such an account without a valid approval, the Send Request panel opens instead of the session.
An approval is valid for the time window that the approver confirms. You can connect without a new request while the approval is valid.
Sending an Access Request
To send an access request:
-
Open the server and click the account, as described in Opening a Browser Session.
The Send Request panel opens.
-
Fill in the request:
Field Description Reason Why you need access, for example a change or ticket number. The approver sees this text. Start Date The date and time from which you need access. End Date The date and time until which you need access. -
Click Send Request.
The request is sent and the panel closes. To cancel without sending, click Cancel.
What Happens After You Send a Request
- Keycyte PAM records the request and adds it to the approval queue of the administrators responsible for the server (for a server approval) or for the account (for an account approval). If both the server and the account require approval, a request is created for each of them.
- The responsible administrators receive an
Access Permission Requestemail, if an email address is known for them. - An administrator approves or rejects the request in the Admin Panel. The approver can adjust the time window.
- When the request is approved, you receive an
Access Permission Approvedemail, if an email address is known for your account. - Within the approved time window, open the server and click the account again. The session starts without the Send Request panel.
Outside the approved time window, or if the request was rejected, the Send Request panel opens again when you select the account.
Note
An approved request only removes the approval step. Other conditions still apply, for example MFA prompts, network and time restrictions, and accounts that are in use by another user.
Using Session Tools
While a session is connected, the session tools are available in the action bar on the right edge of the session tab. Some tools are available only for certain connection types or when your role allows them.
Opening the Action Bar
To open the action bar:
- Click the small tab with the arrow (<) at the middle of the right edge of the session.
The action bar opens on the right. Hover over a button to see its name. To close the action bar, click anywhere outside it.
| Button | Description | Available for |
|---|---|---|
| Paste Clipboard | Sends the text on your computer’s clipboard to the remote session. | Graphical sessions, when pasting is allowed |
| Files | Opens the Files panel. See Transferring Files. | All sessions |
| Share Session | Opens the Share this session panel. See Sharing Sessions. | Your own sessions (not sessions shared with you) |
| Pause session / Resume session | Pauses or resumes input to the session. | SSH, Telnet and Kubernetes sessions that you own |
| Fullscreen / Exit Fullscreen | Shows the session in full screen. | All sessions |
| On-Screen Keyboard | Shows or hides the on-screen keyboard. | Graphical sessions |
| Ctrl+Alt+Del | Sends Ctrl+Alt+Del to the remote system. | Graphical sessions |
Using the Clipboard
Your administrator can allow or block copying from and pasting to a session.
Graphical Sessions
- Copy from the session: text that you copy in the remote session is placed on your computer’s clipboard automatically, if copying is allowed.
- Paste into the session: when you return to the browser tab, the text on your clipboard is sent to the remote session automatically. You can also send it manually with Paste Clipboard in the action bar. Then paste in the remote session as usual, for example with Ctrl+V.
Note
In Firefox, the clipboard is not sent automatically. Use Paste Clipboard. Browsers can ask for permission to read the clipboard the first time.
If pasting is blocked by your administrator, Paste Clipboard is not shown.
Terminal Sessions (SSH, Telnet, Kubernetes)
| Action | How |
|---|---|
| Copy | Select text with the mouse. The selection is copied to your clipboard. You can also press Ctrl+C (Cmd+C on macOS) while text is selected. |
| Paste | Right-click in the terminal, or press Ctrl+V. |
| Interrupt a command | Press Ctrl+C when no text is selected. The keystroke is sent to the remote shell. |
Using Full Screen
To switch to full screen:
- In the action bar, click Fullscreen.
To leave full screen, click Exit Fullscreen in the action bar or press Esc. In browsers that capture keyboard shortcuts in full screen (see the tip below), press and hold Esc.
Tip
In Google Chrome and Microsoft Edge, full screen also captures browser keyboard shortcuts such as Ctrl+W, Ctrl+T and Alt+Tab, and sends them to the remote session instead of the browser.
Using the On-Screen Keyboard
Use the on-screen keyboard to send keys that your physical keyboard or browser cannot send, or to type with a different keyboard layout.
To use the on-screen keyboard:
- In the action bar, click On-Screen Keyboard.
- Optionally, select a layout at the top of the keyboard: English (US), Deutsch (DE), Français (FR), Español (ES), Italiano (IT), Nederlands (NL) or Русский (RU).
- Click the keys.
To move the keyboard, drag it by its handle. To close it, click ✕.
Sending Ctrl+Alt+Del
To send Ctrl+Alt+Del to the remote system, click Ctrl+Alt+Del in the action bar. Pressing these keys on your own keyboard is handled by your local operating system.
Pausing a Terminal Session
You can pause your own SSH, Telnet or Kubernetes session, for example when users who watch a shared session must not see input while you step away.
To pause a session:
- In the action bar, click Pause session.
A banner Session paused — keystrokes are being dropped appears. While the session is paused, your keystrokes are not sent to the remote system. Users who watch the session see Host has paused the session.
To resume, click the banner, or click Resume session in the action bar.
Searching in a Terminal
To search the output of an SSH, Telnet or Kubernetes session:
-
Click in the terminal and press Ctrl+F (Cmd+F on macOS).
The search box opens at the top of the terminal.
-
Type the text to find. The number of matches is shown in the box.
-
Optionally, use the options next to the box:
Option Description Aa (Case sensitive) Matches upper and lower case exactly. |w| (Whole word) Matches whole words only. .* (Regular expression) Treats the search text as a regular expression. -
Press Enter for the next match and Shift+Enter for the previous match, or use the Next and Previous buttons.
To close the search box, press Esc or click Close.
You can change the number of lines that the terminal keeps for search and scrolling in Settings > Terminal Settings. See Settings.
Reconnecting
When a regular session ends, the tab returns to the account selection card, where you can click the account to connect again.
For a session that was shared with you, or a session that started with automatic sign-in, the tab shows the reason and a Reconnect button.
To reconnect:
- Click Reconnect.
Transferring Files
You transfer files with the Files panel of a connected session. What the panel shows depends on the connection type:
| Connection type | What the Files panel shows |
|---|---|
| SSH | The file system of the target server, through SFTP, with the same account as the session. |
| RDP and other graphical connections | Your personal file storage on Keycyte PAM. In RDP sessions this storage can be available inside the remote Windows session as a redirected drive. |
Before You Begin
- The session must be connected.
- For RDP, your administrator must allow the virtual disk for the server, so that your file storage appears as a drive in the remote session. Otherwise you can still use the panel to manage the files in your storage.
Opening the Files Panel
To open the Files panel:
- In the session, open the action bar. See Opening the Action Bar.
- Click Files.
The Files panel opens on the right. In an SSH session, the panel connects to SFTP first and shows SFTP connection established when it is ready.
The panel contains, from top to bottom:
- the upload area Click or drag to upload files;
- the current path, as clickable path segments;
- the toolbar;
- the file list with the File Name, Size and (SSH only) Modified columns, and action buttons for each item.
Click a column header to sort the list. Click a folder name to open the folder.
Toolbar
| Button | Description | SSH | RDP |
|---|---|---|---|
| Home | Goes to your home directory (SSH) or the root of your file storage (RDP). | Yes | Yes |
| Up | Goes to the parent folder. | Yes | Yes |
| Refresh | Reloads the list. | Yes | Yes |
| New folder | Creates a folder in the current folder. | Yes | Yes |
| Upload files | Uploads one or more files to the current folder. | Yes | Yes |
| Upload folder | Uploads a folder with its contents to the current folder. | Yes | Yes |
| Delete selected | Deletes the items selected in the list. The button shows the number of selected items. | Yes | No |
| Show hidden files | A switch that shows or hides files whose names begin with a dot. | Yes | No |
Uploading Files
To upload files:
- In the Files panel, go to the target folder.
- Do one of the following:
- Drag files or folders from your computer onto the upload area.
- Click the upload area or Upload files, and select one or more files.
- Click Upload folder, and select a folder.
A progress bar shows the file being uploaded. When several files are uploaded, a counter such as (3 / 12) shows the progress of the queue. The list is refreshed when the upload is complete.
Tip
In an RDP session you can also drag a file from your computer directly onto the remote desktop. The file is uploaded to your file storage.
Downloading a File
To download a file:
- In the file list, click Download in the row of the file.
The file is saved by your browser. Folders cannot be downloaded; download the files in them one by one.
Creating a Folder
To create a folder:
- Click New folder.
- Enter the Folder name.
- Click Save.
Renaming a File or Folder (SSH)
To rename a file or folder:
- In the row of the item, click Rename.
- Enter the New name.
- Click Save.
Changing Permissions (SSH)
To change the permissions of a file or folder:
-
In the row of the item, click Change permissions.
The dialog shows the item and its current permissions.
-
Enter the new mode as three or four octal digits, for example
0644for a file or0755for a folder. -
Click Save.
If the value is not valid, the panel shows Mode must be 3-4 octal digits.
Deleting Files and Folders
To delete a single item:
- In the row of the item, click Delete.
- In the confirmation dialog, click Yes, Delete.
In an SSH session, you can also select several items in the list, click Delete selected and confirm.
Warning
Deleting a folder deletes all of its contents. Deleted files cannot be restored from the Client Panel.
Closing the Files Panel
To close the panel, click × at the top of the panel, press Esc, or click outside the panel.
In an SSH session, or while an upload is in progress, the dialog Close file browser? asks you to confirm, because closing the panel ends the SFTP connection. Click Yes to close the panel, or Cancel to keep it open. Closing the Files panel does not end the session.
Sharing Sessions
You can let other Keycyte PAM users join one of your active sessions, either with full access or read-only. Session sharing must be allowed by your administrator.
There are two ways to start a shared session:
- Invitation — you share your session with selected users from the session.
- Join request — another user tries to connect with an account that you are already using, and asks to join your session.
Sharing Your Session
To share a session:
-
In the connected session, open the action bar. See Opening the Action Bar.
-
Click Share Session.
The Share this session panel opens with the list of users.
-
Optionally, type in the Search field to filter the users.
-
Select the users that you want to invite.
-
For each user who may only watch, select the Readonly checkbox.
-
Click Share.
The selected users receive an invitation. A message confirms each invitation, or shows why it failed, for example User already has access to this session.
If the session has not connected yet, the message The session has not yet started. is shown.
Removing a User from Your Session
Users who are currently in the session are marked with a green dot in the Share this session panel.
To remove a user:
- In the Share this session panel, click × in the row of the user.
- In the Remove from Session dialog, click Yes, Remove.
The user is removed from the session.
Users Watching a Terminal Session
In an SSH, Telnet or Kubernetes session, a badge with an eye icon and a number shows how many users are watching. A notification appears when a user joins or leaves.
To stop sending input while others watch, you can pause the session. See Pausing a Terminal Session.
Accepting an Invitation
When someone shares a session with you, the Session Invitation dialog opens in your Client Panel.
To accept an invitation:
- In the Session Invitation dialog, click Accept.
A tab named <host user> - Shared Session opens and connects to the session. If you were invited read-only, the tab name ends with (Read Only), and your keyboard and mouse input is not sent to the session.
To decline, click Reject.
Active sessions that are shared with you are also listed in the Shared Sessions folder of the server tree.
Joining a Session That Is in Use
For graphical connections (for example RDP) with session sharing enabled, if another user already has an active session with the account that you select, the Session in use dialog asks A session is in use. Would you like to send a request to join?
To request to join:
- In the Session in use dialog, click Yes.
The request is sent to the user who owns the session. When the owner approves it, a message is shown and a tab named <host user> - Shared Session opens and connects to the session. If the owner approves read-only access, the tab name ends with (Read Only). If the owner rejects it, a message informs you.
Responding to a Join Request
When another user asks to join your session, the Session Join Request dialog shows <user> wants to join your session.
To respond to a join request, do one of the following:
- Click Full Access to let the user work in the session.
- Click Read Only to let the user watch the session.
- Close the dialog to reject the request.
A message confirms your decision.
When a Shared Session Ends
When the owner closes the session or removes you from it, a message is shown in your Client Panel and the session ends in your tab. The Shared Sessions folder in the server tree is updated.
Connecting with a Native Client
Instead of the browser terminal, you can connect to SSH servers with your own SSH client, for example OpenSSH, PuTTY or Windows Terminal. The connection runs through the Keycyte PAM SSH proxy, which signs you in to the target server with the selected account. You never see the password of the target account.
Before You Begin
- The server must be an SSH server in your server tree, and an account must be assigned to you for it.
- Your computer must be able to reach the Keycyte PAM server on TCP port
2222. - You need your Keycyte PAM user name and password, and your MFA code if MFA is enabled for your account.
SSH Command Format
The command has the following format:
ssh <vaultId>@<serverId>@<pamUser>@<pamHost> -p 2222| Part | Description |
|---|---|
<vaultId> | The ID of the account (vault entry) to connect with. |
<serverId> | The ID of the target server. |
<pamUser> | Your Keycyte PAM user name. |
<pamHost> | The host name of your Keycyte PAM server, for example pam.example.com. |
-p 2222 | The port of the Keycyte PAM SSH proxy. This is not the SSH port of the target server. |
For example:
ssh 1042@317@jdoe@pam.example.com -p 2222You do not need to look up the IDs: the Client Panel builds the command for you.
Copying the SSH Command
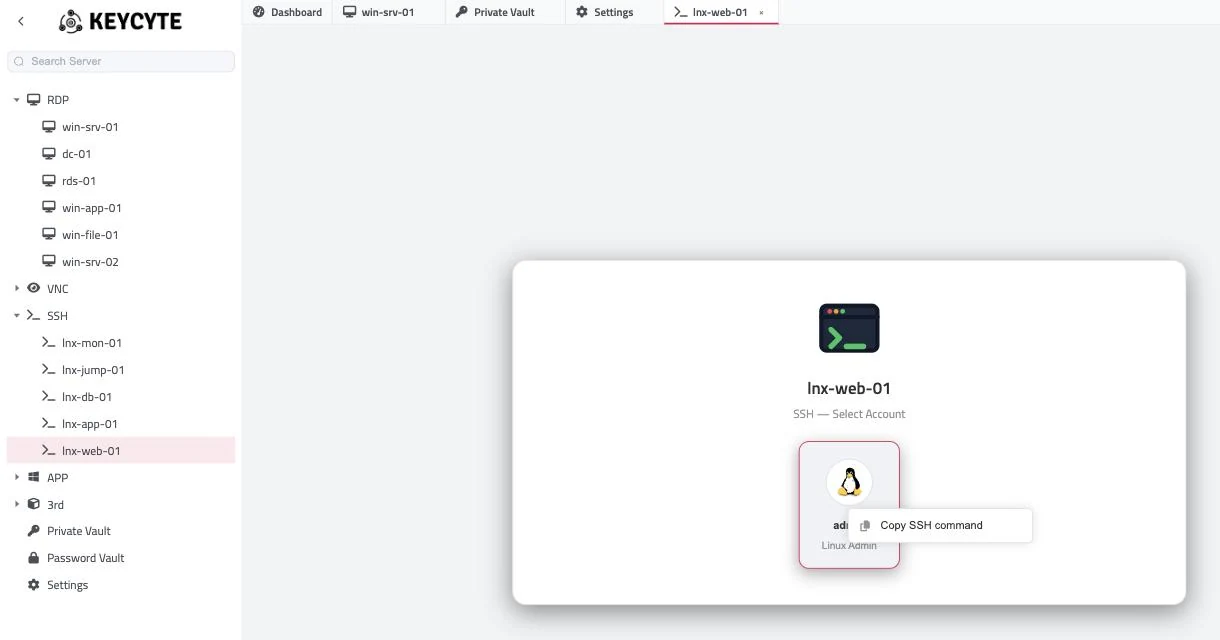
To copy the SSH command:
-
In the server tree, click the SSH server.
The account selection card opens.
-
Right-click the account that you want to use.
-
Click Copy SSH command.
The command is copied to your clipboard and the message SSH command copied to clipboard is shown. If your browser does not allow access to the clipboard, the command is shown in a dialog so that you can copy it manually.
Note
The host name in the command is the address that you used to open the Client Panel. If your SSH client must use a different address to reach Keycyte PAM, edit the part after the last @.
Connecting with the SSH Command
To connect:
- Open a terminal or your SSH client.
- Paste the command and run it.
- When prompted for a password, enter your Keycyte PAM password, not the password of the target account.
- If MFA is enabled for your account, enter your MFA code when prompted.
The session to the target server opens in your SSH client.
Password Vault and Private Vault
The Client Panel has two vaults:
| Vault | Content | Who manages it |
|---|---|---|
| Password Vault | Accounts that your administrator assigns to you through roles, and Private Vault entries that other users share with you. | Your administrator. The Password Vault is read-only in the Client Panel. |
| Private Vault | Your personal accounts and secrets. | You. |
Both vaults are opened from the static entries at the end of the server tree.
Password Vault
The Password Vault lists the accounts you can use. You can copy the user name of an account and, if your role allows it, the password.
To open the Password Vault:
- In the server tree, click Password Vault.
The list shows the following columns:
| Column | Description |
|---|---|
| (icon) | The account type, for example Windows Domain, Windows, Linux or a database type. |
| Name | The name of the vault entry. |
| Username | The user name of the account, with a copy button. |
| Password | Always masked. Use the copy button to copy the password. |
| Domain | The domain of the account, if any. |
| Description | The description. For entries shared with you from another user’s Private Vault, it shows Shared by <user>. |
To find an account, type part of its name, user name or domain in the Search Accounts field. To reload the list, click Refresh.
If the list is empty, no account is assigned to you. Ask your administrator.
Copying a Password
To copy a password:
- In the row of the account, click the copy button in the Password column.
The password is copied to your clipboard. After 20 seconds, Keycyte PAM clears the clipboard if it still contains the password, and shows a message.
If copying is not allowed for you, the message Not authorized to copy this password is shown. You can still use the account to connect to servers, if it is assigned to them. See Opening a Browser Session.
Important
Password copies are recorded in the Keycyte PAM audit log.
Private Vault
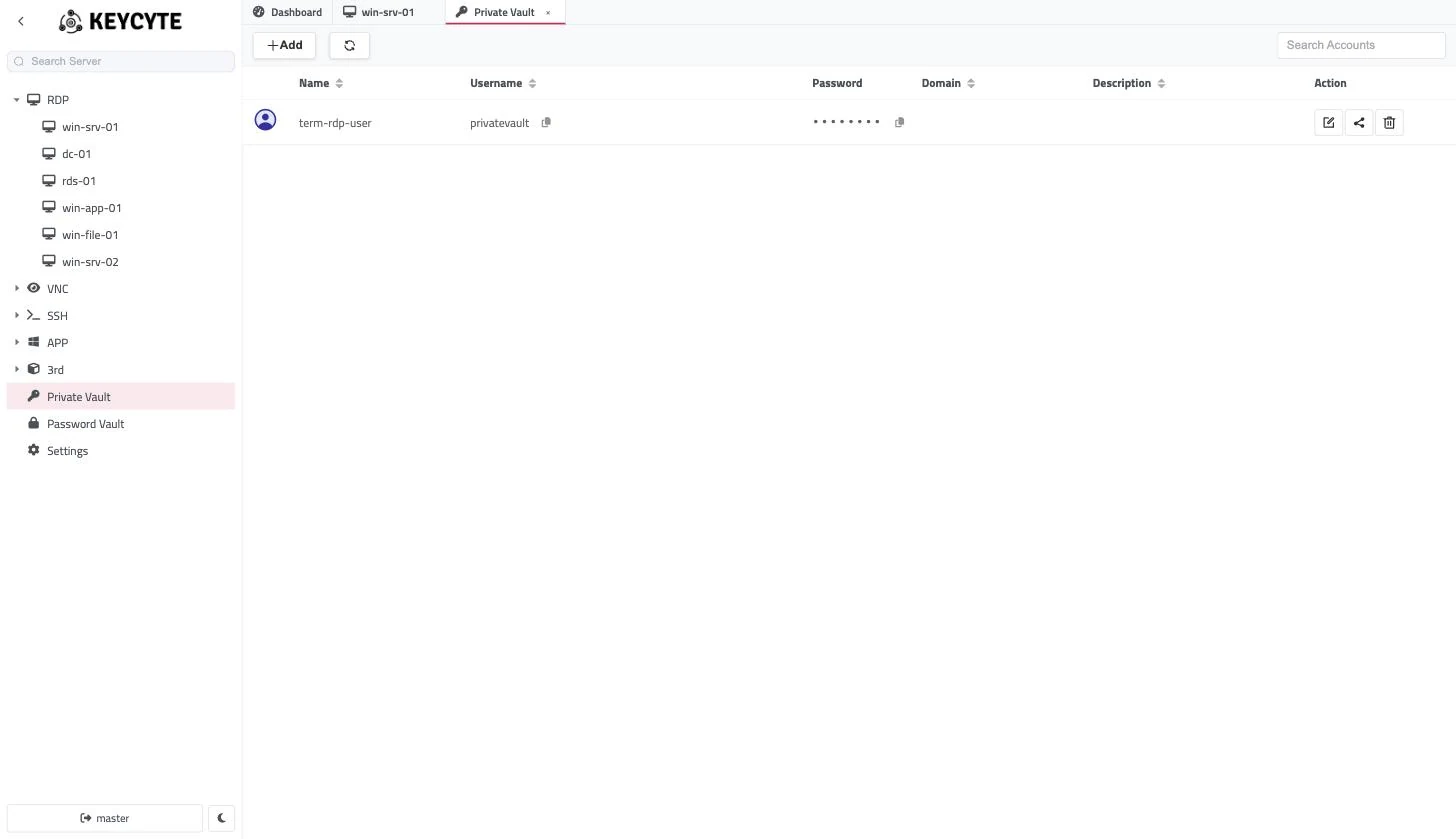
In the Private Vault you keep your own credentials and secrets, encrypted on the Keycyte PAM server. You can link account entries to servers, so that you can connect with them, and share entries with other users.
To open the Private Vault:
- In the server tree, click Private Vault.
The list has the same columns as the Password Vault, plus a share indicator and the Action column with Edit, Share and Delete buttons.
Entry Types
| Type | Group | Main fields |
|---|---|---|
| Other, Windows Domain, Windows, Linux, MySQL, MSSQL, PostgreSQL | Account | Username, Password; Domain for Windows Domain; Private Key and Passphrase for Linux. These entries can have a password policy and be linked to servers. |
| Certificate | Secret | Certificate file (.pem, .crt, .cer), private key file (.pem, .key), Passphrase, and the details Issuer, Valid From, Valid Until, Thumbprint, Key Algorithm. |
| API Key / Token | Secret | The key in Password, and Token Type, Endpoint URL, Key ID, Scopes, Expiry. |
| TOTP Secret | Secret | Issuer, Account Label, Digits, Period, Algorithm. |
| License Key | Secret | The key in Password, and Product, License Expiry. |
| Connection String | Secret | The connection string in Password. |
| Secure Note | Secret | Note Body and Format (Plain text or Markdown). |
| PFX Bundle | Secret | PFX file (.pfx, .p12), Passphrase, Bundle Format, Valid Until, Thumbprint. |
| SSH Key (Standalone) | Secret | Private Key, Passphrase, Key Label. |
Secret types are stored only; they cannot be linked to servers and have no password policy.
Adding an Entry
To add an entry:
-
Click Add.
The Account panel opens.
-
In Type, select the entry type.
-
Fill in the fields for the type. See Entry Types.
For certificate and PFX files, click the select button and choose the file (up to 8 MB). Keycyte PAM reads the file and fills in the details automatically when it can. For a PFX file, enter the Passphrase to fill in the details.
-
For account types, optionally:
- In Policy, select a password policy.
- In Server, select the servers that this account is for. Use Select All and Clear in the list to select or clear all servers that match your search.
-
Optionally, enter a Description.
-
Click Save.
The entry appears in the list.
If a required value is missing, a message such as Secret value is required or Private key is required is shown.
Connecting with a Private Vault Entry
When you link an account entry to a server, the entry appears on the account selection card of that server, if your role allows Private Vault accounts for the server. See Opening a Browser Session.
Editing an Entry
To edit an entry:
-
In the row of the entry, click Edit.
-
Change the fields.
For certificate and PFX entries, the stored file is kept unless you upload a new one.
-
Click Save.
Copying a Value
To copy the user name or password of an entry, click the copy button in the Username or Password column. Copied passwords are cleared from the clipboard after 20 seconds, as in the Password Vault.
Sharing an Entry
You can share an entry with other Keycyte PAM users. Shared entries appear in their Password Vault and, if linked to a server, on the account selection card of that server.
To share an entry:
-
In the row of the entry, click Share.
A panel with the list of users opens.
-
Select the users to share the entry with. To select all users, use the checkbox in the column header.
-
For each user who may copy the password, select Copy. Users without Copy can use the entry to connect but cannot copy its password.
-
Click Share.
Shared entries are marked with a share icon in your list. To stop sharing with a user, clear the user in the same panel and click Share again.
Deleting an Entry
To delete an entry:
- In the row of the entry, click Delete.
- In the confirmation dialog, click Yes, Delete.
Warning
The entry is deleted permanently, also for the users you shared it with.
Settings
Your personal settings are saved for your account and apply in every browser that you sign in from.
To open the settings:
- In the server tree, click Settings.
The Settings tab has three pages: Language, Terminal Settings and Custom Menu.
Tip
To switch the Client Panel between the dark and light theme, use the theme button at the bottom of the sidebar. See Sidebar.
Changing the Language
To change the language:
- On the Language page, in the Language list, select English or Türkçe.
The Client Panel switches to the selected language immediately.
Note
The sign-in page uses the language of your browser, not this setting.
Customizing the Terminal
The terminal settings apply to SSH, Telnet and Kubernetes sessions in the browser. A live preview on the right shows the result as you change the settings.
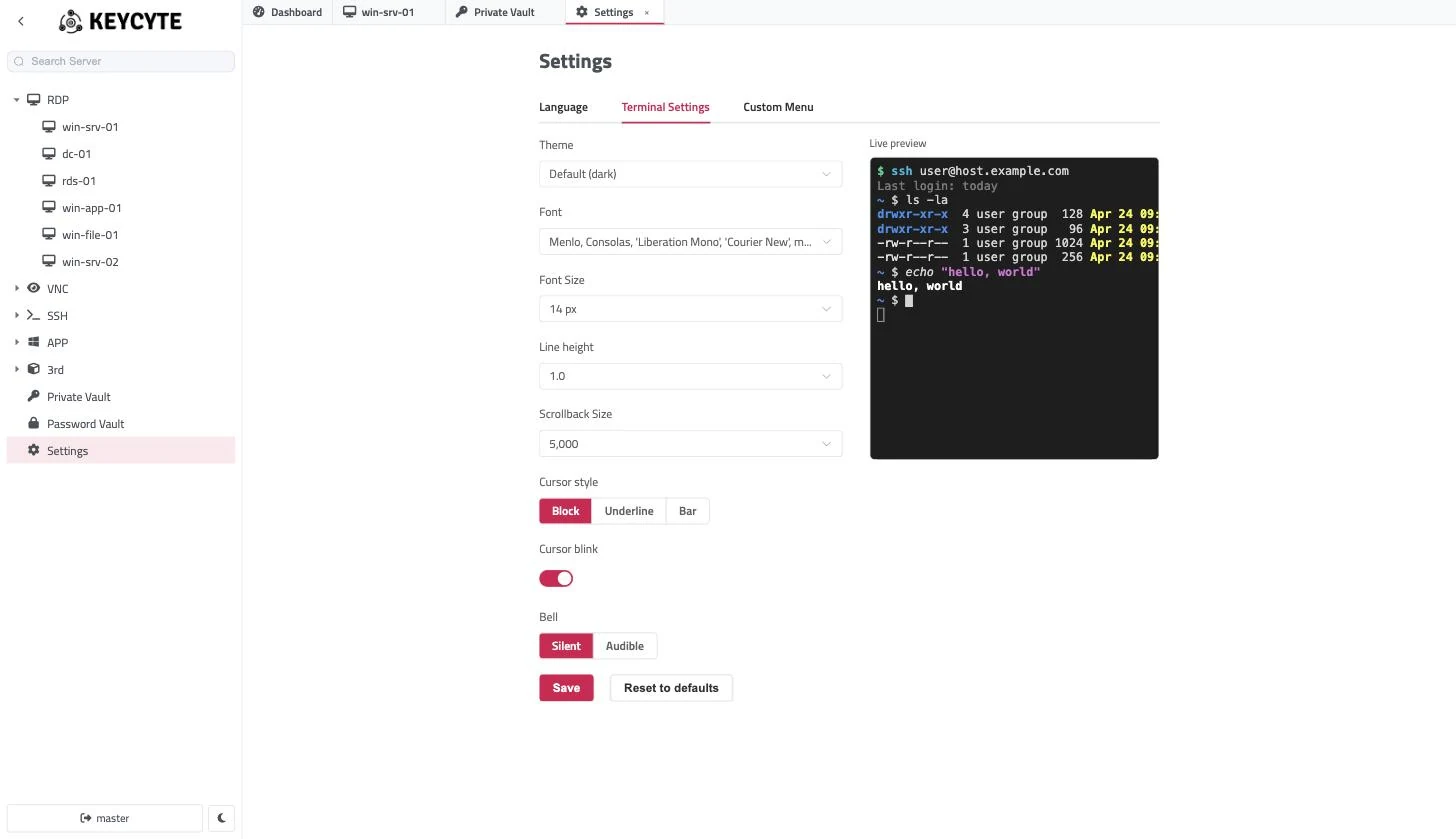
To customize the terminal:
-
Open the Terminal Settings page.
-
Change the settings:
Setting Description Default Theme The color scheme: Default (dark), Dark, Black, Light, Dracula, Solarized Dark, Solarized Light, Monokai or Nord. Default (dark) Font The font: System mono (Menlo / Consolas), JetBrains Mono, Fira Code, Source Code Pro, Ubuntu Mono, Cascadia Code, Hack or Browser default monospace. A font is used only if it is installed on your computer. System mono (Menlo / Consolas) Font Size From 10 px to 24 px. 14 px Line height The spacing between lines: 0.9, 1.0, 1.1, 1.2 or 1.4. 1.0 Scrollback Size The number of lines the terminal keeps for scrolling and searching: 1,000 to 50,000. 5,000 Cursor style Block, Underline or Bar. Block Cursor blink Makes the cursor blink. On Bell Silent, or Audible to play a sound when the remote system rings the terminal bell. Silent -
Click Save.
The settings apply to terminal sessions that you open after saving. To return to the default values, click Reset to defaults, and then click Save.
Organizing Servers in Custom Folders
On the Custom Menu page you create your own folders for the server tree, for example for the servers of one project. Custom folders appear at the top of the server tree, above the protocol folders. A server can be in a custom folder and in its protocol folder at the same time.
Creating a Folder
To create a folder:
- On the Custom Menu page, click Add.
- In Name, enter the folder name.
- Optionally, in Icon, select an icon for the folder.
- Click Save.
The folder appears in the list and in the server tree. If the name is reserved or already in use, a message shows the reason.
Adding Servers to a Folder
To add servers to a folder:
-
In the row of the folder, click Server.
The Select Servers panel opens and lists all servers you can access. The servers already in the folder are selected.
-
Optionally, type in the Search field to filter by name, address or protocol.
-
Select the servers that the folder must contain, and clear the ones it must not contain.
-
Click Save.
The server tree is updated.
Note
The selection replaces the contents of the folder. If you clear all servers and save, Keycyte PAM asks for confirmation and empties the folder.
Renaming a Folder or Changing Its Icon
To edit a folder:
- In the row of the folder, click Edit.
- Change the Name or Icon.
- Click Save.
Deleting a Folder
To delete a folder:
- In the row of the folder, click Delete.
- In the confirmation dialog, click Yes, Delete.
The folder is removed from the server tree. The servers themselves are not affected and remain in their protocol folders.