
Use your browser’s Print dialog and choose “Save as PDF”.
Privileged Access Management
Keycyte PAM 3.2
Administrator Guide
About This Guide
This guide describes how to configure and operate Keycyte PAM from the Admin Panel: how to add the systems that users connect to, store and rotate privileged credentials, define who may reach what, and monitor and audit privileged sessions.
The guide applies to Keycyte PAM 3.2.
Intended Audience
This document is intended for system administrators and security officers who configure and operate Keycyte PAM. You should be familiar with the systems that Keycyte PAM protects (Windows, Linux, network devices and databases) and with your directory services.
How This Guide Is Organized
| Section | Description |
|---|---|
| Getting Started | Signing in to the Admin Panel, the panel layout, administrator types and permission profiles, and the dashboard. |
| Servers | Adding servers, the supported connection protocols, protocol-specific connection settings and bulk operations. |
| Password Vault | Account types, adding accounts, changing and verifying passwords, password history and the recycle bin. |
| Password Policies | Password complexity, automatic password change and the operations that run before and after a connection. |
| Users | User types and roles, adding users, multi-factor authentication, domain user synchronization and service identities. |
| Roles | Server roles, password roles and user roles: who may connect to which server with which account, and when. |
| Access Control | Access requests and approvals, resource rules and command filters. |
| Sessions | Watching and terminating active sessions, session recordings, command history and file history. |
| Discovery | Finding servers and accounts in Active Directory/LDAP, VMware and Proxmox with discovery templates. |
| Reports | Account and session reports and scheduled e-mail reports. |
| Logs | Log types and forwarding logs to a SIEM over syslog. |
| Settings | General, connection, authentication, notification, RADIUS and TACACS+ server, services, storage and tag settings. |
| Secrets API | Retrieving passwords from applications with a service identity. |
Document Conventions
User interface elements are shown in bold, exactly as they appear in the Admin Panel. A menu path is written as Roles > Server Roles. Field values, commands and file names are shown in code.
Note
Notes give additional information about the topic.
Important
Important notes describe conditions that must be met before you continue.
Tip
Tips describe an easier or better way of doing something.
Warning
Warnings describe actions that can cause data loss or a security risk.
Getting Started
The Admin Panel is the web console in which you configure Keycyte PAM. Users connect to systems from a separate web console, the Client Panel; the Admin Panel is for administrators only.
This section contains the following topics:
| Topic | Description |
|---|---|
| Using the Admin Panel | Signing in, the menu and top bar, the command palette, the notification bell and the color theme. |
| Administrator Types | MASTER and ADMIN accounts, permission profiles and the areas that only a MASTER can open. |
| Dashboard | The overview page that opens after you sign in. |
Using the Admin Panel
You manage Keycyte PAM from the Admin Panel, a web console that you open in a browser. This topic describes how to sign in and how the panel is laid out.
Signing In
Before you begin, make sure that:
- Your account has the MASTER or ADMIN role. For details, see Administrator Types.
- If your account has the ADMIN role, a MASTER has assigned at least one permission profile to it. An ADMIN account without a profile that grants access to any module can sign in, but sees only the message You have no permissions.
To sign in to the Admin Panel:
-
In a browser, open the address of Keycyte PAM, for example
https://pam.example.com. The sign-in page opens. -
Enter your Username and Password.
For a domain account, enter the user name in the form that your directory service accepts, for example
jsmithorjsmith@example.com. -
If the sign-in page shows a terms of service check box, read the terms and select the check box. The check box appears when a user agreement is enabled in Settings > General.
-
Click Sign in.
-
Complete any additional step that Keycyte PAM asks for:
Step Description MFA Code Your account uses multi-factor authentication. Enter the code from your authenticator application, or the code that was sent to you by e-mail or SMS. QR code Multi-factor authentication was enabled for your account and you have not set it up yet. Scan the QR code with an authenticator application, or enter the secret key shown under the code, then enter the 6-digit code in MFA Code. New Password, Confirm Password You must change your password. The new password must be at least 8 characters long and contain an uppercase letter, a lowercase letter and a number. Select Application Your account has both an administrator role and the USER role. Click Admin Panel.
The Admin Panel opens at https://pam.example.com/admin/ and shows the Dashboard, or the first page that your permissions allow.
If Microsoft Entra ID sign-in is configured, the sign-in page also shows Sign in with Microsoft. For details, see Authentication Settings.
Note
After too many failed attempts, the sign-in page shows Too many attempts. Try again in n s and disables the Sign in button until the countdown ends. Repeated failed attempts can also lock a local account, according to the local user password policy; an administrator can unlock it on the Users page. For details, see Adding Users.
To sign out, click the sign-out icon at the right end of the top bar. Signing out ends your session on the server, not only in the browser.
Admin Panel Layout
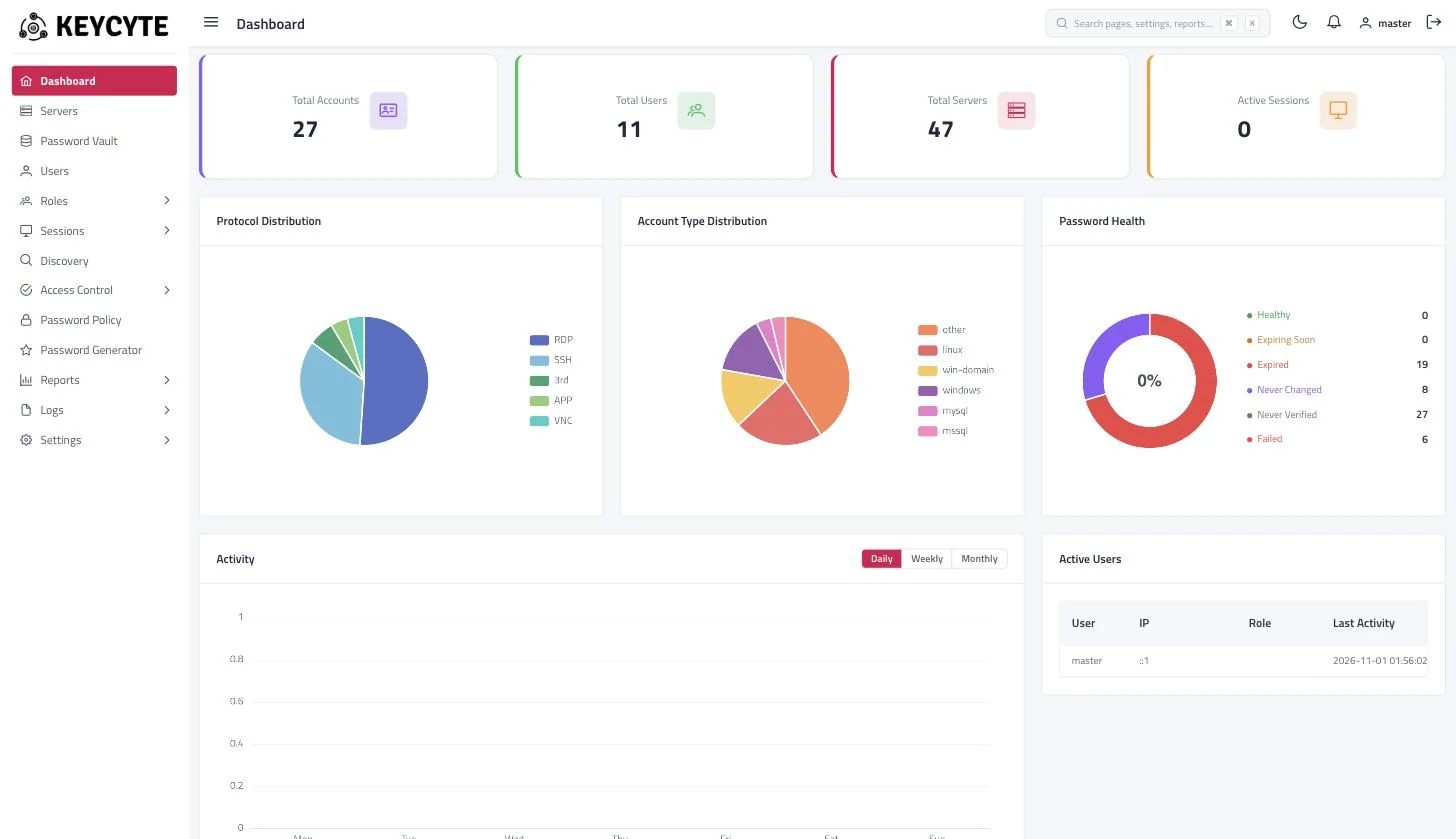
The Admin Panel has the following areas:
| Area | Description |
|---|---|
| Sidebar menu | Pages of the Admin Panel, grouped by subject. Click a group, for example Roles, to expand it. The menu shows only the pages that you are allowed to open. |
| Top bar | From left to right: the button that collapses or expands the sidebar, the name of the current page, the search box that opens the command palette, the theme button, the notification bell, your user name and the sign-out button. |
| Content area | The page that you selected. Most pages show a table with a toolbar above it. |
| Footer | Product logo and the Keycyte PAM version. |
The sidebar menu contains the following items:
| Menu item | Description |
|---|---|
| Dashboard | Overview of resources, sessions, password health and alerts. See Dashboard. |
| Servers | Systems that users connect to. See Servers. |
| Password Vault | Privileged accounts and other secrets. See Password Vault. |
| Users | Keycyte PAM user accounts. See Users. |
| Roles | Server Roles, Password Roles and User Roles. See Roles. |
| Sessions | Active Sessions, Session History, Command History and File History. See Sessions. |
| Discovery | Discovery templates. Shown to MASTER users only. See Discovery. |
| Access Control | Resource Rules and Command Filters. Command Filters is shown to MASTER users only. See Access Control. |
| Password Policy | Password policies for vault accounts. See Password Policies. |
| Password Generator | Generates a random password according to the options that you select. |
| Reports | Account and Session reports. See Reports. |
| Logs | Client, System, Access, Access Control and Password Manager logs. See Logs. |
| Settings | System settings. Shown to MASTER users only. See Settings. |
Common Table Operations
Most pages that list objects work the same way:
- Search Keyword in the toolbar filters the rows that are already loaded as you type.
- Advanced Filter (filter icon) opens a dialog with field-level filters. Clear Filters (crossed-out filter icon) removes them.
- Export to Excel (Excel icon) downloads the rows that match the current search and filter.
- Click a column header to sort by that column.
- Select the check boxes at the start of rows to show the bulk actions for the selected rows, for example Delete Selected.
Command Palette
The command palette lets you jump to a page by typing part of its name.
To open a page from the command palette:
- Press Ctrl+K (on macOS, ⌘K), or click the Search pages, settings, reports… box in the top bar.
- Type one or more words of the page name or group, for example
session history. - Use the arrow keys to select a result and press Enter, or click the result.
To close the palette without opening a page, press Esc.
The palette offers only the pages that your permissions allow. It lists the main pages of the menu and the following settings pages: General, Connection, Web TLS Certificate, Authentication, Permission Profiles, Reporting, Notification, Syslog Settings and License. Other settings pages are reached from the Settings menu.
Notification Bell
The bell in the top bar shows access requests that are waiting for a decision. A red badge on the bell shows how many requests are pending. The list refreshes every 60 seconds and each time you open it.
The bell is shown only to administrators who have the Edit permission for Resource Rules. You see the requests for the servers and accounts that you own.
To approve or reject an access request from the bell:
-
Click the bell. The Notifications panel opens and lists the requests under Access Permission Requests.
Each request shows whether it is for a Server or an Account, the requesting user, the requested Start Date and End Date, the time of the request and the Reason that the user entered.
-
Click Approve or Reject.
For details, see Access Requests.
Color Theme and Language
To switch between the dark and the light theme, click the sun or moon icon in the top bar. The theme is saved in your user profile and applies the next time you sign in. New accounts use the dark theme.
The interface language (English or Turkish) is also saved per user. You can change it in the Client Panel settings; a MASTER can also change it in Settings > General.
Administrator Types
Keycyte PAM has two kinds of administrator accounts: MASTER and ADMIN. A user account becomes an administrator account when it has the MASTER or the ADMIN role. Roles are assigned on the Users page; for details, see User Types and Roles.
MASTER and ADMIN
| MASTER | ADMIN | |
|---|---|---|
| Which pages are visible | Every page of the Admin Panel. | Only the pages for which one of the account’s permission profiles grants the View permission. |
| Which actions are allowed | All actions. | Only the actions (Add, Edit, Delete) that the account’s permission profiles grant for each module. |
| Which objects are visible | All objects. | Only the objects that the ADMIN owns: servers, password vault accounts, users, roles, password policies and access requests for which the ADMIN is listed as an owner. |
| MASTER-only areas | Available. | Not available. |
| Managing administrator accounts | Can create and change MASTER and ADMIN accounts and assign permission profiles. | Cannot create, change or delete MASTER or ADMIN accounts, and can assign only the USER and SERVICE roles. |
Note
Ownership limits what an ADMIN sees, and permission profiles limit what an ADMIN can do with it. For example, an ADMIN with the Delete permission for Servers can delete only the servers that the ADMIN owns. When an ADMIN creates an object such as a server, a user or a password policy, the ADMIN is added as its owner. Owners are changed with the Change Owners dialog on each page; for servers, see Managing Servers.
If an account has both an administrator role and the USER role, the user chooses between Admin Panel and Client Panel after signing in.
MASTER-Only Areas
The following areas are available only to MASTER accounts. Permission profiles cannot grant access to them.
- Discovery
- Access Control > Command Filters
- Everything under Settings, including Permission Profiles, Recycle Bin, Tags and License
Permission Profiles
A permission profile is a named set of permissions. For each module of the Admin Panel, a profile holds four flags: View, Add, Edit and Delete. MASTER accounts are never restricted by profiles.
Every ADMIN account must have at least one permission profile. When an ADMIN has several profiles, their permissions are combined: an action is allowed if any of the profiles allows it.
A module’s Add, Edit or Delete permission also implies its View permission.
The following modules can be granted. Modules marked as view-only have only the View flag.
| Group | Modules |
|---|---|
| Overview | Dashboard (view-only) |
| Resources | Servers, Password Vault, Users |
| Roles | Server Roles, Password Roles, User Roles |
| Sessions | Active Sessions, Session History, Command History, File History |
| Security | Resource Rules, Password Policy, Password Generator (view-only) |
| Reports | Reports |
| Logs | Client, System, Password Manager, Access, Access Control |
For the settings page itself, see Permission Profiles.
Keycyte PAM creates a system profile named Full Admin that grants every permission in every module. It is assigned to existing ADMIN accounts when profiles are first introduced. System profiles cannot be edited or deleted.
Creating a Permission Profile
To create a permission profile:
-
Select Settings > Permission Profiles.
-
Click Add.
-
Enter a Name and, optionally, a Description.
-
Set the permissions in the module matrix. Select or clear the check box of each action for each module. You can also use the preset buttons:
Button Result Read-only Grants only View in every module. Full access Grants every available action in every module. Clear Removes every permission. -
Click Save.
The profile appears in the list. The Modules column summarizes how many modules grant each action, and Assigned Users shows how many users hold the profile.
To assign the profile to an ADMIN account, open the user on the Users page and select the profile in Permission Profiles. For details, see Adding Users.
Deleting a Permission Profile
A profile that is assigned to users cannot be deleted. Remove the profile from those users first, then delete it on the Settings > Permission Profiles page.
Dashboard
The Dashboard is the first page that opens after you sign in. It gives an overview of the objects that you manage, the current session activity and the health of the stored passwords.
To open it, click Dashboard in the menu. An ADMIN needs the View permission for Dashboard. For an ADMIN, the counts, charts and session lists cover only the objects that the ADMIN owns; Active Users, Resources and System Information are not filtered.
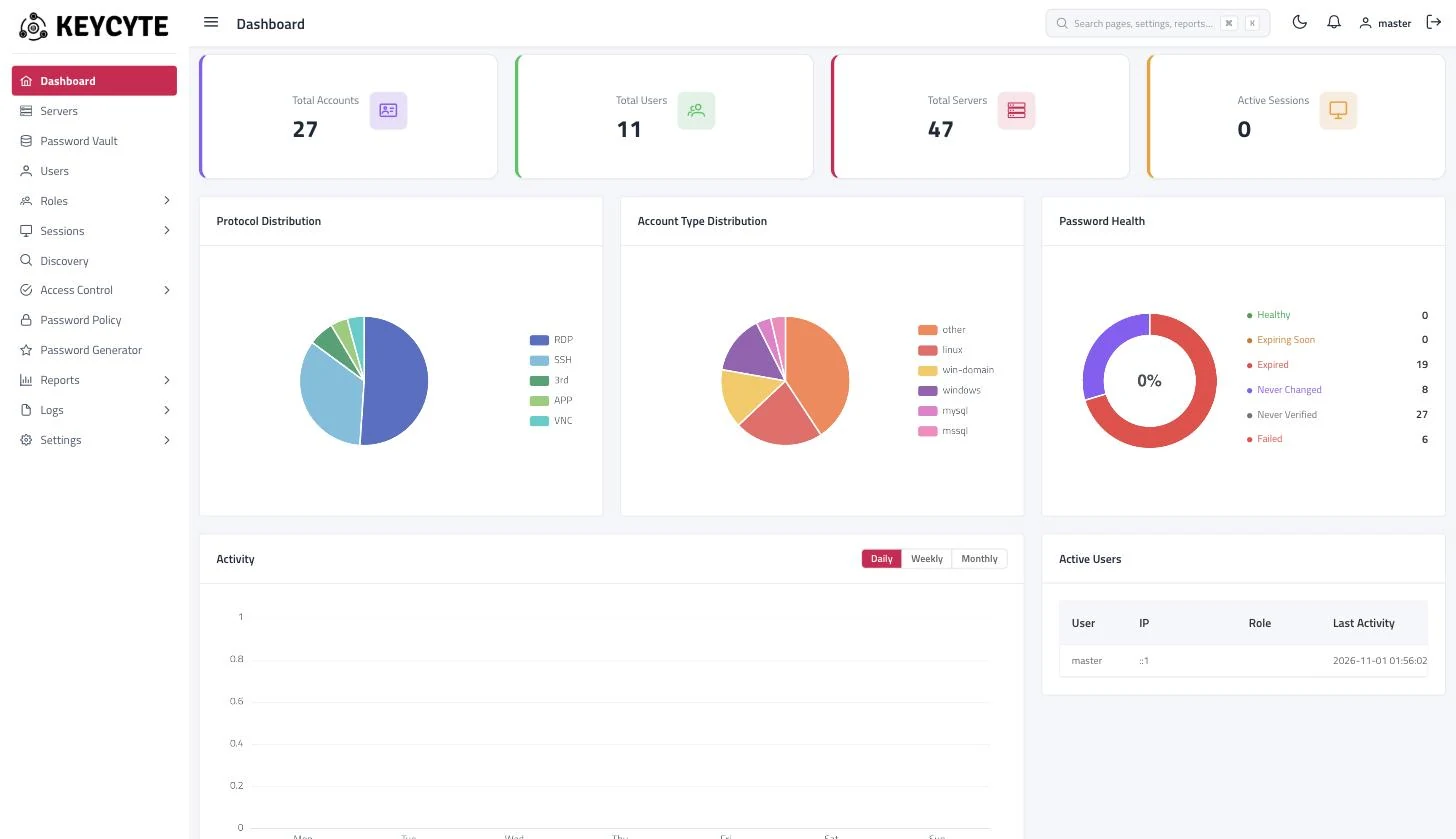
Dashboard Widgets
| Widget | Description |
|---|---|
| Total Accounts, Total Users, Total Servers, Active Sessions | Number of password vault accounts, users, servers and sessions that are open now. |
| Protocol Distribution | Servers grouped by connection protocol. |
| Account Type Distribution | Password vault accounts grouped by account type. |
| Password Health | Password vault accounts grouped by password state: Healthy, Expiring Soon (the password expires within 7 days according to its password policy), Expired, Never Changed, Never Verified and Failed (the last verification failed). |
| Activity | Number of sessions over time. Select Daily (last 7 days), Weekly (last 4 weeks) or Monthly (last 12 months). |
| Active Users | Users who are signed in to Keycyte PAM now, with their role and last activity. |
| Recent Sessions | The latest sessions with user, server address, protocol and duration. |
| Security Alerts | Recent failed sign-in attempts, the number of expired passwords and the number of accounts whose verification failed. |
| Resources | CPU, memory and disk usage of the Keycyte PAM host. |
| System Information | Host name, IP address, uptime, manufacturer and version of the Keycyte PAM host. |
| Quick Access | Shortcuts to Add Server, Add User, View Logs and Generate Password. Each shortcut is shown only if you have the permission it needs. |
Tip
Accounts that appear as Expired or Failed in Password Health usually need attention: check the password policy and the result of the last password change in Password Vault. For details, see Changing Passwords.
Servers
A server is an entry for a system that users connect to through Keycyte PAM: a Windows or Linux host, a network device, a published application, a web application, a database or a Kubernetes pod. Each server has one connection protocol.
A server alone does not let anyone connect. To connect, a user needs:
- A server role that contains the server and authorizes the user. See Server Roles.
- A password vault account that is linked to the server, and a password role that contains the account and authorizes the user. See Adding Accounts and Password Roles.
To open the server list, select Servers in the menu. An ADMIN sees only the servers that the ADMIN owns.
This section contains the following topics:
| Topic | Description |
|---|---|
| Adding Servers | Creating a server and filling in its common settings. |
| Connection Protocols | The supported protocols and what each one needs. |
| Connection Settings | Protocol-specific options such as RDP security, keyboard layout and database name. |
| Managing Servers | Editing, cloning, deleting, owners, tags, bulk port change, filters and export. |
Adding Servers
Add a server for each system that users should reach through Keycyte PAM. You can also create servers in bulk with discovery templates; see Discovery.
Before you begin:
- You need the Add permission for Servers (a MASTER has it by default).
- For 3rd Party and WEBAPP servers, a MASTER must first define the jump server, and the application or web application script, in Settings > Connection. The lists for these fields are filled only for MASTER users.
- If you want to assign the server to roles while you create it, create the server roles first. You can also add the server to roles later.
To add a server:
-
Select Servers in the menu.
-
Click Add in the toolbar. The Server Details panel opens.
-
In Protocol, select the connection protocol. Port is set to the default port of the protocol. For the list of protocols, see Connection Protocols.
-
Fill in the common fields:
Field Description Protocol Connection protocol. Default: RDP.Name Display name of the server, shown to users in the Client Panel. Required. Address Host name or IP address of the target, for example 10.0.0.10orsrv01.example.com. Required.Port TCP port of the target service. Filled in from the protocol; change it if the service listens on another port. Manager User A privileged password vault account that Keycyte PAM uses to manage accounts on this server: changing passwords of local Windows accounts, the operations of the password policy that run before and after a connection, and the Details view. If you leave it empty, Keycyte PAM uses the service account of a configured LDAP directory where one applies. Tags Descriptive labels for grouping and filtering. Tags do not grant access. Roles Server roles that the server is added to. Description Free-text note. Clipboard How line endings of copied text are converted: preserve(no change),unixorwindows.Duration (min) Maximum length of a session in minutes, from 0to1440. When the time is reached, the session is closed.0means no limit. A role schedule can end a session earlier.Command Command to run when the session starts. Used by SSH and KUBERNETES servers. For SSH, <USERNAME>and<PASSWORD>in the command are replaced with the credentials of the account used.TACACS+ Shared Secret Registers the server as a TACACS+ device for the Keycyte TACACS+ server. The secret is never shown again after saving; leave the field empty when editing to keep the current secret. -
Fill in the fields that the selected protocol adds. For details, see Connection Settings.
-
Click Save.
The server appears in the list. If you are an ADMIN and did not select owners, you are recorded as the owner of the server.
Next Steps
- Link password vault accounts to the server. See Adding Accounts.
- Make sure that a server role contains the server and authorizes the users who need it. See Server Roles.
Connection Protocols
Every server has exactly one connection protocol. The protocol decides how Keycyte PAM connects to the target, which port is used by default and which additional settings the server has.
| Protocol (value in the list) | Default port | Typical target |
|---|---|---|
RDP (RDP) | 3389 | Windows desktop or server. |
SSH (SSH) | 22 | Linux or Unix host, network device. |
VNC (VNC) | 5900 | Host with a VNC server. |
Telnet (TELNET) | 23 | Legacy network device or host. |
RemoteApp (APP) | 3389 | A single Windows application published from a Windows host. |
Web Application (WEBAPP) | 443 | A web application opened in a browser on a jump server. |
3rd-party application (3rd) | 443 | A desktop application started on a jump server. |
MySQL (MYSQL) | 3306 | MySQL or MariaDB database. |
MSSQL (MSSQL) | 1433 | Microsoft SQL Server database. |
PostgreSQL (POSTGRESQL) | 5432 | PostgreSQL database. |
Kubernetes (KUBERNETES) | 8080 | A container in a Kubernetes pod. |
RDP
Connects to a Windows host over the Remote Desktop Protocol. Use password vault accounts of the Windows or Windows Domain type. For a domain account, the domain of the account is sent to the target.
RDP servers have the most connection options: security mode, keyboard layout, color depth and display features. The Details button in the server list shows the local users and Windows services of an RDP server.
SSH
Connects to a host over SSH and opens a terminal. Use Linux accounts. An account can authenticate with a password or with a private key and passphrase. A Linux account can switch to a root account automatically after login (Su/Sudo); for details, see Adding Accounts.
Command runs the given command instead of an interactive shell.
VNC
Connects to a VNC server and shows its desktop. The password of the selected account is used as the VNC password. The only protocol-specific option is Cursor.
Telnet
Opens a Telnet terminal. Telnet has no standard login exchange, so Keycyte PAM detects the login prompts with regular expressions: set Username Regex and Password Regex to patterns that match the prompts of the target, and Keycyte PAM types the account’s user name and password when they appear.
RemoteApp (APP)
Connects to a Windows host over RDP and shows a single published application instead of the full desktop. Set App Name to the RemoteApp program name published on the host; you can also set Working Directory and App Args. The RDP display options also apply. The Details button in the server list is available for RemoteApp servers too.
Web Application (WEBAPP)
Opens a web application in a browser that runs on a jump server, and fills in the login form with the account’s credentials.
A WEBAPP server needs:
- Jump Server: the host that runs the browser. A Windows jump server is reached over RDP and the browser is started as a RemoteApp; a Linux jump server is reached over VNC.
- Script: the web application script that drives the login.
- Username Id and Password Id: identifiers of the user name and password fields of the login form.
Jump servers and web application scripts are defined by a MASTER in Settings > Connection. See Connection Settings.
3rd-Party Application (3rd)
Starts a desktop application, for example a database console or a vendor management tool, on a jump server over RDP RemoteApp. Select the Jump Server and the 3rd Party application. Both are defined by a MASTER in Settings > Connection.
If the application saved on a server no longer exists, the server cannot connect and the edit panel shows a warning; select the application again.
MySQL, MSSQL and PostgreSQL
Open a terminal session that runs the command-line client of the database with the credentials of the selected account and the database in Database:
| Protocol | Client |
|---|---|
| MYSQL | mysql |
| MSSQL | sqlcmd |
| POSTGRESQL | psql |
Use password vault accounts of the matching type (MySQL, MSSQL or PostgreSQL).
Kubernetes
Opens a terminal in a container of a Kubernetes pod through the Kubernetes API. Set Namespace, Pod and, if the pod has several containers, Container. Command sets the command that is executed in the container.
If the API server uses TLS, select Use SSL and paste the Client Certificate, Client Key and CA Certificate in PEM format. Ignore Certificate skips verification of the API server certificate.
Warning
Ignore Certificate disables verification of the Kubernetes API server certificate. Use it only for testing.
Connection Settings
The Server Details panel shows additional fields depending on the selected Protocol. This topic lists them. For the fields that every protocol has, see Adding Servers.
The following table shows which groups of fields appear for which protocol:
| Field group | RDP | APP | 3rd | WEBAPP | VNC | TELNET | MYSQL, MSSQL, POSTGRESQL | KUBERNETES |
|---|---|---|---|---|---|---|---|---|
| Security, Color | Yes | |||||||
| Keyboard | Yes | Yes | Yes | |||||
| Resize Method | Yes | Yes | Yes | Yes | ||||
| RDP display check boxes | Yes | Yes | Yes | |||||
| RemoteApp fields | Yes | |||||||
| Jump Server | Yes | Yes | ||||||
| 3rd Party | Yes | |||||||
| Web application fields | Yes | |||||||
| Cursor | Yes | |||||||
| Username Regex, Password Regex | Yes | |||||||
| Database | Yes | |||||||
| Kubernetes fields | Yes |
RDP Options
| Field | Description |
|---|---|
| Security | Security mode for the RDP connection: Any (negotiated with the server), NLA, TLS or RDP. Default for a new server: Any. |
| Keyboard | Keyboard layout of the remote session: English (US), Turkish (Q), German, French, Italian, Spanish, Portuguese (BR) or Japanese. Default for a new server: English (US). |
| Color | Color depth: Default, 8-bit, 16-bit, 24-bit or 32-bit. |
| Resize Method | What happens when the user resizes the browser window: Display Update (the remote desktop is resized in place) or Reconnect (the session reconnects with the new size). Default behaves as Display Update. |
The following check boxes turn features on for RDP, APP and 3rd servers. All are cleared by default.
| Check box | Description |
|---|---|
| Disable Auth | Disables authentication at the RDP level. |
| Wallpaper | Shows the desktop wallpaper. |
| Theme | Enables Windows visual themes. |
| Animations | Enables menu animations. |
| Font Smoothing | Enables font smoothing (ClearType). |
| Compositions | Enables desktop composition effects. |
| Window-Drag | Shows window contents while a window is dragged. |
| Disable GFX | Turns off the RDP graphics pipeline extension. Try this if the session shows display problems. |
| Console | Connects to the console (administrative) session of the Windows host. |
Tip
Visual features increase bandwidth use. Leave Wallpaper, Theme, Animations, Compositions and Window-Drag cleared unless users need them.
Note
Audio redirection is turned off for browser sessions.
RemoteApp (APP) Options
APP servers use the Keyboard, Resize Method and RDP check box fields, and the following:
| Field | Description |
|---|---|
| App Name | RemoteApp program to start on the host. |
| Working Directory | Working directory of the program. Optional. |
| App Args | Command-line arguments of the program. Optional. |
3rd Party Options
3rd servers use the Keyboard, Resize Method and RDP check box fields, and the following:
| Field | Description |
|---|---|
| Jump Server | Jump server on which the application runs. |
| 3rd Party | Application to start. Applications are defined in Settings > Connection. |
Web Application (WEBAPP) Options
| Field | Description |
|---|---|
| Jump Server | Jump server on which the browser runs. |
| Script | Web application script that performs the login. Scripts are defined in Settings > Connection. |
| Username Id | Identifier of the user name field on the login page. |
| Password Id | Identifier of the password field on the login page. |
| Disable Kiosk Mode | Opens the browser in normal mode instead of kiosk mode. |
Note
When a 3rd or WEBAPP server connects through a jump server, Keycyte PAM always uses the Display Update resize method.
VNC Options
| Field | Description |
|---|---|
| Cursor | How the mouse cursor is drawn: Default, Local (drawn by the browser) or Remote (drawn by the VNC server). |
Telnet Options
| Field | Description |
|---|---|
| Username Regex | Regular expression that matches the user name prompt of the target, for example [Ll]ogin:. When the prompt appears, Keycyte PAM sends the account’s user name. |
| Password Regex | Regular expression that matches the password prompt, for example [Pp]assword:. When the prompt appears, Keycyte PAM sends the account’s password. |
Database Options
| Field | Description |
|---|---|
| Database | Name of the database to open. Used by MYSQL, MSSQL and POSTGRESQL servers. |
Kubernetes Options
| Field | Description |
|---|---|
| Namespace | Namespace of the pod. The placeholder shows default. |
| Pod | Name of the pod. |
| Container | Name of the container. Optional when the pod has one container. |
| Use SSL | Connects to the Kubernetes API over TLS and shows the certificate fields below. |
| Client Certificate | Client certificate in PEM format. |
| Client Key | Private key of the client certificate in PEM format. |
| CA Certificate | CA certificate that signed the API server certificate, in PEM format. |
| Ignore Certificate | Skips verification of the API server certificate. |
For Kubernetes servers, Command sets the command executed in the container.
Managing Servers
The Servers page lists the servers that you can manage. A MASTER sees all servers; an ADMIN sees only the servers that the ADMIN owns.
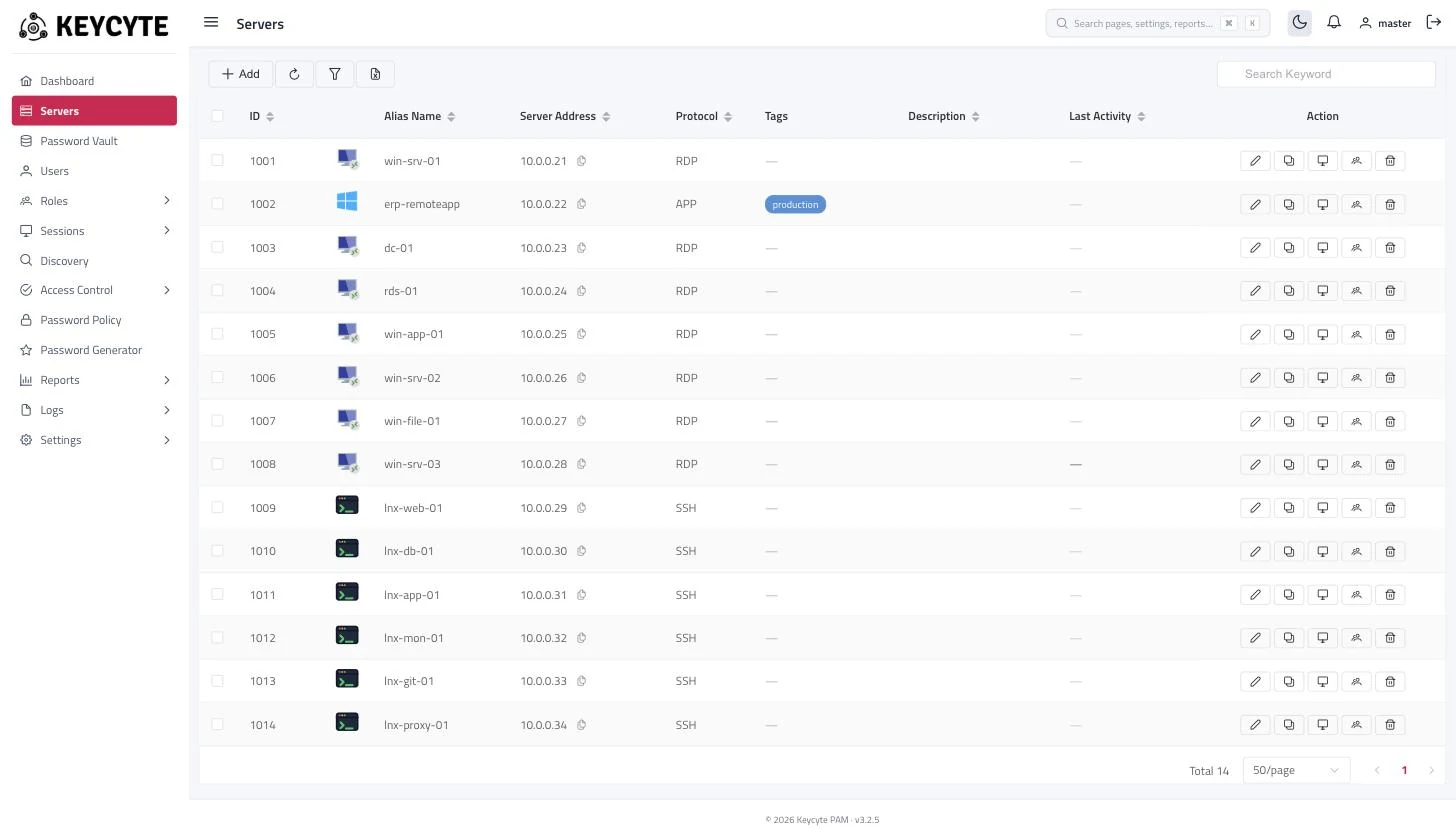
Server List
| Column | Description |
|---|---|
| ID | Internal ID of the server. |
| (icon) | Connection protocol. |
| Alias Name | Name of the server. |
| Server Address | Address of the target. Click the copy icon to copy the address to the clipboard. |
| Protocol | Connection protocol. |
| Tags | Tags of the server. |
| Description | Free-text note. |
| Last Activity | When a user last connected to the server. Recent times are shown as relative values, for example 5m ago; point to the value to see the exact time. |
| Action | Edit, Clone, Details, Server Owners and Delete buttons. Buttons that need a permission you do not have are hidden. |
Editing a Server
To edit a server:
- In the server list, click Edit (pencil icon) in the row of the server.
- Change the fields in the Server Details panel. For the fields, see Adding Servers and Connection Settings.
- Click Save.
You need the Edit permission for Servers.
Cloning a Server
Cloning creates a new server with the same settings, roles and connection options as an existing one. Use it to add many similar servers.
To clone a server:
- Click Clone in the row of the server. The Server Details panel opens with a copy of the settings. The name gets the suffix
(Copy). - Change at least Name and Address.
- Click Save.
You need the Add permission for Servers. Tags are not copied.
Viewing Server Details
For RDP and APP servers, Details (monitor icon) opens a page that lists the Local Users and Service Accounts (Windows services) of the host. For a service you can see its logon account and start or stop it; starting and stopping needs the Edit permission for Servers.
Keycyte PAM reads this information through its password manager service with the server’s Manager User. If the service cannot be reached, the page shows Password manager service not running. For other protocols, Details shows Detail view is not supported for this protocol.
Changing Server Owners
Owners are the ADMIN and MASTER accounts that manage a server. An ADMIN sees and manages only the servers that the ADMIN owns. Owners of a server also receive its access requests and connection notifications.
To change the owners of one server:
- Click Server Owners (users icon) in the row of the server. The Change Owners dialog lists the administrator accounts.
- Select the check boxes of the accounts that should own the server and clear the others.
- Click Save.
To set the same owners on several servers, select the servers in the list, click Server Owners in the toolbar, select the owners and click Save.
Important
The selection replaces the current owners of each server; it is not added to them. If you select no account, the owners are not changed.
An ADMIN sees only the administrator accounts that the ADMIN manages in this dialog.
Changing the Port of Several Servers
To set the same port on several servers:
- Select the servers in the list.
- Click Change port for selected (pencil icon) in the toolbar.
- Enter the new Port, a number from 1 to 65535.
- Click Apply.
A message shows how many servers were updated. Servers that you are not allowed to change are counted as forbidden and are not changed.
Tagging Servers
Tags are descriptive labels that help you group and filter servers. They do not grant access to anything; access is governed by roles.
To tag a server, open it with Edit, select one or more tags in Tags and click Save. Tags are created and merged by a MASTER in Settings > Tags.
Deleting Servers
To delete a server, click Delete (trash icon) in its row and confirm. To delete several servers, select them and click Delete Selected in the toolbar.
Warning
Deleting a server is permanent. The server is removed from all roles, its links to password vault accounts and its owners are removed, and its tags are detached. The password vault accounts themselves are not deleted.
You need the Delete permission for Servers.
Searching and Filtering Servers
Search Keyword in the toolbar filters the list by name, address, protocol and description as you type.
To filter by more fields:
-
Click Advanced Filter (filter icon) in the toolbar.
-
Fill in one or more fields:
Field Description Protocol One or more protocols. Alias Part of the server name. Address Part of the address. Port Port number. Description Part of the description. Manager User Servers that use one of the selected manager users. Roles Servers that belong to one of the selected server roles. Tags Servers that have the selected tags. Select Match all selected tags to require every selected tag instead of any of them. Not Assigned to Any Role Servers that are in no server role. No Password Vault Servers that no password vault account is linked to. -
Click Filter.
To remove the filter, click Clear Filters.
Exporting the Server List
Click Export to Excel (Excel icon) in the toolbar. The file contains the ID, Alias, Address, Port, Protocol and Description of every server that matches the current search and filter.
Password Vault
The password vault stores the privileged accounts that Keycyte PAM uses to log users in to servers, and other secrets such as certificates, API keys and secure notes. Every entry is stored encrypted. Users of the Client Panel connect with vault accounts without seeing their passwords, unless a password role allows them to copy the password.
To open the vault, select Password Vault in the menu. A MASTER sees all entries; an ADMIN sees only the entries that the ADMIN owns, with the permission level that is set for the ADMIN on each entry.
This section contains the following topics:
| Topic | Description |
|---|---|
| Account Types | The account and secret types and which of them Keycyte PAM can rotate. |
| Adding Accounts | Creating an entry, linking it to servers, the main account of a Windows service, Su/Sudo escalation and owners. |
| Changing Passwords | Changing, setting and verifying passwords, password history and bulk changes. |
| Recycle Bin | Restoring deleted entries or deleting them permanently. |
Account Types
Every password vault entry has a type. The type decides which fields the entry has and whether Keycyte PAM can change its password on a target system.
The types fall into two groups:
- Account types describe a login on a target system. Most of them can be linked to servers, assigned a password policy and rotated.
- Secret types are store-only. They have no target system to which a new value could be pushed, so they cannot be linked to servers, cannot have a password policy and are never rotated.
Account Types
| Type | Use | Password change on the target |
|---|---|---|
| Windows Domain | Active Directory account. The entry has a Domain field. | Yes. |
| Windows | Local account of a Windows host. | Yes. |
| Linux | Account of a Linux or Unix host or network device. Can hold a private key and passphrase, and can switch to a root account after login (Su/Sudo). | Yes. |
| MySQL | MySQL or MariaDB account. | Yes. |
| PostgreSQL | PostgreSQL account. | Yes. |
| MSSQL | Microsoft SQL Server account. | Stored and used for connections. |
| Windows Service | Logon account of a Windows service on one server. Linked to a main account. | Indirectly: when the password of the main account changes, Keycyte PAM updates the logon password of the service on its server. The entry itself cannot be changed directly. |
| Other | Any other account. | Stored and used for connections. |
Password changes on target systems are carried out by the Keycyte PAM password manager service (keycyte-password-manager). Only the Windows Domain, Windows, Linux, MySQL and PostgreSQL types are changed by the automatic password rotation of a password policy. For details, see Configuring Password Policies.
Secret Types
| Type | Primary secret | Additional fields |
|---|---|---|
| Certificate | Certificate file (.pem, .crt, .cer) and private key file (.pem, .key). Both are required. | Issuer, Valid From, Valid Until, Thumbprint, Key Algorithm, SAN. Filled in automatically when the certificate is uploaded. |
| PFX Bundle | PFX/PKCS#12 file (.pfx, .p12) and its Passphrase. Both are required. | Bundle Format (PKCS#12 (.pfx/.p12) or JKS), Valid Until, Thumbprint. Filled in automatically when the file and passphrase are entered. |
| API Key / Token | The token, in Password. | Token Type (Bearer, Basic, PAT, Custom), Endpoint URL, Key ID, Scopes, Expiry. |
| TOTP Secret | The TOTP seed, in Private Key. | Issuer, Account Label, Digits (6–10), Period (seconds) (15–300), Algorithm (SHA-1, SHA-256, SHA-512). |
| License Key | The license key, in Password. | Product, License Expiry. |
| Connection String | The connection string or DSN, in Password. | None. |
| Secure Note | The note text, in Note Body. | Format (Plain text or Markdown). |
| SSH Key (Standalone) | Private key, in Private Key, with an optional Passphrase. | Key Label. |
Uploaded files can be up to 8 MB.
Note
Secret types are useful for credentials that applications retrieve through the Secrets API. For details, see Secrets API.
Adding Accounts
Add a password vault entry for each privileged account that users connect with, and for each secret that you want to keep in Keycyte PAM.
Before you begin:
- You need the Add permission for Password Vault.
- Add the servers that the account is used on. See Adding Servers.
- If the account should be rotated, create a password policy. See Configuring Password Policies.
Adding an Account
To add an account:
-
Select Password Vault in the menu.
-
Click Add in the toolbar. The Account panel opens.
-
In Type, select the account or secret type. The panel shows the fields of the selected type. For the types, see Account Types.
-
Fill in the fields:
Field Shown for Description Type All Type of the entry. Default: Other. Name All Display name of the entry. Required. Main Account Windows Service The account whose password the service uses. See Windows Service Accounts. Service Name Windows Service Name of the Windows service. Policy Account types except Windows Service Password policy of the account. The policy defines the complexity of generated passwords and whether the password is changed automatically. Domain Windows Domain Domain of the account, for example example.com.Username All User name of the account. Password All types except Certificate and PFX Bundle Current password of the account. For Secure Note this field is Note Body. Shown only when you create the entry; afterwards the password is changed with the password change actions. Private Key Linux, SSH Key (Standalone) Private key for key-based SSH login. Shown only when you create the entry. Passphrase Linux, Certificate, SSH Key (Standalone), PFX Bundle Passphrase of the private key or bundle. Shown only when you create the entry. Tags All Descriptive labels for grouping and filtering. Roles All types except Windows Service Password roles that the entry is added to. Servers Account types except Windows Service Servers that the account can be used on. See Linking an Account to Servers. Server Windows Service The Windows server on which the service runs. Description All Free-text note. Secret types have additional fields, such as Valid Until for a certificate. See Account Types.
-
For a Linux account, optionally configure Su/Sudo escalation. See Su/Sudo Escalation.
-
Click Save.
The entry appears in the list. Its password is shown masked; nobody can read it from the list.
Note
For Certificate and PFX Bundle entries, upload the files with the select buttons in the panel. When you edit such an entry later, the stored files are kept unless you upload new ones.
Linking an Account to Servers
An account can be used for a connection only on the servers it is linked to. Select the servers in Servers. The list also offers shortcuts:
- All protocol servers, for example All RDP servers, adds every server of that protocol that you can see.
- A server role (marked Role) adds every server of the role that you can see.
Shortcuts add the servers as they are at that moment. Servers added to the protocol or role later are not linked automatically. Select All adds every server that matches the current search text; Clear removes them.
To connect with the account, a user also needs a password role that contains the account and a server role that contains the server. See Password Roles and Server Roles.
Windows Service Accounts
A Windows Service entry represents the logon account of one Windows service on one server. It is not used for connections; it keeps the service working when a password changes.
To add a Windows service account:
- Add the account that the service runs as (the main account) as a Windows, Windows Domain or Linux entry.
- Add a new entry with Type set to Windows Service.
- In Main Account, select the main account.
- In Service Name, enter the name of the Windows service.
- In Server, select the Windows server on which the service runs.
- Click Save.
When the password of the main account is changed on the target, Keycyte PAM also changes the logon password of the service on the selected server, and records the result in the service entry. If that update fails, the service entry keeps its previous password and its status shows the error.
Su/Sudo Escalation
A Linux account can switch to a root account automatically after it logs in. Use this when users must log in with a personal or non-privileged account but need root privileges on the target.
To configure escalation, in the Su/Sudo section of a Linux entry:
-
Turn on the Su/Sudo switch.
-
In Escalation Method, select how to switch: sudo su -, su -, sudo su, su, enable (Cisco), super (Huawei) or super level-15 (H3C). If no method is selected, sudo su - is used.
-
In Root Account, select the vault entry of the root account. Only other Linux entries are listed.
-
Click Save.
The SSH proxy switches to the root account with the selected method after the login, using the password of the root account.
Account Owners and Permission Levels
Owners are the administrator accounts that manage an entry. An ADMIN sees only the entries that the ADMIN owns, and each owner has a permission level on the entry:
| Level | What the owner can do |
|---|---|
view | See the entry in the list and its history. |
modify | Also edit the entry, change and verify its password. |
full_access | Also copy the password, private key and passphrase, copy passwords from the history, retry a skipped self change, and delete the entry. |
A MASTER always has full access. The actions also require the matching permission profile flag, for example Edit for Password Vault to change a password.
To change the owners of an entry:
- Click the action menu (…) in the row of the entry and select Owners.
- In the Change Owners dialog, select the administrator accounts that should own the entry and set the Permission level of each.
- Click Save.
To set owners on several entries, select them and click Password Owners (users icon) in the toolbar.
Changing Passwords
Keycyte PAM can change the password of a vault account on the target system, or only update the password that is stored in the vault. You start these actions from the action menu (…) at the end of each row on the Password Vault page.
Before you begin, make sure that:
- You have the Edit permission for Password Vault.
- As an ADMIN, your permission level on the entry is
modifyorfull_access. See Adding Accounts. - To change a password on the target, the account type supports it (Windows Domain, Windows, Linux, MySQL or PostgreSQL) and the server has a working privileged account where one is needed. See Account Types.
Account Action Menu
| Action | Description |
|---|---|
| Edit | Opens the entry for editing. |
| Password Copy | Copies the password to the clipboard. Needs full_access. |
| Private Key Copy, Passphrase Copy | Copy the private key or passphrase of a Linux account. Need full_access. |
| Change Password | Generates a new password and changes it on the target. |
| Manual Change | Sets a password that you enter, in the vault only or also on the target. |
| Verify | Checks that the stored password works on the target. |
| Retry self change | Shown when a self change is skipped for the account. Needs full_access. |
| History | Shows previous passwords. |
| Owners | Changes the owners of the entry. |
| Delete | Moves the entry to the recycle bin. Needs full_access and the Delete permission. |
Note
A copied secret is cleared from the clipboard after 20 seconds, unless you have copied something else in the meantime. Every copy is logged.
Changing a Password on the Target
Change Password generates a new password that matches the account’s password policy, changes it on the target and stores it in the vault.
The account must have a password policy with a Length greater than 0.
To change a password on the target:
- On the Password Vault page, click … in the row of the account and select Change Password.
- Confirm Auto change password on target?.
Keycyte PAM changes the password and then logs in to the target with the new password before it stores it. The vault is updated only if this check succeeds. If the account is the main account of Windows service entries, the logon password of each service is also updated.
How the password is changed (by the account itself or reset with a privileged account) is set by Change Method in the password policy. For details, see Configuring Password Policies.
Setting a Password Manually
Use Manual Change when you know the new password, for example after the password was changed outside Keycyte PAM.
To set a password manually:
- Click … in the row of the account and select Manual Change.
- Enter the password in New Password and again in Retry Password.
- Select Change on Targets to also change the password on the target system. Clear it to update only the password stored in the vault.
- Click Change.
The new password must differ from the current password and must not be one of the previous passwords of the account. With Change on Targets, the password must also meet the requirements of the account’s password policy, and the account type must support password change.
Important
Without Change on Targets, only the vault is updated. Use this option only when the target already has the new password; otherwise connections with the account will fail.
Verifying a Password
Verify logs in to the target with the stored password and records the result. Use it to find accounts whose password was changed outside Keycyte PAM.
To verify a password, click … in the row of the account and select Verify. The result is shown in a message and recorded in the Password Manager log.
While a password change for the account is in progress, verify again after it finishes.
Retrying a Self Change
With the default change method, an account first tries to change its own password. If that fails for a lasting reason, for example because the target does not allow it, Keycyte PAM resets the account with the privileged account for the next 30 days instead of trying again. Such accounts show a Self change skipped tag next to their name; point to the tag to see until when and why.
To try the self change again before the 30 days end, click … in the row of the account and select Retry self change. The next rotation tries the self change again.
Viewing Password History
Every successful change adds a version to the password history of the account.
To view the history, click … in the row of the account and select History. The dialog lists previous versions with Version, Username and Change Date. To copy an earlier password, click the copy button in its row; this needs full_access.
Setting the Same Password on Several Accounts
To set the same password on several accounts:
- Select the accounts on the Password Vault page.
- Click Set password for selected (key icon) in the toolbar.
- Enter the password in New Password and Retry Password.
- Click Change.
The password is stored in the vault only; it is not changed on the targets. To change a password on a target, use Change Password or Manual Change for each account. A message shows how many accounts were updated; accounts that you are not allowed to change are counted as forbidden.
Finding Accounts by Status
To list accounts by the result of their last password operation, click Advanced Filter and select one or more values in Status: OK, Warning or Error. The same dialog filters by Name, Type, Servers, Roles, Tags, Password Policy and Description, and finds accounts that have no role (Not Assigned to Any Role), no server (Not Assigned to Any Server) or no policy (No Password Policy). Click Apply to filter.
Recycle Bin
When you delete a password vault entry, Keycyte PAM moves it to the recycle bin instead of deleting it at once. The entry stays restorable until its retention period ends; then it is deleted automatically.
The recycle bin is available only to MASTER users.
Warning
Deleting an entry does not change its password on the target system. The credential stays valid for the whole retention period. If an account must stop working, change or disable it on the target before you delete the entry.
Viewing the Recycle Bin
To open the recycle bin, select Settings > Recycle Bin.
| Column | Description |
|---|---|
| Name, Username, Type | The deleted entry. |
| Deleted By | Administrator who deleted the entry. |
| Deleted At | When the entry was deleted. |
| Expires In | Days left until the entry is deleted automatically, or Expired. |
No password is shown in the recycle bin. To reach the password of a deleted entry, restore it.
Restoring an Entry
To restore an entry:
- In Settings > Recycle Bin, click Restore in the row of the entry.
- Confirm the restore.
The entry returns to the password vault with its owners, servers, roles, tags and password history. If its original ID is still free, the entry gets it back, so access rules that referred to it apply again.
Deleting an Entry Permanently
To delete an entry permanently, click Delete Permanently in its row and confirm. This cannot be undone.
Changing the Retention Period
The retention period is set in Settings > General, in Recycle Bin Retention; see General Settings. The default is 30 days. A new value applies to entries deleted afterwards; entries already in the bin keep their original expiry.
Password Policies
A password policy defines how Keycyte PAM generates and changes the passwords of the vault accounts that use it:
- the complexity of generated passwords,
- whether and when passwords are changed automatically,
- how a password is changed (by the account itself or with a privileged account),
- operations on Windows and Active Directory accounts that run before a user connects and after the session ends, such as adding the account to a group only for the duration of the session.
A vault account uses at most one policy. You assign the policy on the account, or add accounts to the policy on the Password Policy page.
To open the page, select Password Policy in the menu. An ADMIN sees only the policies that the ADMIN owns.
This section contains the following topic:
| Topic | Description |
|---|---|
| Configuring Password Policies | Creating a policy, its options, and assigning accounts to it. |
Configuring Password Policies
Create a password policy for each group of accounts that should share the same password rules, then assign the accounts to it.
Before you begin, make sure that you have the Add permission for Password Policy. To assign accounts, you need the Edit permission.
Creating a Password Policy
To create a password policy:
-
Select Password Policy in the menu.
-
Click Add. The Password Policy dialog opens.
-
Fill in the general fields:
Field Description Name Name of the policy. Required. Age Maximum age of a password in days. When Auto Change is selected, a password older than this is changed automatically. A password that was never changed counts as due. 0turns off scheduled changes.Length Length of generated passwords. Must be greater than 0for Keycyte PAM to generate passwords.Exclude Char Characters that generated passwords must not contain, for example l1O0to avoid characters that are easy to confuse, or characters that a target system does not accept.Change Method How the password is changed on the target. See Change Methods. Default: Account itself first, then privileged reset. -
Under Password Complexity, select the character classes of generated passwords: Upper (A–Z), Lower (a–z), Digits (0–9) and Punctuation. If you select none, letters and digits are used.
-
Under Change and Permission, select the options that you need. See Automatic Change and Connection Operations.
-
Under Period, optionally restrict scheduled changes to a time window. See Change Period.
-
Click Save.
The policy appears in the list, which shows its Age, Length and the selected character classes.
Automatic Change
| Option | Description |
|---|---|
| Auto Change | Changes passwords automatically when they are older than Age. |
| Change After | Together with Auto Change: changes the password after a session that used the account ends. The change is skipped if another session still uses the account. |
Automatic changes apply to accounts of the following types only:
| Account type | Automatic change |
|---|---|
| Windows Domain | Yes |
| Windows | Yes |
| Linux | Yes |
| MySQL | Yes |
| PostgreSQL | Yes |
Accounts of other types can use a policy for the complexity of generated passwords, but are not changed automatically. Secret types such as certificates and API keys cannot have a policy.
How scheduled changes run:
- Keycyte PAM checks the accounts every minute. In a replicated installation, only the master node changes passwords.
- An account that is used by an active session is skipped and checked again later.
- Every change is verified by logging in to the target with the new password before the vault is updated.
- After a failed attempt, the next attempt for the account waits 5 minutes; the wait doubles after each further failure, up to 6 hours.
The results are recorded in the Password Manager log.
Change Methods
| Option | Description |
|---|---|
| Account itself first, then privileged reset | The account changes its own password with its current password. If that fails, the password is reset with the privileged account (the server’s Manager User or a directory service account). Default. |
| Always reset with privileged account | The password is always reset with the privileged account. |
| Account itself only | The account always changes its own password; a privileged account is never used. |
When the account changes its own password, the password rules of Active Directory or Windows apply and no privileged credential is needed. If an account cannot change its own password for a lasting reason, Keycyte PAM resets it with the privileged account for the next 30 days. You can end this early with Retry self change in the account’s action menu on the Password Vault page; see Changing Passwords.
Note
For a local account on a Windows host that is a member of a domain, Account itself first, then privileged reset goes directly to the privileged reset.
Connection Operations
The following options change the account on Windows hosts or in Active Directory for the duration of a session: the change is made before the user connects and undone after the session ends. Use them to keep privileged group memberships and enabled accounts to a minimum outside sessions.
| Option | Applies to | Before the connection | After the session |
|---|---|---|---|
| PC RDP Group | Windows, Windows Domain | Adds the account to the Remote Desktop users group of the target host. | Removes it. |
| PC Local Admin | Windows, Windows Domain | Adds the account to the local Administrators group of the target host. | Removes it. |
| DC RDP Group | Windows Domain | Adds the account to the Remote Desktop Users group on the domain controller. | Removes it. |
| Domain Admin | Windows Domain | Adds the account to the Domain Admins group. | Removes it. |
| Enable/Disable | Windows, Windows Domain | Enables the account. | Disables it. |
| Unlock | Windows Domain | Unlocks the account if it is locked out. | — |
Operations on a target host use the server’s Manager User. For Windows Domain accounts, the domain operations before the connection are skipped while another session already uses the account.
Change Period
By default, a due password is changed at the next check. To restrict scheduled changes to a time window, select Period and set:
| Field | Description |
|---|---|
| Period | Day, Week or Month. |
| Day | For Week: the day of the week (Mon to Sun). |
| Start Month | For Month: the day of the month (01 to 28). |
| Time | Time of day at which due passwords are changed. |
The Verify check box is also in this section.
Assigning Accounts to a Policy
You can assign a policy on the account itself (Policy field; see Adding Accounts) or from the policy list.
To add accounts to a policy:
- On the Password Policy page, expand the row of the policy. The Accounts list shows the accounts that use the policy.
- Click Add.
- Select the accounts. Use Search Keyword to find them.
- Click Save.
To remove an account from the policy, click the delete icon in its row in the Accounts list and confirm.
Tip
Search Keyword on the Password Policy page also searches the accounts of each policy and expands the policies that contain a match.
Changing Policy Owners
An ADMIN sees only the policies that the ADMIN owns. When an ADMIN creates a policy, the ADMIN is added as an owner. To change the owners, click Owners (users icon) in the row of the policy, select the administrator accounts in Change Owners and click Save.
Deleting a Policy
Before you delete a policy, assign its accounts to another policy or remove them from it. To delete a policy, click Delete in its row and confirm. You need the Delete permission for Password Policy.
Users
Every person or application that uses Keycyte PAM has a user account. The account’s type decides how the user authenticates; its roles decide which panel the user can sign in to.
To open the user list, select Users in the menu. A MASTER sees all users. An ADMIN sees only the users that the ADMIN owns, and cannot manage MASTER or ADMIN accounts.
This section contains the following topics:
| Topic | Description |
|---|---|
| User Types and Roles | Local, domain, RADIUS and Entra ID users, and the MASTER, ADMIN, USER and SERVICE roles. |
| Adding Users | Creating and editing users, resetting passwords, unlocking accounts, owners and shared resources. |
| Multi-Factor Authentication | Enabling authenticator, e-mail or SMS codes for users. |
| Syncing Domain Users | How domain users are created and kept up to date from the directory. |
| Service Identities | Machine accounts with the SERVICE role and their API keys. |
User Types and Roles
A Keycyte PAM user account has one type and one or more roles.
User Types
The type decides where the user’s password is checked.
| Type | Authentication | How the account is created |
|---|---|---|
| Local | The password is stored in Keycyte PAM. The local user password policy in Settings > General applies: complexity, expiry, lockout after failed attempts and password history. | An administrator creates it on the Users page. |
| Domain | The password is checked against an LDAP or Active Directory directory that is configured in Settings > Authentication. | An administrator creates it, or Keycyte PAM creates it automatically at the first sign-in when the user, or a group the user belongs to, is authorized in a server role or password role. |
| Radius | The password is checked against an external RADIUS server that is configured in Settings > Authentication. If the RADIUS server sends a challenge, the user enters the code on the sign-in page. | An administrator creates it. |
| Entra ID | The user signs in with Sign in with Microsoft. | An administrator creates it, or Keycyte PAM creates it automatically at the first sign-in when the user, or an Entra ID group the user belongs to, is authorized in a server role or password role. |
For the directory, RADIUS and Entra ID settings, see Authentication Settings.
User Roles
The roles decide which panel the user can sign in to. A user can have several roles.
| Role | Description |
|---|---|
| MASTER | Full administrator. Signs in to the Admin Panel without restrictions. Only a MASTER can assign this role. |
| ADMIN | Administrator restricted by permission profiles and object ownership. Signs in to the Admin Panel. Only a MASTER can assign this role, and the account needs at least one permission profile. |
| USER | Signs in to the Client Panel to connect to servers. When you save a user without any role, the USER role is assigned. |
| SERVICE | Machine identity for applications. An account with only this role cannot sign in anywhere (Admin Panel, Client Panel, SSH or RDP); it authenticates to the API with an API key. |
For the difference between MASTER and ADMIN, see Administrator Types. For SERVICE accounts, see Service Identities.
Note
A user who has an administrator role and the USER role chooses between Admin Panel and Client Panel after signing in. Add USER or ADMIN next to SERVICE if a person also needs to sign in with a service account.
These account roles are different from the server, password and user roles on the Roles menu, which grant access to servers and accounts. See Roles.
Adding Users
Add a user account for each person who should sign in to Keycyte PAM. Domain and Entra ID users can also be created automatically at their first sign-in; see Syncing Domain Users.
Before you begin:
- You need the Add permission for Users.
- For domain, RADIUS and Entra ID users, the directory, RADIUS server or Entra ID connection must be configured in Settings > Authentication. See Authentication Settings.
- To create an ADMIN account, sign in as a MASTER and create the permission profiles first. See Administrator Types.
Adding a User
To add a user:
-
Select Users in the menu.
-
Click Add in the toolbar (tooltip New User). The Portal User panel opens.
-
Fill in the fields:
Field Description Type Local, Domain, Radius or Entra ID. Default: Local. See User Types and Roles. Domain For Domain users: the domain of the account, for example example.com. Filled in automatically when you select a user from the directory search.Username User name. For Domain and Entra ID users, type at least two characters to search the directory and select the user from the list. Password For Local users: the initial password. Required for new local users. Email E-mail address. Used for e-mail MFA codes, MFA setup e-mails, password reset e-mails and notifications. Phone Phone number. Used for SMS MFA codes. Tags Descriptive labels for grouping and filtering. Description Free-text note. Roles One or more of MASTER, ADMIN, USER and SERVICE. An ADMIN can assign only USER and SERVICE. If you select no role, USER is assigned. Permission Profiles Shown to a MASTER when ADMIN is selected. At least one profile is required. Permissions of several profiles are combined. Enabled Clear to disable the account. A disabled user cannot sign in. Selected by default. MFA Turns on multi-factor authentication. See Multi-Factor Authentication. Password never expires For Local users: excludes the user from password expiry. Use it only for break-glass or service accounts. MFA Type Shown when MFA is selected: AUTHENTICATOR,EMAIL,SMSorNONE.Session Timeout (minutes) Sign-in session lifetime for this user, from 0to1440. Leave empty or enter0to use the global default. -
Click Save.
The user appears in the list. If you are an ADMIN, you are added as an owner of the user.
User List
| Column | Description |
|---|---|
| (icon) | User type. |
| ID | Internal ID of the user. |
| Username | User name, with the domain for domain users. Badges mark exceptions: a locked account (lock badge, point to it to see until when), a disabled account, a user without MFA, and ∞ for a password that never expires. |
| Roles | Account roles and, for ADMIN accounts, the assigned permission profiles. |
| Description, Tags | Note and tags. |
| Last Activity | When the user was last active. |
| Action | Edit, MFA Setup, Change Owners, API Keys (SERVICE accounts only), Shared Resources and Delete. |
An ADMIN cannot select or change rows of MASTER and ADMIN accounts.
Resetting Local User Passwords
To reset the password of local users:
- Select the users in the list.
- Click Reset Password (key icon) in the toolbar. The button appears when users are selected.
- Select Send new password via email to users to e-mail the new password to each user, or clear it to only show the passwords.
- Click Reset.
Keycyte PAM generates a random password for each local user. Users must change it at their next sign-in. The Reset Password Results dialog shows each new password with a copy button; share the passwords securely. Domain, RADIUS and Entra ID users are skipped, because their passwords are managed in their identity provider.
Unlocking Users
A local user is locked after too many failed sign-in attempts, according to the local user password policy in Settings > General. The Username column shows a lock badge for locked users.
To unlock users:
- Select the users in the list. The unlock button appears when the selection contains locked users.
- Click Unlock n locked user(s) (unlock icon).
- Confirm.
Changing User Owners
Owners are the administrator accounts that manage a user. An ADMIN sees only the users that the ADMIN owns.
To change the owners of a user, click Change Owners in its row, select the administrator accounts and click Save. To change the owners of several users, select them and click Change Owners of Selected in the toolbar.
Important
In Change Owners of Selected, the owners you select replace the current owners on every selected user.
Viewing Shared Resources
Shared Resources shows what a user can reach: the servers and the password vault accounts that the user’s roles grant, with the roles that grant each one. Use it to check a user’s access.
To view the shared resources of a user, click Shared Resources in the row of the user.
Exporting the Access Matrix
To download the access of all users as an Excel file, click User Matrix Export (export icon) in the toolbar. The file user_access_matrix.xlsx lists what each user can reach. An ADMIN gets the matrix for the users that the ADMIN owns.
To export the user list itself, click Export to Excel. The file contains the ID, Username, Email, Type, Domain, Enabled, MFA, Roles and Description of each user.
Deleting a User
To delete a user, click Delete in its row and confirm. You need the Delete permission for Users.
Multi-Factor Authentication
Multi-factor authentication (MFA) asks a user for a one-time code in addition to the password. Keycyte PAM supports three MFA types:
| MFA type | How the user gets the code |
|---|---|
Authenticator (AUTHENTICATOR) | A time-based code from an authenticator application, such as Microsoft Authenticator or Google Authenticator. The user registers Keycyte PAM in the application once by scanning a QR code. |
Email (EMAIL) | A code sent to the user’s e-mail address at each sign-in. |
SMS (SMS) | A code sent to the user’s phone number at each sign-in. |
MFA applies when the user signs in to the Admin Panel or the Client Panel. Server roles and password roles can also require an MFA code before a connection; see Server Roles.
Before you begin:
- You need the Edit permission for Users.
- For Email, and for sending authenticator setup e-mails, configure e-mail delivery in Settings > Notification. For SMS, configure an SMS gateway there. See Notification Settings.
- Make sure that users have an e-mail address or phone number on file. For domain users, the e-mail address is read from the directory if it is not set on the user.
Enabling MFA for Users
To enable MFA for one or more users:
- Select Users in the menu.
- Do one of the following:
- For one user, click MFA Setup in the row of the user.
- For several users, select them and click Enable MFA (envelope icon) in the toolbar.
- In the MFA Setup dialog, select the MFA type: Authenticator, Email or SMS.
- For Authenticator, select or clear Send MFA setup email to users:
- Selected: each user receives an e-mail with the QR code and secret key.
- Cleared: each user sees the QR code at the next successful sign-in and completes the setup there.
- Click Setup.
The MFA Setup Results dialog shows the outcome for each user. For security, the QR code and secret are never shown to the administrator. If the setup e-mail cannot be sent, the user sees the QR code at the next sign-in instead.
For Email and SMS, MFA is active immediately; no setup step is needed.
You can also turn MFA on or off and change the type when you edit a user: select MFA and choose the MFA Type in the Portal User panel. Users without MFA are marked with a badge in the user list.
What the User Sees
At the next sign-in, after entering the password:
- Authenticator, not yet set up: the sign-in page shows a QR code and the secret key. The user scans the code with an authenticator application and enters the 6-digit code in MFA Code.
- Authenticator, set up: the user enters the current code from the application in MFA Code.
- Email or SMS: Keycyte PAM sends a code, and the user enters it in MFA Code.
Wrong codes count as failed sign-in attempts and can lock the account according to the local user password policy.
Tip
To give a user a new authenticator secret, for example after the user replaced the phone that holds the authenticator application, edit the user, clear MFA, click Save, and then run MFA Setup for the user again with Authenticator. Clearing MFA removes the stored secret, so the next setup issues a new one.
Syncing Domain Users
Domain users do not have to be created one by one. Keycyte PAM keeps them in step with the directory in two ways: users are created automatically at their first sign-in, and Synchronize Users refreshes the stored data of existing domain users.
Before you begin, make sure that the LDAP or Active Directory connection for each domain is configured in Settings > Authentication. See Authentication Settings.
Automatic Creation at First Sign-In
When a domain user signs in for the first time and has no Keycyte PAM account yet, Keycyte PAM checks the directory. The account is created automatically, with the USER role, if:
- the user is authorized directly in a server role or password role, or
- a group that the user belongs to is authorized in a server role or password role.
Otherwise, the sign-in is refused. Entra ID users are created the same way, based on their Entra ID groups.
To let a whole department sign in, authorize its directory group in a role. See Server Roles.
Keycyte PAM identifies a domain user by user name and domain, and by the security identifier (SID) of the directory object. If a user is renamed in Active Directory, the existing Keycyte PAM account is updated at the next sign-in instead of a new account being created.
Synchronizing Domain Users
Group memberships decide which roles apply to a domain user. Keycyte PAM stores the groups of each domain user and refreshes them at each sign-in. Synchronize Users refreshes them for all domain users at once, for example after you changed group memberships in Active Directory.
To synchronize domain users:
- Select Users in the menu.
- Click Synchronize Users (refresh icon) in the toolbar.
For each domain user, Keycyte PAM connects to the directory of the user’s domain, looks up the user and:
- replaces the stored group memberships with the user’s current groups,
- updates the user name if it was changed in the directory.
Synchronization does not create new users and does not delete users that were removed from the directory. Users whose domain has no directory configuration, or who are not found in the directory, are skipped.
You need the Add permission for Users to synchronize.
Tip
To stop a user who left the organization from signing in, disable or delete the user in the directory and clear Enabled on the Keycyte PAM account, or delete it.
Service Identities
A service identity is a user account for an application rather than a person. Applications use it to retrieve credentials from Keycyte PAM through the Secrets API. A service identity has the SERVICE role and authenticates with API keys, not with a password.
An account that has only the SERVICE role is refused at every interactive sign-in: the Admin Panel, the Client Panel, and SSH or RDP connections.
Before you begin, make sure that you have the Add and Edit permissions for Users.
Creating a Service Identity
To create a service identity:
- Select Users in the menu and click Add (tooltip New User).
- In Type, keep Local.
- Enter a Username that names the application, for example
svc-backup. - Enter a Password. The panel requires a password for every new local user; an account with only the SERVICE role cannot sign in with it.
- In Roles, select only SERVICE. The panel shows Service account — cannot sign in.
- Fill in Description and other fields as needed.
- Click Save.
The account can retrieve the vault accounts that its password roles grant. Authorize the account in a password role that contains the accounts the application needs. See Password Roles.
Issuing an API Key
To issue an API key:
- In the user list, click API Keys (key icon) in the row of the service identity. The API Keys dialog opens.
- In Label, enter a name that identifies where the key is used, for example
blueorgreen. - In Expiry, select how long the key is valid: 30 days, 90 days, 180 days, 365 days or Never expires. Default: 90 days.
- If you select Never expires, enter the reason in Why does this key never expire?. The reason is recorded for audits.
- Click Issue key.
The Key issued box shows the key ID and the secret. Copy the secret with Copy secret and store it in the application’s configuration.
Warning
The secret is shown only once. It cannot be retrieved again. If it is lost, issue a new key and revoke the old one.
A service identity can hold at most two active keys at a time. Two keys let you rotate without downtime: issue the new key, update the application, then revoke the old key.
Monitoring and Revoking Keys
The API Keys dialog lists the keys of the identity with their Label, Status, Expiry and Last used time. A key that has not been used for a long time is marked Dormant; this also applies to keys that never expire.
To revoke a key, click Revoke in its row and confirm. Any application that still uses the key stops working immediately.
To remove a revoked key from the list, click Delete permanently. The revocation stays in the system log.
Using the Key
The API Keys dialog links to the Integration guide and the OpenAPI spec of the Secrets API. For how applications authenticate and retrieve secrets, see Secrets API.
Roles
Roles grant access. Keycyte PAM has three kinds of roles, each on its own page under Roles:
| Role | What it contains | What it controls |
|---|---|---|
| Server Roles | Servers, and the users and groups that are authorized. | Which servers a user can connect to, and how the session behaves: recording, file transfer, clipboard, approval, MFA, session sharing, notifications. |
| Password Roles | Password vault accounts, and the users and groups that are authorized. | Which accounts a user can connect with, and what the user may do with them: copy the password, see the user name, use the account exclusively. |
| User Roles | Users. | When and from which IP addresses the members can sign in and connect. A user role can also be authorized in server and password roles as a group. |
How Access Is Decided
A user can connect to a server with an account when all of the following are true:
- A server role that contains the server authorizes the user, directly or through a group.
- A password role that contains the account authorizes the user, directly or through a group.
- The account is linked to the server in the password vault.
- The schedules of the roles allow access at this time, and the user’s user roles allow the time and the client IP address.
- If a role requires approval, an approved access request covers the current time. See Access Requests.
- If a role requires MFA, the user enters a valid code.
When several roles apply to the same server or account, their features add up: a feature is on if any applicable role turns it on. For example, a session is recorded if any server role that covers the server for this user has Session Record selected, and copying is blocked if any of them has Disable Copy selected.
A role whose schedule does not include the current time does not apply.
Note
Steps 1 and 2 apply to accounts with the USER role. A MASTER who connects from the Client Panel is not limited by server and password roles, and an ADMIN can also connect to servers and accounts that the ADMIN owns.
Role Owners
Each role has owners, the administrator accounts that manage it. An ADMIN sees and manages only the roles that the ADMIN owns. Owners are set with Owners in the role’s action menu.
Tags
Roles can have tags, like servers and accounts. Tags are labels for grouping and filtering; they do not grant access.
Server Roles
A server role gives a set of users access to a set of servers and defines how their sessions behave. To open the page, select Roles > Server Roles.
Before you begin:
- You need the Add permission for Server Roles to create roles and the Edit permission to change them.
- Add the servers. See Adding Servers.
- To authorize directory users or groups, configure the directory in Settings > Authentication.
Creating a Server Role
To create a server role:
- Select Roles > Server Roles.
- Click Add. The Server Role panel opens.
- Optionally select Tags, and enter a Name.
- Select the features of the role. See Server Role Features.
- Optionally set the TACACS+ Privilege Level. See TACACS+ Privilege Level.
- Move the servers of the role from Non-Member to Member. Use the search box above each list to find servers.
- Click Save.
- Authorize users and groups. See Authorizing Users and Groups.
After the role is saved, the Linked Command Filters section of the panel lets a MASTER attach command filters to the role. See Command Filters.
Server Role Features
All features are cleared by default.
| Feature | Description |
|---|---|
| Session Record | Records the sessions of the role’s users on the role’s servers. Recordings are played in Sessions > Session History. |
| Text Record | Text recording of the session. |
| File Transfer | Lets users transfer files to and from the server during a session. For RDP, a virtual drive is attached to the session. |
| Approve | Users must request access and have the request approved before they can connect. See Access Requests. |
| MFA | Users must enter an MFA code before each connection. |
| Private Vault | Users can connect with credentials from their own private vault in the Client Panel. |
| Owner | Marks the authorized users and groups of the role as its owners. |
| Auto Login | Connects with the credentials that the user signed in to Keycyte PAM with, instead of a vault account. |
| Disable Copy | Blocks copying from the remote session to the user’s computer. |
| Disable Paste | Blocks pasting from the user’s computer into the remote session. |
| Share | Lets users share an active session with other users. |
| Sign Out | For RDP: after the user disconnects, Keycyte PAM signs the account out of its Windows session on the host, so the session does not stay open in a disconnected state. |
| Notify On Connect | Sends an e-mail to the owners of the server every time a user connects to it. |
| Notify On Disconnect | Sends an e-mail to the owners of the server every time a session on it ends. |
Notify On Connect and Notify On Disconnect apply to every connection to the server through any role that has them selected. E-mail delivery must be configured in Settings > Notification; see Notification Settings.
TACACS+ Privilege Level
For network devices that authenticate operators through the Keycyte TACACS+ server, TACACS+ Privilege Level sets the Cisco privilege level (0–15) that is returned when a shell is authorized: 1 is User EXEC and 15 is Privileged EXEC. When several roles apply, the highest level wins. Leave the field empty (Device default) to return no level, so that the device applies its own default.
Authorizing Users and Groups
A role applies to the users that are authorized in it.
To authorize users and groups:
- In the row of the role, click More actions (…) and select Authorization.
- Under Authorized Users, type at least two characters of a user name in Enter Domain User and select the user. The search covers local and RADIUS users, directory users and Entra ID users.
- Under Groups, type at least two characters in Enter Domain Group and select the group. The search covers LDAP groups, Entra ID groups and user roles.
- To remove an entry, click the delete button in its row.
- Click Save.
A directory user who is authorized directly, or through a group, can sign in for the first time even if no Keycyte PAM account exists yet; the account is created automatically. See Syncing Domain Users.
The Authorized users & groups column of the role list shows the authorized entries. To list only the roles in which a given user or group is authorized, select it in Filter by user or group above the list.
Changing the Servers of a Role
To change the servers of a role, either edit the role, or click … in its row, select Servers, move servers between Non-Member and Member, and click Save.
The Members column shows how many servers the role has; click it to expand the row and see them. To remove one server, click the delete button in its row in the expanded list.
Setting a Schedule
A schedule limits the times when the role applies. Outside the schedule, the role grants no access. Sessions that are open when the schedule ends are warned 10, 5 and 1 minutes in advance and then closed.
To set a schedule:
-
Click … in the row of the role and select Schedule.
-
Select the schedule type:
Type Fields The role applies None — At any time. Default. Daily Start Time, End Time Every day between the two times. If End Time is earlier than Start Time, the window runs overnight and ends the next day. Weekly Start Time, End Time, Days On the selected days (Mon to Sun) between the two times. Custom Start Date, End Date Between two dates and times. You must set at least one of them. -
Click Save.
Times are the local time of the Keycyte PAM server.
Note
A custom schedule without dates does not restrict access. The role list marks such roles with Custom, no dates — not restricted.
Bulk Actions
To change several roles at once, select them in the list and click Bulk actions:
| Action | Description |
|---|---|
| Set features | For each feature, select No change, On or Off. Only the features that you set to On or Off change. |
| Set schedule | Replaces the schedule of each selected role. None removes the time restriction. |
| Add authorized | Adds users and groups to every selected role that does not have them yet. |
| Remove authorized | Removes the selected users and groups from every selected role that has them. |
| Add owners, Remove owners | Adds or removes owners on every selected role. |
| Add tags, Remove tags | Adds or removes tags on every selected role. |
A message reports how many roles were updated, already matched, were skipped because you do not own them, or no longer exist.
Deleting a Server Role
To delete a role, click … in its row, select Delete and confirm. Users lose the access that the role granted. You need the Delete permission for Server Roles.
Password Roles
A password role gives a set of users access to a set of password vault accounts. A user can connect to a server with an account only if a password role grants the account and a server role grants the server. Password roles also decide which accounts a service identity can retrieve through the Secrets API.
To open the page, select Roles > Password Roles.
Before you begin, make sure that you have the Add permission for Password Roles and that the accounts exist in the password vault.
Creating a Password Role
To create a password role:
- Select Roles > Password Roles.
- Click Add. The Password Role panel opens.
- Optionally select Tags, and enter a Name.
- Select the features of the role. See Password Role Features.
- Move the accounts of the role from Non-Member to Member.
- Click Save.
- Authorize users and groups: click … in the row of the role, select Authorization, add users under Authorized Users and groups under Groups, and click Save. The search works as for server roles; see Server Roles.
Password Role Features
All features are cleared by default.
| Feature | Description |
|---|---|
| Session Record | Records the sessions that use the role’s accounts. A session is recorded if either a server role or a password role that applies to it requires recording. |
| Password Copy | Lets users copy the password of the account in the Client Panel. Without it, users connect with the account without seeing its password. |
| Account Lock | Lets only one session use the account at a time. While a session is open with the account, other users cannot connect with it and see who is using it. |
| Username Disable | Hides the user name of the account from users in the Client Panel. |
| Approve | Users must request access to the account and have the request approved before they can connect with it. See Access Requests. |
| MFA | Users must enter an MFA code before each connection with the account. |
| Owner | Marks the authorized users and groups of the role as its owners. |
| Notify On Use | Sends an e-mail to the owners of the account every time its password is fetched for a connection. |
| Notify On Copy | Sends an e-mail to the owners of the account every time its password is copied. |
Changing the Accounts of a Role
To change the accounts of a role, either edit the role, or click … in its row, select Accounts, move accounts between Non-Member and Member, and click Save.
The Members column shows how many accounts the role has; click it to expand the row and see them.
Schedule, Bulk Actions and Owners
Password roles have the same Schedule, Owners and Bulk actions as server roles. Outside its schedule, a password role grants no access. For details, see Server Roles.
Deleting a Password Role
To delete a role, click … in its row, select Delete and confirm. You need the Delete permission for Password Roles.
User Roles
A user role groups users. It has two uses:
- It restricts its members: a schedule limits when they can sign in and connect, and IP lists limit where they can sign in and connect from.
- It can be authorized in server roles and password roles as a group, so that all its members get the access of those roles.
To open the page, select Roles > User Roles.
Before you begin, make sure that you have the Add permission for User Roles.
Creating a User Role
To create a user role:
- Select Roles > User Roles.
- Click Add.
- Enter a Name, and optionally Tags and a Description.
- Move the users of the role from Non-Member to Member.
- Click Save.
After the role is saved, the Linked Command Filters section of the panel lets a MASTER attach command filters to the role. See Command Filters.
The row of each role has the buttons Edit, Schedule, IP List, Members, Owners and Delete. Expand a row to see its members.
Restricting Sign-In Times
A schedule on a user role restricts when its members can sign in and connect. Outside the schedule, sign-in and new connections are refused, and the refusal is recorded in the Access log.
To set a schedule, click Schedule in the row of the role, select None, Daily, Weekly or Custom, fill in the times or dates, and click Save. The schedule types are the same as for server roles; see Server Roles.
If a user is a member of several user roles, every one of their schedules must allow the current time.
Restricting Client IP Addresses
To restrict the addresses that members can sign in and connect from:
- Click IP List in the row of the role.
- Under Blacklist Address, add the addresses that are always refused. Under Whitelist Address, add the addresses that are allowed. Type an address and press Enter or click the add button.
- Click Save.
You can enter an exact address (10.0.0.10), a CIDR range (10.0.0.0/8) or a wildcard (192.168.1.*).
The lists are evaluated as follows:
- An address that matches the blacklist of any of the user’s roles is refused.
- If a role has a whitelist, an address that matches none of its entries is refused.
- A role without a whitelist does not restrict addresses beyond its blacklist.
Warning
A whitelist that does not contain the addresses your users work from locks them out. Test the list with one user before you add many members.
Changing Members and Owners
To change the members, click Members, move users between Non-Member and Member, and click Save. To remove one member, expand the row and click the delete button next to the user.
To change the owners, click Owners, select the administrator accounts in Change Owners and click Save.
Deleting a User Role
To delete a role, click Delete in its row and confirm. You need the Delete permission for User Roles.
Access Control
Roles decide who may reach which servers and accounts. Access control adds two further controls:
- Approval (just-in-time access). For servers and accounts whose role requires approval, users request access for a time window, and an owner approves or rejects the request. Approved requests and manually created approvals are kept as resource rules.
- Command filters. Commands that users type in SSH sessions, and commands that network devices authorize through TACACS+, are checked against filter patterns and accepted, warned about or rejected.
The pages are under Access Control in the menu: Resource Rules and Command Filters. Command Filters is available only to MASTER users.
This section contains the following topics:
| Topic | Description |
|---|---|
| Access Requests | How users request access and how owners approve or reject requests. |
| Resource Rules | Viewing, creating and changing approvals for users on servers and accounts. |
| Command Filters | Defining command patterns, their action and the scope they apply to. |
Access Requests
With approval-based access, users do not have standing access to sensitive servers or accounts. Instead, a user requests access for a time window, and an owner of the server or account approves the request. The user can connect only during the approved window.
How the Approval Flow Works
- An administrator selects Approve in a server role, a password role, or both. See Server Roles and Password Roles.
- A user of the role tries to connect in the Client Panel and is asked to request access. The user enters a start date, an end date and a reason, and submits the request.
- Keycyte PAM creates a request for each object that needs approval: one for the server if a server role requires approval, and one for the account if a password role requires approval.
- Keycyte PAM sends an e-mail to the owners of the server (for a server request) and the owners of the account (for an account request). The e-mail contains a link to the Resource Rules page. The request also appears in the notification bell of these owners.
- An owner approves or rejects the request. When a request is approved, the requester receives an e-mail.
- Between the approved start and end date, the user can connect. Outside this window, the user must request access again.
If both the server and the account require approval, both requests must be approved before the user can connect.
E-mail delivery must be configured in Settings > Notification. See Notification Settings.
Approving or Rejecting a Request
Before you begin, make sure that:
- You are an owner of the server or account, or a MASTER.
- You have the Edit permission for Resource Rules.
To approve or reject a request:
-
Click the bell in the top bar. A red badge shows the number of pending requests.
-
In the Notifications panel, under Access Permission Requests, check the request:
Item Description Server or Account tag Whether the request is for a server or an account. User name The user who requested access. ID ID of the requested server or account. Start Date, End Date The requested access window. Requested When the request was submitted. Reason The reason that the user entered. -
Click Approve or Reject.
The message Request approved or Request rejected confirms the decision, and the request leaves the list.
You can also decide on requests on the Access Control > Resource Rules page by editing the request and changing its Action. See Resource Rules.
Tip
The bell refreshes every 60 seconds. Open it to refresh the list immediately.
Resource Rules
A resource rule records whether a user is approved to use a server or an account during a time window. Access requests from the Client Panel create resource rules automatically; administrators can also create rules directly, for example to grant pre-approved access for a maintenance window.
Resource rules take effect only for servers and accounts whose server role or password role has Approve selected. For other servers and accounts, the roles alone decide access.
To open the page, select Access Control > Resource Rules. A MASTER sees all rules; an ADMIN sees the rules for which the ADMIN was notified as an owner.
Rule List
| Column | Description |
|---|---|
| (icon), Type | Server or Account. |
| Object | Name of the server or account. |
| Portal User | The user that the rule applies to. |
| Request Date | When the user submitted the request. Empty for rules created by an administrator. |
| Start Time, End Time | The time window of the rule. |
| Action | State of the rule. See the table below. |
| Reason | The reason that the user entered in the request. |
| Action | Meaning |
|---|---|
allow | Approved. The user can use the object between Start Time and End Time. |
inactive | Not decided yet. Pending requests have this state and appear in the notification bell. |
deny | Not approved. |
reject | Rejected with Reject in the notification bell. |
Search Keyword filters the list by object, type, user, action and reason.
Creating a Resource Rule
Before you begin, make sure that you have the Add permission for Resource Rules.
To create a resource rule:
-
Select Access Control > Resource Rules.
-
Click Add. The Access Control dialog opens.
-
Fill in the fields:
Field Description Type Server or Account. Server / Account The server or account that the rule is for. The field matches the selected type. Portal User The user that the rule applies to. Start Time Start of the time window. Required. End Time End of the time window. Required. Action allow,denyorinactive. Selectallowto approve. -
Click Save.
If the user needs both a server and an account that require approval, create a rule for each.
Changing or Deleting a Rule
To change a rule, click the edit button in its row, change the fields and click Save. Changing Action to allow approves a pending request; the requester receives an e-mail. Reason shows the user’s reason and cannot be changed. You need the Edit permission for Resource Rules.
To delete a rule, click the delete button in its row and confirm. You need the Delete permission for Resource Rules.
Tip
To withdraw an approval before its end time, change Action to deny or delete the rule. New connections are refused from then on.
Command Filters
A command filter is a set of command patterns with an action. Keycyte PAM checks each command that a user runs against the filters that apply to the session, and the first matching filter decides what happens to the command.
Command filters apply to:
- SSH sessions through the Keycyte PAM SSH proxy;
- commands that network devices authorize through the Keycyte TACACS+ server.
Command filters are available only to MASTER users. To open the page, select Access Control > Command Filters.
Filter Actions
| Action | In an SSH session | Over TACACS+ |
|---|---|---|
accept | The command runs. Filters with a higher priority number are not checked for this command. | Permitted. |
warning | The command runs and is recorded with a warning level in the command history. | Permitted and recorded as warned. |
notify_and_warn | The user sees a warning before the command runs, and the command is recorded with a warning level. | Permitted and recorded as warned. |
reject | The command is blocked and does not reach the server. | Refused. |
Matched commands are recorded with the filter that matched them. See Sessions > Command History.
How Filters Are Evaluated
When a session starts, Keycyte PAM collects the enabled filters that apply to the user and the server, and orders them by Priority, lowest number first. For each command, the patterns of the filters are checked in this order, and the first pattern that matches decides the action. A command that matches no pattern runs normally.
A filter without patterns has no effect.
Creating a Command Filter
To create a command filter:
-
Select Access Control > Command Filters.
-
Click Create in the toolbar. The Create Command Filter dialog opens on the General tab.
-
On the General tab, fill in the fields:
Field Description Name Name of the filter, up to 128 characters. Required. Description Free-text note. Priority Evaluation order, from 0to9999. Lower numbers are checked first. Default:100.Action accept,warning,notify_and_warnorreject. Default:warning.Ignore case (default for items) Matches patterns without regard to upper and lower case. Each pattern can override this. Enabled Turns the filter on. Selected by default. -
On the Patterns tab, click Add Pattern and define one or more patterns. See Patterns.
-
Click Save.
The filter is saved and applies to all sessions until you add bindings. The Bindings and Test tabs become available when you open the saved filter with Edit.
Patterns
Each row on the Patterns tab is one pattern item:
| Column | Description |
|---|---|
| Type | command or regex. |
| Pattern (one per line) | The text to match. |
| Ignore case | Yes, No, or empty to use the filter’s Ignore case (default for items) setting. |
The two types match differently:
| Type | How it matches | Example |
|---|---|---|
command | Each line of the pattern is a literal text. The command matches if it contains any of the lines anywhere. | The lines rm -rf / and mkfs match sudo rm -rf /tmp/x and mkfs.ext4 /dev/sdb1. |
regex | The pattern is a regular expression (Go syntax). The command matches if the expression finds a non-empty match anywhere in it. | ^\s*(shutdown|reboot)\b matches commands that start with shutdown or reboot. |
Important
A command pattern matches substrings, so a short pattern can match more than intended. For example, rm also matches perform. Use a regex pattern with word boundaries when you need an exact command.
A regular expression that is not valid matches nothing. Test new patterns on the Test tab.
To remove a pattern, click the delete button in its row.
Bindings
Bindings decide which sessions a filter applies to. A filter without bindings applies to all sessions.
To add a binding:
- Open the filter with Edit and select the Bindings tab.
- Click Add Binding. The Add Binding dialog opens.
- In Scope Type, select Server Role, User Role, Server or User.
- In Target, select the role, server or user.
- Click Add.
Bindings work on two axes:
- the user axis: User and User Role bindings;
- the server axis: Server and Server Role bindings.
A filter applies to a session when both axes match. An axis without bindings matches everything. For example, a filter bound only to the server role Production Linux applies to every user on those servers; a filter bound to the user role Contractors and the server role Production Linux applies only to contractors on those servers.
To remove a binding, click the delete button in its row and confirm.
You can also attach filters from the role side: the edit panel of a server role or user role has a Linked Command Filters section with Attach Filter. See Server Roles and User Roles.
Testing a Command
The Test tab checks a command against the saved patterns of the filter with the same matching engine that sessions use.
To test a command:
- Open the filter with Edit and select the Test tab.
- Type a command, for example
rm -rf /, and click Run.
The result shows either No match — this command would pass through, or Match — action action would fire with the pattern item and the matched text. The test covers only this filter; it does not consider the priority of other filters.
Managing Filters
The filter list shows each filter’s Name, Action, Priority, Description, Updated time and Enabled switch.
- To turn a filter off or on, use its Enabled switch.
- To change a filter, click Edit. Changes on the General and Patterns tabs are saved with Save; bindings are saved immediately.
- To delete a filter with its patterns and bindings, click Delete and confirm.
- To filter the list, click Advanced Filter and set Name Contains, Action or Status (Enabled or Disabled).
Note
Sessions read their filters when they start. Changes apply to sessions that start afterwards.
Sessions
The Sessions menu of the Admin Panel collects everything Keycyte PAM knows about connections that users open to servers through the platform. Use it to watch sessions while they run, to replay sessions after they end, and to search the commands and file transfers that took place in them.
The menu contains the following pages:
| Page | What you do there |
|---|---|
| Active Sessions | See the sessions that are open now, watch a session live, send a message to users, and terminate sessions. See Monitoring Active Sessions. |
| Session History | Search finished sessions, play recordings, read the key log, and download recordings. See Reviewing Session History. |
| Command History | Search the commands that users ran in terminal sessions. See Reviewing Command and File History. |
| File History | Search the files that users uploaded or downloaded in terminal sessions. See Reviewing Command and File History. |
What is recorded for a session is decided by the server roles that cover the server: for example, the Session Record and Text Record features of a server role. For details, see Server Roles.
Note
ADMIN users see these pages only if one of their permission profiles grants the View permission for the module. An ADMIN sees only the sessions on servers, accounts and users that the ADMIN administers. MASTER users are not restricted. For details, see Permission Profiles.
Monitoring Active Sessions
The Active Sessions page lists every session that is open through Keycyte PAM at this moment. From this page you can watch a session while it runs, send a message that appears in the user’s session, and close one or more sessions.
To open the page, select Sessions > Active Sessions.
Table View
By default the page shows the sessions in a table. The list refreshes automatically every 30 seconds; to refresh it at once, click Refresh in the toolbar. The Time column counts up every second.
| Column | Description |
|---|---|
| (icon) | Protocol of the session, for example RDP or SSH. |
| Portal User | Keycyte PAM user who opened the session. |
| Server | Name (or address) of the target server. |
| Account | Vault account used to sign in to the target. |
| Start Date | Date and time the session started. |
| Time | Elapsed time since the session started. |
| Action | View, Send message and Shutdown buttons for the row. |
You can sort the table by Portal User, Server, Account and Start Date.
Grid View
The grid view shows the live screen of every open session side by side, so that you can watch several sessions at the same time.
To switch to the grid view, click Grid View in the toolbar. The button is available only when at least one session is open.
The grid uses one column for a single session, two columns for two to four sessions, and three columns for five or more sessions. Each cell shows the user, the server and the elapsed time, and has View (opens the session in the large viewer) and Shutdown buttons.
To return to the table, click Table View.
Watching a Session
You can watch a running session in a viewer window. The viewer is read-only: your keyboard and mouse input is not sent to the session.
To watch a session:
- In the row of the session, click View.
- In the viewer window, use the maximize button to switch to full screen, if required.
- To stop watching, close the viewer window.
How the session is shown depends on the protocol:
- RDP, VNC and web application sessions are shown as a live screen.
- SSH, Telnet and Kubernetes sessions are shown as a live terminal.
For RDP, VNC and web application sessions, the user receives a notification in the Client Panel when an administrator starts watching the session, and another when the administrator stops watching. The watch is also written to the Client log and appears in Session History as a session of the Admin Watch type.
Sending a Message to Users
You can send a short message that appears inside one or more open sessions, for example to warn users before maintenance.
Before you begin, make sure that your permission profile grants the Edit permission for Active Sessions. MASTER users always have this permission.
To send a message:
- Do one of the following:
- To send the message to one session, click Send message in the row of the session.
- To send the message to several sessions, select the sessions in the table and click Send message in the toolbar.
- In the Send message dialog, check the sessions listed under Recipients.
- Under Severity, select Info, Warning or Error.
- In Message, type the text. The message can be up to 500 characters long.
- Click Send.
In RDP, VNC and web application sessions, the message appears as a banner in the user’s session window. In SSH, Telnet and Kubernetes sessions, the message is written into the user’s terminal. If the message cannot be delivered to some sessions, Keycyte PAM reports how many sessions received it and how many failed.
Terminating Sessions
Terminating a session closes the connection immediately.
Before you begin, make sure that your permission profile grants the Delete permission for Active Sessions. MASTER users always have this permission.
To terminate a session:
- In the row of the session, click Shutdown.
- In the confirmation dialog, confirm that you want to terminate the session.
To terminate several sessions at once:
- Select the sessions in the table. The number of selected sessions appears next to the toolbar buttons.
- Click Terminate selected.
- Confirm the operation.
The terminated sessions disappear from the list. If some sessions cannot be terminated (for example, because they belong to servers you do not administer), Keycyte PAM reports how many sessions were terminated and how many failed. Every termination is written to the System log.
Warning
The user loses any unsaved work in a terminated session. Send a message first if the user should have time to save.
Reviewing Session History
The Session History page lists the sessions that users opened through Keycyte PAM. For recorded sessions you can play the recording in the browser, read what the user typed, and download the recording.
To open the page, select Sessions > Session History.
Session List
| Column | Description |
|---|---|
| (icon) | Protocol of the session. |
| Connection ID | Shortened unique ID of the session. Point to it to see the full ID. When a long recording is split into several parts, a Part n/N tag shows which part the row is. |
| Type | User (a session the user opened), Collaboration (a user who joined a shared session) or Admin Watch (an administrator watching the session). |
| Portal User | Keycyte PAM user who opened the session. |
| Client IP | Address the user connected from. |
| Server Address | Address of the target server. |
| Username | Account used on the target. |
| Start Date, End Date | When the session started and ended. |
| Duration | Length of the session. unknown means that the end of the session was never observed, so no duration can be given. |
| Description | Free-text note that an administrator added to the session. |
| Action | Edit (description) and Play buttons. |
Searching and Filtering Sessions
To search all columns for a word, type it in Search Keyword in the toolbar and press Enter.
To filter the list:
-
Click Advanced Filter in the toolbar.
-
Fill in one or more of the following fields:
Field Description Protocol Protocol of the session. Session Type User, Collaboration or Admin Watch. Portal User Keycyte PAM user name. Client IP Address the user connected from. Username Account used on the target. Server Address Address of the target server. Start Date Begin, Start Date End Range for the session start time. End Date Begin, End Date End Range for the session end time. -
Click Apply.
To remove all filters, click Clear Filters in the toolbar.
Adding a Description to a Session
You can attach a note to a session, for example a change ticket number. You need the Edit permission for Session History.
To add a description:
- In the row of the session, click Edit.
- Type the note in Description.
- Click Save.
Playing a Recording
The Play button is available only for sessions that were recorded. If a session was not recorded, the button is dimmed; point to it to see the reason, for example:
- No server role covering this server (or its account) has recording enabled.
- The encryption key was unavailable when the session started.
- The recording path could not be written to.
- The target host refused the connection, so no session ran.
- The session ended before anything was captured.
If recording was enabled but the file can no longer be found, Keycyte PAM shows the message “Recording was enabled for this session, but its file is missing”.
To play a recording:
- In the row of the session, click Play.
- Use the player controls described below.
- To move to the previous or next session in the list without closing the player, use the arrow buttons at the top of the player.
The player that opens depends on the type of the recording.
Graphical Session Player
RDP, VNC and web application sessions open in the graphical player.
| Control | Description |
|---|---|
| Seek bar | Drag to move to another point in the recording. Above the bar, a heat map shows where screen activity (Frame) and typing (Keys) happened. |
| Play / Pause | Starts or pauses playback. The current position and the total length are shown next to the button. |
| Speed | Playback speed: x0.5, x1, x2 or x4. |
| Show Key Log / Hide Key Log | Opens or closes the key log panel. |
| Export Video | Downloads the recording as an MP4 video file. |
| Full screen | Switches the player to full screen. |
Moving backwards in a long recording can take a few seconds. While the player catches up, it shows a Seeking progress bar that you can cancel.
The key log panel lists the text that the user typed, grouped by time. Type in the search box to find text; click an entry to jump to that moment in the recording. Text is captured only when the Text Record feature is enabled in a server role that covers the server.
Terminal Session Player
SSH and Telnet sessions open in the terminal player, which replays the terminal output with its own play, pause, seek and speed controls. In addition:
- Commands opens a panel that lists the commands run in the session. Click a command to jump to it.
- Export Video downloads the terminal recording.
- The maximize button switches the player to full screen.
SFTP Transfer Log
For an SFTP session, the player shows the list of file operations instead of a recording: Time, Operation, Details, Size and Result.
RDP Gateway Recordings
Sessions recorded by the Keycyte RDP gateway open in a dedicated player for that recording format.
Downloading Recordings
To download several recordings at once:
- Select the sessions in the table.
- Click Download in the toolbar.
- In the Bulk Download dialog, check the list of sessions and click Start Download.
Each recording is saved as a separate file named after the server address, the user name, the start and end time and the connection ID. Sessions without a recording file, and SFTP sessions, are skipped and listed as errors at the end. You can cancel the download while it runs.
Recording Formats
Keycyte PAM stores recordings in different formats depending on the protocol. When you download a recording, you receive the following file:
| Session | Downloaded file | How to open it |
|---|---|---|
| RDP, VNC, web application | .mp4 video, converted on the server when you download it | Any video player. |
| SSH, Telnet | .cast file (terminal recording in the asciinema format) | An asciinema-compatible player, or the Keycyte PAM terminal player. |
| RDP through the Keycyte RDP gateway | .kcrec file | Only the Keycyte PAM player. |
| SFTP | No recording file. The transfers are listed in File History. | — |
The MP4 video is encoded at the session’s own screen size.
Note
Recordings are kept in the recording path set in Settings > General > Record Configuration. They cannot be deleted from the Storage page of the Admin Panel.
Reviewing Command and File History
Keycyte PAM keeps a searchable record of the commands that users run in terminal sessions and of the files they transfer. The Command History and File History pages show these records, one row per command or per transfer, with a link to the session recording.
Both pages work the same way:
- To search, type a word in Search Keyword and press Enter.
- To filter, click Advanced Filter, fill in the fields and click Apply. To remove the filters, click Clear Filters.
- To download the current list as an Excel file, click Export to Excel.
- To see all the details of a row, expand the row or click Detail.
- To open the recording of the session at that entry, click Jump to session recording.
Command History
To open the page, select Sessions > Command History.
| Column | Description |
|---|---|
| Date Time | When the command was run. |
| User | Keycyte PAM user. |
| Server | Address of the target server. |
| Account | Account used on the target. |
| Type | Connection type: SSH, TELNET, KUBERNETES or WEBTERMINAL. |
| Command | The command line. |
| Risk | Result of the command filter check (see below). You can sort by this column. |
The Risk column shows one of the following values:
| Value | Meaning |
|---|---|
OK | No command filter rule matched. |
INFO | A rule at an informational level matched (levels 1–3). |
WARN | A warning rule matched. |
BLOCK | The command was blocked. |
REJECTED, ACCEPTED, CANCELLED | Risk levels 6, 7 and 8 as reported by the SSH proxy. |
Command filter rules are configured in Access Control > Command Filters. For details, see Command Filters.
The Advanced Filter dialog has the following fields:
| Field | Description |
|---|---|
| Start Date, End Date | Time range. |
| Session ID | Full or partial session ID. |
| Portal User | Keycyte PAM user name. |
| Server Address | Host name or address of the target. |
| Target Username | Account used on the target. |
| Command Contains | Text that the command must contain. |
| Connection Type | SSH, TELNET, KUBERNETES or WEBTERMINAL. |
| Min Risk Level | Shows only commands at or above this level (0 = OK, 1–3 = INFO, 4 = WARN, 5 = BLOCK, 6 = REJECTED, 7 = ACCEPTED, 8 = CANCELLED). |
The Command Detail dialog also shows the client type and version, the remote address, the action taken, and the command output when it was captured.
File History
To open the page, select Sessions > File History.
| Column | Description |
|---|---|
| Date Time | When the transfer happened. |
| User | Keycyte PAM user. |
| Server | Address of the target server. |
| Account | Account used on the target. |
| Type | Connection type. |
| Client IP | Address the user connected from. This column is hidden by default; to show it, click Columns and select Client IP. |
| Direction | upload or download. |
| Filename | Name and path of the file. |
| Size | Size of the file. |
| Status | OK if the transfer succeeded, FAIL if it did not. |
| Action | Action that Keycyte PAM took: allowed, aborted or blocked. |
The Advanced Filter dialog has the following fields: Start Date, End Date, Session ID, Portal User, Server Address, Target Username, Filename Contains, Direction, Connection Type (SSH or WEBTERMINAL), Action Taken and Status.
Tip
To send command and file transfer records to a SIEM, enable Command and File Transfer for a syslog target. For details, see Forwarding Logs to Syslog.
Discovery
Discovery finds the systems and accounts that already exist in your environment so that you do not have to add them to Keycyte PAM one by one. You describe a source once in a discovery template, run the discovery, and register the results as servers or password vault accounts.
The following sources are available in the Admin Panel:
| Source | What is discovered | Registered as |
|---|---|---|
Active Directory (ACTIVE_DIRECTORY) | Computer and user objects in the organizational units you select | Computers as servers, users as vault accounts |
VMware vCenter (VMWARE) | Virtual machines, with their IP address, power state and guest operating system | Servers |
A template can also run on a schedule. A scheduled run adds new servers and updates existing ones according to the template’s conflict policy, and can send an e-mail that summarizes what changed.
For the procedures, see Configuring Discovery Templates.
Important
The Discovery page is available only to MASTER users.
Configuring Discovery Templates
A discovery template stores where and how Keycyte PAM looks for systems and accounts. You create a template once and then run it by hand from the Discovery page, on a schedule, or both.
To open the page, select Discovery. The page has two areas: Discovery Templates (the list of templates) and Discover User And Computer (running a discovery and registering the results).
Important
The Discovery page is available only to MASTER users.
Before You Begin
- For Active Directory templates, add an LDAP configuration for the domain in Settings > Authentication. The template uses the bind account and the base settings of that configuration. For details, see Configuring Authentication Sources.
- For VMware templates, prepare the vCenter SDK URL and a vCenter account that can read the inventory.
- To receive e-mail about scheduled runs, configure SMTP in Settings > Notification. For details, see Configuring Notifications.
Creating a Discovery Template
To create a template:
-
In the Discovery Templates area, click Add. The Create Discovery Template panel opens.
-
In Type, select
ACTIVE_DIRECTORYorVMWARE. -
Enter a Name and, optionally, a Description.
-
Specify the source settings:
For
ACTIVE_DIRECTORY:Field Description DNS Suffix LDAP configuration (domain) to search. The list shows the DNS suffixes of the LDAP configurations in Settings > Authentication. DN Search box for organizational units. Type part of an OU name and select the OU from the suggestions. Each OU you select is added to Members. Members Organizational units the discovery searches. To remove an OU, click the delete button in its row. For
VMWARE:Field Description VMware URL vCenter SDK address, for example https://vcenter.example.com/sdk.Username vCenter account, for example administrator@vsphere.local.Password Password of the vCenter account. When you edit a saved template, leave the field empty to keep the current password. For a VMware template, click Test Connection to check the URL and credentials.
-
In the Schedule section, configure automatic runs if required:
Field Description Run automatically Turns the schedule on. Period Hourly, Daily or Weekly. Start time Time of day (HH:mm, in the server’s local time zone) from which the period is counted. If it is empty, the next run is one period after the template is saved or last ran. -
In the Conflict handling section, select the Policy when an existing server matches:
Option What happens to a discovered server that already exists Update existing (fill empty fields, refresh last seen) The existing server is updated and its last-seen time is refreshed. This is the default. Skip discovered item The discovered item is ignored. Mark only (don’t modify) Only the last-seen time of the existing server is refreshed. Existing servers are matched first by their Active Directory or VMware unique ID, then by address. Address and port values that an administrator changed by hand are never overwritten.
-
In the E-mail notification section, configure notifications if required:
- Turn on Notify on changes.
- In Recipients, type an e-mail address and press Enter. Repeat for each recipient.
-
Click Save.
The template appears in the Discovery Templates list. To change a template, click its edit button; to delete it, click its delete button.
How Scheduled Runs Work
Keycyte PAM checks the templates once a minute and runs every template whose next run time has passed. Templates run one after another, not in parallel.
A scheduled run does the following:
- Active Directory templates search for computer objects; VMware templates read the virtual machines.
- Each discovered host is added as a server, or applied to the matching existing server, according to the conflict policy. Windows hosts are added with the RDP protocol on port 3389; Linux hosts discovered in VMware are added with SSH on port 22.
- Servers that were found by the template earlier but are missing from this run are reported, not deleted.
- User accounts are not added automatically. Vault accounts are added only when you register them by hand (see below).
If Notify on changes is on, Keycyte PAM sends an e-mail to the recipients when a run added, changed or missed servers, or reported errors. Runs without any change do not send e-mail.
Running a Discovery and Registering Results
To run a discovery by hand:
- In the Discover User And Computer area, select the template in Select Template.
- For an Active Directory template, select what to search for in Search Type:
User,ComputerorUserAndComputer. - Click Start Discovery.
The results appear in the table. For Active Directory, the table shows the name and the location (distinguished name) of each object. For VMware, it shows the host name, IP address, registration status, suggested protocol, power state and guest operating system.
For VMware results, you can narrow the table by power state, protocol and registration status. The registration Status is one of the following:
| Status | Meaning |
|---|---|
| New | The virtual machine is not registered in Keycyte PAM. |
| Registered | A server already exists for the virtual machine. |
| IP Changed | A server exists, but with a different IP address. Click the tag to update the server’s address to the discovered one. |
Virtual machines without an IP address cannot be selected.
To register the results:
- Select the rows to register.
- Do one of the following:
- To add computers or virtual machines as servers, click Add Servers.
- To add Active Directory users as password vault accounts, click Add Password Vault.
- To register every matching result at once, without selecting rows, click the All (n) button next to the action buttons.
When you register many results at once, Keycyte PAM reports how many items were added, skipped and failed. Active Directory users are added as Windows Domain accounts.
Note
A registered server or account still needs to be covered by server roles or password roles before users can connect with it.
Reports
Keycyte PAM builds reports from the data it already collects: the state and history of password vault accounts, and the sessions users open. Reports are shown in the Admin Panel as charts and tables, and can be exported or sent by e-mail on a schedule.
| Report | What it answers | Where |
|---|---|---|
| Account reports | Which accounts have expired passwords, failed verification or were never changed; how password changes and verifications went over time. See Using Account Reports. | Reports > Account |
| Session reports | Who connected to which servers, when, for how long, and with which accounts. See Using Session Reports. | Reports > Session |
| Scheduled reports | A daily, weekly or monthly e-mail with an Excel summary of password operations. See Scheduling Reports. | Settings > Reporting |
Note
ADMIN users see Reports > Account and Reports > Session if one of their permission profiles grants the View permission for the Reports module. Settings > Reporting is available only to MASTER users.
Using Account Reports
The account report shows the health of the passwords stored in the password vault and the history of password changes and verifications. Use it to find accounts that need attention, for example accounts whose password is older than their password policy allows, or accounts whose last verification failed.
To open the report, select Reports > Account.
What the Report Includes
The report covers only accounts whose password Keycyte PAM can change and verify. Store-only secrets, such as certificates, API keys, secure notes and TOTP seeds, are left out. An ADMIN sees only the accounts that the ADMIN administers.
A password is considered expired when it is older than the maximum age set in the account’s password policy. An account without a password policy, or with a policy that has no maximum age, never expires.
Selecting the Period
The date selector in the toolbar sets the period for the time-based parts of the report (trends, activity, change history). Select Last 1 Day, Last 1 Week, Last 1 Month (default), Last 3 Months, Last 6 Months, Last 1 Year or Custom Range. For Custom Range, select the start and end dates.
The summary cards, health figures and the Expired Accounts and Failed Verify Accounts tabs always show the current state, regardless of the period.
Summary Cards and Alerts
| Card | Description |
|---|---|
| Total Accounts | Number of accounts in the report. |
| Healthy | Accounts whose last operation did not fail, whose password has been changed at least once, and which are neither expired nor expiring soon. |
| Expired | Accounts whose password is older than the policy allows. The card also shows how many accounts are expiring soon (within 7 days). |
| Failed Verify | Accounts whose last password change or verification failed. |
| Never Changed | Accounts whose password Keycyte PAM has never changed. |
| Never Verified | Accounts whose password has never been verified. |
An account that both failed and expired is counted in both cards. Below the cards, alerts summarize the conditions that need action.
Report Tabs
| Tab | Content |
|---|---|
| Overview | Charts: Health Distribution, Type Distribution, Password Change Trend, Policy Compliance, Operation Distribution, Password Age, and the Top Active Accounts table. |
| Expired Accounts | Accounts with an expired password: account name, server, last change, days expired and policy. |
| Failed Verify Accounts | Accounts whose last operation failed: account name, server, last verification date and error message. |
| Activity Log | Password operations in the period: time, user, account, destination, operation type, trigger, severity and message. |
| Change History | Password changes in the period, with the change date and the version number of each change. |
You can sort the Expired Accounts and Failed Verify Accounts tables by clicking the column headers.
Exporting the Report
To download the report as an Excel workbook, click Export Excel.
To send a similar summary by e-mail on a schedule, see Scheduling Reports.
Using Session Reports
The session report summarizes the sessions that users opened through Keycyte PAM. The Overview tab gives a fixed set of charts and top lists; the Detailed analysis tab lets you filter sessions in detail, group them the way you need, and export the result.
To open the report, select Reports > Session.
Selecting the Period
The date selector in the toolbar applies to both tabs. Select Last 1 Day, Last 1 Week (default), Last 1 Month, Last 3 Months, Last 6 Months, Last 1 Year or Custom Range. To reload the data, click Refresh.
Overview Tab
The summary cards show Total Connections (with the number of currently active sessions), Active Users, Active Servers and Avg Session Duration.
The tab also contains:
| Section | Content |
|---|---|
| Top Users, Top Servers | Charts of the users and servers with the most connections. |
| Protocol Usage | Share of each protocol. |
| Peak Hours | Connections by hour of day. |
| Top Connecting Users | Users with the most connections, with their share of the total. |
| Most Connected Servers | Servers with the most connections, with address and protocol. |
| Protocol Statistics | Connections and average duration per protocol. |
| Security Alerts | Connections made at unusual hours, with user, server, time and risk. |
To export the overview, select a format (Excel (.xlsx), PDF (.pdf) or CSV (.csv)) and a report type (Full Report, Summary or Security Report) in the toolbar, then click Export.
Detailed Analysis Tab
The Detailed analysis tab answers questions such as “who connected to this server outside working hours last month” or “how much time did each user spend with this account”.
Filtering Sessions
To filter the sessions:
-
Click Filters to open the filter panel.
-
Set the filters you need. Empty filters match everything.
Group Filters Who Users, User types (Local, Domain, RADIUS, Entra ID), User roles. Where Servers, Protocols, Server tags, Server roles. With which account Target accounts, Account types, Account scope (Any, Shared vault, Private vault). When Start hour (from–to), Weekdays, Off-hours only (before 08:00 / after 22:00), Include open sessions. Session Session types (User session, Shared session, Admin watch), Duration (minimum and maximum, in minutes), Close reasons (including Any error), Recording (Any, Recorded, Not recorded). Client Client IP (a single address, a prefix such as 10.10.5., or a CIDR range such as10.10.0.0/16), Client types. -
Click Apply.
The active filters are shown as chips; to remove all of them, click Clear filters.
Note
The Recording filter uses the recording information stored with each session. Sessions recorded before this information was stored count as not recorded.
Saving Filters
You can save a set of filters to reuse it later.
- Set the filters.
- Click Save filter and select Save as new….
- Enter a Name. To make the filter available to every user of the report, select Shared with everyone.
- Click Save.
To apply a saved filter, select it in the Saved filters list. If you change the filters after applying it, the filter is marked as modified; click the reapply button to return to the saved state. Use Update saved filter and Delete saved filter to change or remove it. Only the owner of a shared filter, or a MASTER user, can change or delete it.
Grouping and Comparing
In Group by, select how to group the sessions:
- User, Server, Target account, Protocol, Client IP
- User × Server, User × Account
- Day, Week, Month, Hour of day, Weekday
Each row shows the number of sessions, total and average time, the longest session, the number of distinct users, servers and accounts, the top server or user, the first and last session, the number of off-hours sessions and the number of sessions that were closed by force. Expand a row to see the breakdown by a second dimension. To open the matching sessions, click Open in Session History in the row.
A trend chart above the table shows sessions per day or per week.
To compare with the previous period of the same length, select Compare with previous period. The table then shows the previous values next to the current ones.
If there are too many groups, only the first groups are shown and a warning asks you to narrow the filters.
Exporting the Analysis
To export the current table, click Excel or CSV.
Scheduling Reports
A scheduled report sends an e-mail with an Excel workbook to a list of recipients every day, every week or every month. The workbook summarizes the password change and verification operations of the period and lists the accounts that need attention.
To open the page, select Settings > Reporting.
Important
This page is available only to MASTER users. Keycyte PAM sends the reports through the SMTP server configured in Settings > Notification. For details, see Configuring Notifications.
Creating a Scheduled Report
To create a scheduled report:
-
Click Add. The Report Configuration dialog opens.
-
Specify the following settings:
Field Description Report Name Name of the report. It appears in the e-mail subject and the file name. Report Type Daily, Weekly or Monthly. Scheduled Time Time of day to send the report. Timezone Time zone for Scheduled Time, for example UTCorEurope/Istanbul.Week Day For weekly reports: day of the week. Month Day For monthly reports: day of the month. In months with fewer days, the report runs on the last day of the month. Enabled Turns the schedule on. Email Enabled Sends the report by e-mail. A report without e-mail delivery is not generated. Recipients E-mail addresses, separated by commas or semicolons. -
Click Save.
The report appears in the list with its schedule, time, time zone, and the state of Enabled and Email delivery.
Managing Scheduled Reports
Use the buttons in the Action column of a report:
- Edit: opens the Report Configuration dialog.
- Pause / Resume: turns the schedule off or on.
- Send now: generates the report and sends it at once. The button is available only when the report and its e-mail delivery are enabled.
- Delete: removes the report.
Report Content
Each run covers the period before it: the last day for a daily report, the last 7 days for a weekly report, and the last month for a monthly report.
The e-mail has the subject Keycyte PAM - <Report Name> Report and an Excel attachment named after the report and the run time. The workbook contains:
- A Statistics sheet with figures on the password operations of the period.
- Success Accounts and Error Accounts sheets that list the successful accounts and the failed or not checked accounts, with the account name, type, status, message, last change, last verification and description.
- A Trends & Analysis sheet.
The workbook does not contain account user names, domains or passwords.
Logs and SIEM Integration
Keycyte PAM writes an audit record for sign-ins, administrator changes, user connections, password operations and access requests. You can review these records in the Logs menu of the Admin Panel and forward them in real time to syslog servers, for example to a SIEM.
| Topic | Content |
|---|---|
| Log Types | What the Client, System, Password Manager, Access and Access Control logs record, and how to search them. |
| Forwarding Logs to Syslog | How to add syslog targets over UDP, TCP or TCP with TLS, and select which records each target receives. |
Command and file transfer records of terminal sessions are shown under Sessions. For details, see Reviewing Command and File History.
Note
ADMIN users see each log page only if one of their permission profiles grants the View permission for that log. Syslog settings are available only to MASTER users.
Log Types
Keycyte PAM keeps five audit logs. Each has its own page under the Logs menu.
| Menu item | Log | What it records |
|---|---|---|
| Logs > Client | Client log | What users do through the platform: session start and end, failed connections, sign-outs, administrator watches of sessions, MFA events and e-mail delivery. |
| Logs > System | System log | What administrators change in the Admin Panel: creating, editing and deleting objects, settings changes, session terminations, and calls to the Secrets API. |
| Logs > Password Manager | Password manager log | Password changes and verifications on vault accounts, with their result. |
| Logs > Access | Access log | Sign-in attempts to the Admin Panel and the Client Panel, successful and failed, and sign-outs. |
| Logs > Access Control | Access control log | Access requests: who asked for access to which server or account, for which period, and whether the request was allowed or denied. |
Working with a Log Page
All log pages work the same way:
- To search, type a word in Search Keyword and press Enter.
- To filter, click Advanced Filter, fill in the fields and click Apply. To remove the filters, click Clear Filters.
- To refresh the list, click Refresh.
Most rows can be expanded to show the full structured record, the same data that is sent to syslog.
Client Log
| Column | Description |
|---|---|
| Date Time | When the event happened. |
| Username | User the event belongs to. |
| Client IP | Browser address of the user. Empty for background events. |
| Category | Area of the event, for example connection, session, mfa or email. |
| Severity | INFO, WARNING or ERROR. |
| Message | Description of the event. |
Filters: Start Date, End Date, Username, Category, Severity, Event (event name, for example session_start) and Client IP.
System Log
| Column | Description |
|---|---|
| Date Time | When the change was made. |
| Username | Administrator (or service identity) that made the change. |
| Category | Area of the change. |
| Severity | INFO, WARNING or ERROR. |
| Type | Event name. |
| Message | Description of the change. |
The expanded record shows which object was changed and, for edits, the changed fields. Secret values are never written to the log.
Filters: Start Date, End Date, Username, Category, Severity and Event.
Password Manager Log
| Column | Description |
|---|---|
| Date Time | When the operation ran. |
| Username | User name of the vault account the operation ran on. |
| Operation | Operation performed. |
| Destination | Target system of the operation. |
| Severity | INFO, WARNING or ERROR. |
| Method | How the operation was performed. |
| Manager User | User who started the operation, or the system for scheduled rotations. |
| Message | Result or error message. |
Filters: Start Date, End Date, Manager User, Account, Operation and Severity.
Access Log
| Column | Description |
|---|---|
| Date Time | When the attempt happened. |
| Username | User name that was entered. |
| Client Address | Address the attempt came from. |
| Method | Result or authentication method of the attempt, for example success, failed, logout, keycyte or entra. |
| Type | User type. |
| Message | Details, for example Login successful, Invalid MFA code or Account temporarily locked. |
Filters: Start Date, End Date, Username, Method, Type and Client Address.
Access Control Log
| Column | Description |
|---|---|
| User | User who requested access. |
| Type | Server or Account. |
| Action | allow (approved), deny (rejected) or inactive (still waiting for an approver). |
| Request Date | When the request was made. |
| Start Date, End Date | Requested access period. |
| Reason | Reason the user gave. |
Filters: Start Date, End Date, User, Type and Action.
Forwarding Logs to Syslog
Keycyte PAM can forward its audit records to syslog servers as they are written, so that a SIEM or a central log server receives them without polling. You can add several syslog targets; each target has its own protocol and its own selection of record types.
To open the page, select Settings > Syslog Settings.
Important
This page is available only to MASTER users.
How Forwarding Works
- Records are sent to every enabled target, each according to its own record-type selection.
- Messages use the RFC 5424 syslog format with the application name
keycyte-pamand theuserfacility. The message body is a JSON object with the same fields that the Admin Panel shows when you expand a log row. - Each target has its own connection and queue. A slow or unreachable target does not delay the others or the user’s request. Keycyte PAM retries a failed target after a short pause; if a target’s queue fills up, new records for that target are dropped.
- Changes on the page take effect immediately, without a restart.
Adding a Syslog Target
Before you begin, make sure that the syslog server is reachable from the Keycyte PAM server on the port you plan to use. For TCP+TLS, the syslog server’s certificate must be trusted by the operating system of the Keycyte PAM server.
To add a target:
-
Click Add. The Syslog Server dialog opens.
-
Specify the following settings:
Field Description Protocol UDP(default),TCP, orTCP+TLS. TLS connections use TLS 1.2 or later and verify the server certificate.Address Host name or IP address of the syslog server, for example 10.0.0.20.Port Port of the syslog server. Default: 514.Client Log Forward Client log records. System Log Forward System log records. ACL Log Forward Access log records (sign-in attempts and sign-outs). Access Control Forward access requests (Access Control log). Password Manager Forward password change and verification events. Command Forward the commands run in terminal sessions. File Transfer Forward file transfer records of terminal sessions. Status Enables the target. A disabled target receives nothing. -
Click Save.
The target appears in the list with a column for each record type. To change a target, click its edit button; to remove it, click its delete button.
Tip
To send different records to different systems, add one target per system. For example, send only System Log and ACL Log to the SOC’s SIEM, and Command and File Transfer to a separate log archive.
Note
UDP does not confirm delivery. If you cannot afford to lose records, use TCP or TCP+TLS.
Settings
The Settings menu holds the system-wide configuration of Keycyte PAM: authentication sources, notification channels, built-in RADIUS and TACACS+ servers, platform services and administrator permissions.
Important
The Settings menu is available only to MASTER users. Permission profiles cannot grant access to it.
The menu contains the following pages:
| Page | Documented in |
|---|---|
| General | Configuring General Settings |
| Connection | Configuring Connection Settings |
| Web TLS Certificate | Deployment Guide |
| Authentication | Configuring Authentication Sources |
| Permission Profiles | Permission Profiles |
| Reporting | Scheduling Reports |
| Notification | Configuring Notifications |
| Syslog Settings | Forwarding Logs to Syslog |
| Replication | Deployment Guide |
| Storage | Managing Services, Storage, Tags and the Recycle Bin |
| Radius Server | Configuring the RADIUS Server |
| TACACS+ Server | Configuring the TACACS+ Server |
| Services | Managing Services, Storage, Tags and the Recycle Bin |
| Backup | Deployment Guide |
| License | Deployment Guide |
| Tags | Managing Services, Storage, Tags and the Recycle Bin |
| Recycle Bin | Managing Services, Storage, Tags and the Recycle Bin |
The Web TLS Certificate, Replication, Backup and License pages are part of installing and operating the appliance, and are covered in the Keycyte PAM Deployment Guide.
Configuring General Settings
The General page collects system-wide options that do not belong to a specific feature: recording storage, the password policy for local users, branding of the sign-in pages, the user agreement, and bulk import of servers and accounts.
To open the page, select Settings > General. Each card on the page has its own Save button; changes on one card do not save the others.
System Information and Language
The System Information card shows the operating system, host name, IP address, MAC address, CPU, CPU cores, memory and disk of the Keycyte PAM server.
The language list below the card sets the Admin Panel language of your own account: English or Turkce.
Diagnostic Logging
Log Level sets how much detail the Keycyte PAM service writes to its own service log: DEBUG, INFO, WARN or ERROR. The change takes effect immediately.
Warning
Debug-level logging significantly increases log volume and exposes more session detail. Revert to INFO once troubleshooting is complete.
External Source
Use the External Source card to add many accounts or servers at once from an Excel file.
To import accounts or servers:
- Click Download Account Template or Download Server Template and fill in the downloaded
.xlsxfile. - Click Import Account Template or Import Server Template and select the file.
- In the Preview dialog, check the rows.
- Click Save All.
Record Configuration
| Field | Description |
|---|---|
| Record Base | Directory on the Keycyte PAM server where session recordings are stored. Default: /record/. |
| Export Resolution | 1920x1080 (default), 1280x720, 720x576 or 720x480. |
| Bitrate | 1 Mbps, 2 Mbps (default), 3 Mbps or 4 Mbps. |
OTP Configuration
| Field | Description |
|---|---|
| Algorithm | SHA1, SHA256 or SHA512. |
| Digits | Code length, 4 to 8. |
| Period | Code validity in seconds, 15 to 120. |
Access Request, URL and History Options
| Card | Description |
|---|---|
| ACL Admin Count | Value from 1 to 10. |
| Redirect URL | Base address of Keycyte PAM, for example https://pam.example.com. It is used for the links in access request e-mails: the approval link sent to approvers and the portal link sent to the requester. |
| Password History Count | Number of previous passwords kept in the history of each password vault account, 1 to 50. Default: 5. Older versions are deleted. |
| Recycle Bin Retention | Number of days a deleted password vault account stays restorable in the recycle bin before it is purged automatically. Default: 30. The change applies only to new deletions. |
Warning
A password vault account in the recycle bin is not rotated on its target. The archived password stays valid on the target system for the whole retention period.
Local User Password Policy
These rules apply to the passwords of local Keycyte PAM users (not to vault accounts).
| Section | Field | Description |
|---|---|---|
| Complexity | Minimum Length, Maximum Length | Allowed password length. |
| Require Uppercase, Require Lowercase, Require Digit, Require Special Character | Character classes the password must contain. | |
| Expiration | Password Expiry (days) | Days after which the password must be changed. 0 means the password never expires. |
| Warning Before Expiry (days) | Days before expiry when the user is warned. | |
| Account Lockout | Max Failed Login Attempts | Failed sign-ins after which the account is locked. 0 means no lockout. |
| Lockout Duration (minutes) | How long the account stays locked. 0 means an administrator must unlock it. | |
| Password History | Password History Count | Number of previous passwords that cannot be reused. |
| Banned Passwords | Passwords that are never accepted. Type a password and press Enter to add it. |
Click Save at the bottom of the card to apply the policy.
Customize
Use the Customize card to brand the sign-in pages and the application.
- Import Login Logo, Import App Logo, Import Footer Logo, Import Login Background: upload an image for each element.
- App Title: title of the application. Click Save next to the field.
- Client Login Banner: text shown on the Client Panel sign-in page. Leave it empty to use the default banner. Click Save next to the field.
- Reset to Defaults: removes all logos, the title, the banners and the background, and restores the defaults.
User Agreement
When the user agreement is enabled, users must accept it to sign in. Sign-in attempts without acceptance are recorded in the Access log.
| Field | Description |
|---|---|
| Enabled | Turns the agreement on. |
| Agreement Header | Title of the agreement. |
| Agreement Text | Text of the agreement. |
Configuring Connection Settings
The Connection page holds the building blocks that some server types need in order to connect: jump servers that host applications, a third-party vault to import accounts from, third-party application definitions, and login scripts for web applications.
To open the page, select Settings > Connection. The page has four cards: Jump Server, 3rd Party Vault, 3rd Party Application and Webapp Dialect.
Jump Server
A jump server is an intermediate host through which Keycyte PAM opens web application and third-party application sessions. You select the jump server in the settings of a server whose protocol is a web application or a third-party application.
- A Windows jump server is reached over RDP; the application (or the web browser for web applications) runs on it as a RemoteApp program.
- A Linux jump server runs browser sessions for web applications; Keycyte PAM shows the browser to the user over VNC.
To add a jump server:
-
On the Jump Server card, click Add.
-
Specify the following settings:
Field Description Type WindowsorLinux.Alias Name of the jump server shown in lists. Address Host name or IP address of the jump server. Port Windows only. RDP port of the jump server. Program Path Windows only. Path of the launcher program that runs as the RemoteApp program on the jump server. Program Path (Linux) Linux only. Access token that Keycyte PAM uses to start browser sessions on the jump server. Login Type Windows only. How Keycyte PAM signs in to the jump server (see below). -
Click Save.
Login Type has the following options:
| Option | How Keycyte PAM signs in to the jump server |
|---|---|
Auto | With the user’s own Keycyte PAM user name, domain and sign-in password. |
Self | With a free account from the accounts assigned to the jump server. |
Shadow | With a temporary local account that Keycyte PAM creates on the jump server for the session. The account is created with the credentials of the LDAP configuration marked Master in Settings > Authentication. |
3rd Party Vault
Keycyte PAM can import accounts from a CyberArk vault into its own password vault. Imported accounts are marked as coming from CyberArk; when you synchronize again, the passwords of accounts that were already imported are updated.
To add a CyberArk vault:
-
On the 3rd Party Vault card, click Add.
-
Specify the following settings:
Field Description Vault Name Name of the vault in Keycyte PAM. URL Base address of the CyberArk REST API. Keycyte PAM appends /auth/Cyberark/Logonand/Accountsto it.Parameters Optional query string appended to the account list request, for example a search or safe filter. Local Vault Keycyte PAM user. Username, Password CyberArk account used for the API calls. -
Click Save.
To synchronize, click the run button in the row of the vault. Keycyte PAM signs in to CyberArk, reads the account list, retrieves the password of each account, and creates or updates the matching vault accounts.
3rd Party Application
A third-party application definition describes a desktop program that users start on a Windows jump server, with the credentials of a vault account filled in automatically.
To add an application:
-
On the 3rd Party Application card, click Add.
-
Specify the following settings:
Field Description Alias Name of the application shown in lists. App Program to start. Arguments Command-line arguments of the program. Script Automation script that the launcher runs after the program starts. -
Click Save.
In Arguments and Script, you can use the following placeholders. Keycyte PAM replaces them when the session starts:
| Placeholder | Replaced with |
|---|---|
<username> | User name of the vault account. |
<password> | Password of the vault account. |
<domain> | Domain of the vault account. |
<host> | Address of the server. |
<portaluser> | Keycyte PAM user who opened the session. |
Webapp Dialect
A webapp dialect is a named list of script steps that sign a user in to a web application automatically. You select a dialect in the settings of a web application server.
To add a dialect:
- On the Webapp Dialect card, click Add.
- Enter a Name.
- Type a step in Script and click Add. Repeat for each step. Steps run in the order they are listed; to remove a step, click its delete button.
- Click Save.
In the steps, the quoted words "username", "password" and "domain" are replaced with the values of the vault account when the session starts.
Configuring Authentication Sources
Besides local users, Keycyte PAM can authenticate users against directory services and identity providers. The Authentication page configures these sources:
- LDAP Configuration: one or more LDAP or Active Directory domains.
- RADIUS Configuration: an external RADIUS server that Keycyte PAM queries as a client.
- Entra ID Configuration: sign-in with Microsoft Entra ID.
When a user signs in with a password, Keycyte PAM tries the sources in this order: local users, RADIUS, LDAP/Active Directory.
To open the page, select Settings > Authentication.
LDAP Configuration
Each LDAP configuration describes one domain. Keycyte PAM uses it to authenticate domain users, to look up their e-mail address and phone number for MFA, to search users and groups when you authorize them in roles, and as the source of Active Directory discovery.
Adding an LDAP Configuration
To add a domain:
-
On the LDAP Configuration card, click Add. The Ldap Credential dialog opens.
-
Specify the following settings:
Field Description Ldap Address Host name or IP address of the domain controller, for example dc01.example.com.Ldap Port 389for LDAP (default), usually636for LDAPS.Username Bind account that Keycyte PAM uses to search the directory. Password Password of the bind account. When you edit a saved configuration, leave the field empty to keep the current password. DNS Suffix DNS name of the domain, for example example.com. Users can sign in asuser@example.com.Base Base DN for user searches, for example DC=example,DC=com.Group Base Base DN for group searches. Login Field Attribute that holds the sign-in name. Default: sAMAccountName.Mail Field Attribute that holds the e-mail address. Default: mail.Phone Field Attribute that holds the phone number. Default: telephoneNumber.SSL Connects over LDAPS. Master Marks this domain as the default. Users who sign in without a domain suffix are authenticated against the master domain. -
Click Save.
To check the connection, click the test button in the row of the configuration.
Note
If there is only one LDAP configuration, it is used for users without a domain suffix even when Master is not selected. With several configurations and no master, those users must sign in as user@domain.
Adding a CA Certificate for LDAPS
When SSL is selected, Keycyte PAM must trust the certificate of the domain controller. You can import the certificate automatically from the server or upload it.
To add a certificate:
- In the row of the configuration, click the certificate (lock) button. The Certificates dialog opens.
- Do one of the following:
- On the Auto Discovery tab, click Discover Certificates. Keycyte PAM connects to the server and lists the certificates in its chain, with subject, issuer and expiry; the certificate to trust is marked Recommended. Click Trust in its row. To check a certificate first, click View PEM.
- On the Manual Upload tab, enter an Alias, click Import and select the certificate file (
.pem,.crtor.cer), then click Upload.
- Click Close.
RADIUS Configuration
With a RADIUS configuration, Keycyte PAM forwards sign-in requests to an external RADIUS server, for example an existing MFA server.
| Field | Description |
|---|---|
| Enabled | Turns RADIUS authentication on. |
| Server | Address of the RADIUS server. |
| Auth Port | Authentication port. Default: 1812. |
| Auth Protocol | PAP (default), CHAP, MSCHAP or MSCHAPv2. |
| Shared Secret | Secret shared with the RADIUS server. Leave it empty to keep the current secret. |
| Timeout | Seconds to wait for an answer. Default: 5. |
Click Save to apply the settings.
To test the connection:
- Click Test. The RADIUS Test dialog opens.
- Enter a Username and Password and click Test.
- If the RADIUS server asks for a second factor, enter the MFA Code and click Verify.
The result appears in the dialog.
Note
This card configures Keycyte PAM as a RADIUS client. To let network devices authenticate against Keycyte PAM, see Configuring the RADIUS Server.
Entra ID Configuration
With Entra ID, users sign in to Keycyte PAM with their Microsoft account.
Before you begin, register an application in Microsoft Entra ID and add the redirect URI https://<your-keycyte-host>/sso/entra/callback, for example https://pam.example.com/sso/entra/callback. Create a client secret for the application.
| Field | Description |
|---|---|
| Enabled | Turns Entra ID sign-in on. |
| Tenant ID | Directory (tenant) ID of your Entra ID tenant. |
| Client ID | Application (client) ID of the registered application. |
| Client Secret | Client secret of the application. Leave it empty to keep the current secret. |
| Scope | Requested permissions. Default: openid profile email User.Read. |
| Ignore SSL | Skips certificate validation for the connection to Microsoft. |
Click Test to check the configuration, then Save. To remove the configuration, click the delete button on the card.
When a user signs in with Entra ID for the first time, Keycyte PAM creates an Entra ID user automatically, but only if the user, or one of the user’s groups, is authorized in a server role or a password role. Otherwise the sign-in is refused and recorded in the Access log.
Warning
Select Ignore SSL only for troubleshooting. Without certificate validation, the connection to the identity provider can be intercepted.
Configuring Notifications
Keycyte PAM sends e-mail for MFA codes and setup, access requests, scheduled reports and discovery results, and SMS for MFA codes. The Notification page configures both channels.
To open the page, select Settings > Notification. The page has three cards: Email Configuration, MFA Customization and Sms Configuration.
Email Configuration
To configure the SMTP server:
-
On the Email Configuration card, specify the following settings:
Field Description Host Host name or IP address of the SMTP server, for example smtp.example.com.Port SMTP port. Default: 587.Encryption None (plain SMTP / relay) (default), STARTTLS (587) or SSL/TLS (465). Skip TLS verify Skips validation of the SMTP server certificate. HELO hostname Optional name that Keycyte PAM announces to the SMTP server, for example pam.example.com.From address Sender address, for example noreply@example.com.From name Sender display name, for example Keycyte PAM.Authentication Select Required if the SMTP server requires sign-in. Username, Password SMTP account, when authentication is required. Leave Password empty to keep the current password. -
Click Save.
-
To check the settings, click Test, enter an address in the Email Test dialog and click Test. The result appears in the dialog.
Warning
Select Skip TLS verify only for troubleshooting or with an internal relay you trust.
MFA Customization
Use the MFA Customization card to change the e-mails that users receive for MFA.
| Field | Description |
|---|---|
| QR Code Subject | Subject of the MFA setup e-mail that contains the QR code. Default: Keycyte MFA Setup Information. |
| QR Content | HTML body of the MFA setup e-mail. Leave it empty to use the default template. In a custom body, the first %s is replaced with the QR code image (Base64-encoded PNG) and the second %s with the secret key. |
| Email Subject | Subject of the e-mail that carries a one-time code. Default: Keycyte PAM - Verification Code. |
| Email Content | Body of the one-time code e-mail. {username} is replaced with the user name and {otp} with the code. Default: Hello {username}, your verification code is: {otp}. |
Click Save to apply the changes.
Important
A custom QR Content must contain exactly two %s placeholders, in this order: QR image, then secret key.
Sms Configuration
To send one-time codes by SMS, configure an SMS gateway.
-
In Provider, select the gateway type. The form shows only the fields that the selected gateway uses.
Provider Fields İVTbox (token + JSON POST) Token URL, SMS URL, Username, API Key Generic HTTP GET (URL template) SMS URL, Username, Password TT Mesaj (token + JSON POST) Token URL, SMS URL, Username, Password, Sender / Header, Token Username, Token Password If you leave Provider empty (Auto-detect (legacy)), Keycyte PAM treats an SMS URL that contains placeholders as a generic GET template and anything else as İVTbox.
-
Fill in the fields:
Field Description Token URL Address where Keycyte PAM obtains an access token from the gateway. SMS URL Address of the send request. For Generic HTTP GET, this is a URL template; Keycyte PAM replaces <username>,<password>,<phone>and<message>with URL-encoded values.Username, Password, API Key Gateway credentials. Sender / Header SMS header registered with the provider. Token Username, Token Password Separate credentials for the token request. Leave them empty if they are the same as the sending account. OTP Message Text of the SMS. Use {otp}where the code should appear. Leave it empty for the default text. -
Click Save.
-
To check the settings, click Test, enter a phone number in the Phone Test dialog and click Test.
An example SMS URL template for a generic gateway:
https://sms.example.com/send?user=<username>&pass=<password>&to=<phone>&text=<message>Tip
Keep OTP Message short. Most gateways split messages longer than 160 characters.
Configuring the RADIUS Server
Keycyte PAM includes a RADIUS server. Network access devices (RADIUS clients, also called NAS), such as VPN gateways, firewalls and wireless controllers, can send their sign-in requests to it. The RADIUS server authenticates the user with the same chain as the Keycyte PAM sign-in page (local users, RADIUS, LDAP/Active Directory) and asks for the user’s MFA code when MFA is enabled.
The RADIUS server runs as a separate Keycyte PAM service. You can see its state and restart it on the Services page.
To open the page, select Settings > Radius Server. If the server has not been configured yet, the page says so; fill in the settings and save them.
Note
Do not confuse this page with the RADIUS card in Settings > Authentication. That card makes Keycyte PAM a RADIUS client of an external server; this page makes Keycyte PAM the RADIUS server for your devices.
Configuring the RADIUS Server
To configure the server:
-
Specify the following settings:
Field Description Listen Port UDP port the server listens on. Default: 1812.Shared Secret Secret shared with the RADIUS clients. Leave it empty to keep the current secret. MFA Timeout (seconds) How long the server waits for the user’s MFA code, 30 to 600. Default: 180. Max Failed Attempts Number of failed attempts allowed, 1 to 10. Default: 3. Session Timeout (seconds) 10 to 3600. Default: 30. Allowed NAS IPs Comma-separated addresses of the devices allowed to send requests, for example 10.0.0.1, 10.0.0.2. Leave it empty to allow all.Log Level DEBUG,INFO(default) orERROR.Description Free-text note. -
Click Save.
-
On each network device, add Keycyte PAM as a RADIUS server with the address of the Keycyte PAM server, the listen port and the shared secret.
Important
Restrict Allowed NAS IPs to your devices. With an empty list, any host that knows the shared secret can test passwords against Keycyte PAM.
Configuring the TACACS+ Server
Keycyte PAM includes a TACACS+ server for the administration of network devices such as switches, routers and firewalls. Devices send the sign-in, command authorization and accounting of their administrators to Keycyte PAM, which applies the same users, roles and MFA as for other sessions.
The TACACS+ server runs as a separate Keycyte PAM service. You can see its state and restart it on the Services page.
How Devices Are Registered
A device is registered by entering a TACACS+ Shared Secret in the settings of the server (asset) that represents the device. Each device then uses its own secret. The Fallback Shared Secret on this page is used only by devices that have no secret of their own.
The privilege level that a device grants to the user comes from the TACACS+ Privilege Level of the server roles that cover the user. For details, see Server Roles.
Configuring the TACACS+ Server
To open the page, select Settings > TACACS+ Server. Until you save the page, the server runs on its own default settings.
To configure the server:
-
Specify the following settings:
Field Description Listen Port TCP port the server listens on. Default: 49.Fallback Shared Secret Secret for devices that have no secret of their own. Leave it empty so that unregistered devices cannot connect at all. Allowed Device IPs Comma-separated addresses or CIDR ranges of the devices allowed to connect, for example 10.0.0.0/24. Leave it empty to allow all.Device Secret Cache (seconds) How long a device secret is reused before it is looked up again, 0 to 86400. Default: 300. A changed secret takes effect after this time, without a restart. PAP MFA Separator PAP has no second prompt, so users with MFA append the code to the password: password<separator>123456. Default:,. Enternoneto disable; users with MFA then cannot sign in over PAP.Log Level DEBUG,INFO(default) orERROR.Description Free-text note. -
To protect the TACACS+ traffic with TLS 1.3, select Enable TLS in the TLS 1.3 section and specify:
Field Description Certificate File Path of the server certificate, for example /etc/keycyte/tls/tacacs.crt.Private Key File Path of the private key, for example /etc/keycyte/tls/tacacs.key.Require Client Certificate Accepts only devices that present a client certificate. CA File Path of the CA certificate that signs the client certificates. Required when Require Client Certificate is selected. The paths refer to the file system of the TACACS+ server, not to your workstation.
-
Click Save.
Warning
When TLS is enabled, both the certificate and the private key are required. If they are missing, the TACACS+ server refuses to start rather than listen without protection.
Managing Services, Storage, Tags and the Recycle Bin
This topic covers four maintenance pages of the Settings menu: Services, Storage, Tags and Recycle Bin.
Services
The Services page shows the containers that make up Keycyte PAM and lets you control them. It also manages the access keys that Keycyte PAM services use to authenticate to the PAM server.
To open the page, select Settings > Services.
Keycyte Services
The Keycyte Services card lists the service containers:
| Column | Description |
|---|---|
| Container | Container name. |
| Service | Keycyte service the container runs. |
| State | Container state, for example running or stopped. |
| CPU, Memory | Current resource use. |
| Uptime | Time since the container started. |
| Actions | Logs, Start, Stop and Restart buttons. |
To refresh the list, click Refresh.
- To view the recent log output of a container (the last 500 lines), click Logs. In the log panel, click Refresh to reload it.
- To control a container, click Start, Stop or Restart and confirm the operation.
Warning
Stopping or restarting a container interrupts the active sessions that the service handles. The PAM container cannot stop or start itself; only Restart is available for it.
If the page shows Docker socket not available, the Docker socket (/var/run/docker.sock) is not mounted into the PAM container, and the service list and logs cannot be shown. For details, see the Deployment Guide.
Service AccessKeys
Keycyte PAM services such as keycyte-ssh-proxy and keycyte-radius-server authenticate to the PAM server with an HMAC-SHA256 HTTP signature and a per-service access key. The Service AccessKeys card lists the services, their Access Key ID, and when the key was Last Used.
To generate or rotate a key:
- In the row of the service, click Generate (no key yet) or Rotate (replace the existing key). Rotating asks for confirmation.
- In the dialog that opens, copy
KEYCYTE_ACCESS_KEY_IDandKEYCYTE_ACCESS_KEY_SECRET, or click Copy as .env. - Set the two values as environment variables of the service container.
- Restart the service container.
Important
The secret is shown only once. After you close the dialog it cannot be retrieved, only rotated. When you rotate a key, the old secret stops working immediately, and the service fails its requests until it is restarted with the new values.
These keys are for Keycyte’s own services. Keys for customer applications that read secrets are issued to service identities; for details, see Service Identities.
Storage
The Storage page shows the per-user virtual drive directories on the Keycyte PAM server (/drive). These directories hold the files that users transfer through the virtual drive of their sessions.
To open the page, select Settings > Storage.
The list shows each Directory Name and Directory Size. Expand a directory to see its files, with File Name and File Size. To find a directory, type in Search Keyword.
- To delete a single file, click the delete button in the file row and confirm.
- To delete all files in a directory, click the delete button in the directory row and confirm.
Note
Session recordings are not stored here and cannot be deleted from the Admin Panel.
Tags
Tags are labels for grouping and filtering servers, password vault accounts, users and roles. Tags do not grant access to anything; access is governed by roles. The Tags page manages the tag vocabulary that is offered everywhere tags are used.
To open the page, select Settings > Tags.
The list shows each tag with its Name, Description and In use count (the number of items that carry the tag, or unused).
To add a tag:
- Click Add.
- Enter a Name, and optionally select a Color and enter a Description.
- Click Save.
To change a tag, click Edit in its row.
To merge two tags:
- In the row of the tag to remove, click Merge.
- Select the tag to merge into.
- Click Merge.
Every item that carried the first tag now carries the selected tag, and the first tag is deleted.
To delete a tag, click Delete in its row and confirm. If the tag is in use, the confirmation says on how many items; deleting the tag removes it from all of them.
Recycle Bin
When you delete a password vault account, Keycyte PAM keeps it in the recycle bin for a retention period, so that you can restore it. After the period ends, the account is purged automatically. The retention period is set in Settings > General (Recycle Bin Retention, default 30 days).
To open the page, select Settings > Recycle Bin.
The list shows each deleted account with its Name, Username, Type, Deleted By, Deleted At and Expires In (days left, or Expired). No password is shown on this page.
- To restore an account, click Restore and confirm. The account returns to the password vault with its owners, servers, roles and history.
- To delete an account permanently, click Delete Permanently and confirm. This cannot be undone.
Warning
A deleted account’s password is not changed on its target system. It stays valid there for the whole retention period. If the account must stop working, change its password on the target.
Permission Profiles
Permission profiles define what an ADMIN user can see and do in each module of the Admin Panel. A profile is a matrix of modules and four permissions: View, Add, Edit and Delete. Profiles are assigned to ADMIN users on the Users page.
Key rules:
- Every ADMIN user needs at least one permission profile.
- When an ADMIN has several profiles, the permissions are combined: a permission granted by any profile is granted.
- MASTER users are never restricted by profiles.
- The View permission of a module decides whether its menu item and page are visible. An ADMIN whose profiles grant no module at all sees a page that says the account has no permissions.
- Profiles cannot open MASTER-only pages: Discovery, Access Control > Command Filters and the whole Settings menu.
- Profiles limit what an ADMIN can do; they do not widen the ADMIN’s ownership scope. An ADMIN still sees only the servers, accounts and users that the ADMIN administers.
To open the page, select Settings > Permission Profiles.
Modules
The matrix contains the following modules, grouped as in the menu:
| Module | Notes |
|---|---|
| Dashboard | View only. |
| Servers, Password Vault, Users | |
| Server Roles, Password Roles, User Roles | |
| Active Sessions | Edit allows sending messages; Delete allows terminating sessions. |
| Session History | Edit allows changing session descriptions. |
| Command History, File History | |
| Resource Rules | The Access Control > Resource Rules page. |
| Password Policy | |
| Password Generator | View only. |
| Reports | Covers both Reports > Account and Reports > Session. |
| Client, System, Password Manager, Access, Access Control (logs) | One module per log page. |
A dash in the matrix means that the permission does not apply to the module.
System Profile
Keycyte PAM creates a system profile named Full Admin that grants every permission of every module. System profiles are marked System in the list and cannot be changed or deleted. On the first start, every ADMIN user without a profile receives Full Admin, so that no administrator loses access.
Creating a Permission Profile
To create a profile:
- Click Add.
- Enter a Name and, optionally, a Description.
- Set the permissions in the matrix. To start from a preset, click Read-only (only View on every module), Full access (every permission) or Clear (nothing). Use the All column to set every permission of a module at once.
- Click Save.
The list shows, for each profile, how many modules grant each permission and how many users the profile is Assigned Users to.
Editing and Deleting Profiles
- To change a profile, click its edit button. Changes apply to every ADMIN who has the profile.
- To delete a profile, click its delete button and confirm. A profile that is assigned to users cannot be deleted; remove it from those users first.
Assigning Profiles to Users
Profiles are assigned in the user’s settings on the Users page, in the Permission Profiles field. The field is required for ADMIN users.
Secrets API
The Secrets API lets an application read a credential from the Keycyte PAM password vault at run time, instead of keeping the password in a configuration file or an environment variable. It is the only Keycyte PAM API intended for customer applications; the other endpoints under /api/ serve the Admin Panel and are not a public contract.
How Access Is Controlled
- The caller is a service identity. The application authenticates as a Keycyte PAM user that holds the SERVICE role. A user with only the SERVICE role cannot sign in to the Admin Panel, the Client Panel or SSH/RDP sessions, so a leaked API key cannot become an interactive session.
- Password roles decide what the caller can read. A service identity sees exactly the accounts that its password roles grant, including the schedule window of those roles. There is no separate permission model and no MASTER shortcut.
- One secret per call. There are no bulk reads. The account list returns metadata only, never secret values.
- Read only. The API cannot create, change, rotate or verify accounts, and cannot read personal (private) vaults or password history.
For how to create a service identity and issue its API keys, see Service Identities. To grant accounts to it, add it to password roles; see Password Roles.
Authentication
Every request is signed with an HMAC-SHA256 HTTP signature, using the key ID and secret of an API key issued to the service identity.
- The request carries a
Dateheader and anAuthorization: Signature ...header. - The signature covers the request method and path (
(request-target)) and theDateheader, so a signed request cannot be replayed against another endpoint. - The
Dateheader must be within about 300 seconds of the server time. Keep the clock of the calling host synchronized with NTP. - Only
hmac-sha256is accepted. - A key can be limited to a list of client IP addresses and can have an expiry date, which is enforced with no grace period.
The exact header format is described in Secrets API Reference.
Auditing
Every call is written to the System log, successful or refused, with the calling key ID, the account, and the reason text that the caller sent, if any. Secret values are never written to the log.
Integration Files
The API Keys dialog of a service identity in the Admin Panel links to an integration guide (/admin/docs/secrets-api.html) and to the OpenAPI specification (/admin/docs/secrets-api.yaml) served by your Keycyte PAM server.
Secrets API Reference
This reference describes the two endpoints of the Secrets API (version 1.0.0), the request signature, and the error responses. All requests go to your Keycyte PAM server over HTTPS, for example https://pam.example.com.
| Method | Path | Purpose |
|---|---|---|
GET | /api/secrets/accounts | List the accounts the key may read, without secret values. |
POST | /api/secrets/fetch | Read one secret of one account. |
Request Signature
Every request needs two headers, and both must be listed in the signature:
Date: Sat, 30 Aug 2026 17:04:47 GMT
Authorization: Signature keyId="<key-id>",algorithm="hmac-sha256",headers="(request-target) date",signature="<base64-signature>"
The signature is the Base64-encoded HMAC-SHA256 of the signing string, computed with the key secret. The signing string joins the listed headers with a newline (\n):
(request-target): post /api/secrets/fetch
date: Sat, 30 Aug 2026 17:04:47 GMT- The method in
(request-target)is lowercase; the path is the full path, including any query string. - Only
hmac-sha256is accepted; RSA and ECDSA are rejected. Datemust be within about 300 seconds of the server time.
GET /api/secrets/accounts
Returns every account in the caller’s scope, sorted by name and then by accountId. Use it to look accounts up by name instead of hard-coding numeric IDs. The list is also the exact boundary of the key: it shows what a leak of the key would expose.
The response never contains password, privatekey or passphrase.
Response 200
| Field | Type | Description |
|---|---|---|
accounts | array | Accounts in scope (see below). |
count | integer | Number of entries in accounts. |
Each entry of accounts:
| Field | Type | Description |
|---|---|---|
accountId | integer | Numeric ID of the account. |
name | string | Account name. Pass it as name to /api/secrets/fetch. |
username | string | Login name of the account. Not treated as a secret. |
domain | string | Domain of the account. Omitted when empty. |
type | string | Account type, for example linux, windows, mysql. |
description | string | Administrator’s note. Omitted when empty. |
An empty list is a normal result: the identity holds no password roles, or none of them is inside its schedule window now.
{
  "accounts": [
    { "accountId": 6365, "name": "app-db", "username": "appuser", "type": "mysql" }
  ],
  "count": 1
}
POST /api/secrets/fetch
Returns one secret value of one account. The account is identified in the request body, not in the URL, so that it does not appear in access logs.
Request body
Send exactly one of accountId or name.
| Field | Type | Description |
|---|---|---|
accountId | integer | Numeric ID of the account. Stable for the life of the account, but changes if the account is deleted and created again. |
name | string | Account name. Matched case-insensitively, with surrounding spaces ignored, and only within the caller’s scope. |
field | string | Secret to read: password (default), privatekey or passphrase. For example, an API key is stored in password and a TOTP seed in privatekey. |
reason | string | Optional text recorded in the audit log, up to 256 bytes. It never changes the result. |
Response 200
| Field | Type | Description |
|---|---|---|
accountId | integer | Account that was read. Check it when you asked by name. |
field | string | Field that was returned, in lowercase. |
value | string | The secret, in clear text. |
Warning
Treat the response as sensitive. Do not log it, cache it on disk, or include it in error reports.
Error Responses
| Status | Body | Meaning |
|---|---|---|
400 | {"message": "..."} | Neither or both of accountId and name were sent, field is not one of the three names, or the requested field is empty on the account. |
401 | {"error": "unauthorized"} | The signature is missing, malformed, expired, or does not match an active key. The body does not say which; the server log holds the reason. |
403 | {"error": "forbidden"} or {"message": "this credential cannot read secrets"} | The call came from an IP address outside the key’s allow-list, or the key has no owning user. |
404 | {"message": "secret not found"} | No secret was returned. The same response covers a missing account, an account outside the caller’s scope, and a name that matches nothing the caller can see. |
409 with Retry-After | {"message": "account password is being rotated: ..."} | The account’s password is being changed now. Wait the number of seconds in Retry-After and retry. If the condition persists for several minutes, the rotation could not save the new password and an administrator must resolve it; raise an alarm instead of retrying forever. |
409 without Retry-After | {"message": "account name is ambiguous: ..."} | name matches more than one account in the caller’s scope. Use accountId, or rename one of the accounts. |
500 | {"message": "..."} | Server error. |
Note
Errors from the authentication layer (401, and 403 for IP restrictions) use the error field; errors from the endpoints use the message field. Read both in your client.
Example
The following shell script reads the password of the account named app-db. Replace the placeholders with your values.
KEY_ID="<key-id>"
KEY_SECRET="<key-secret>"
HOST="pam.example.com"
PATH_="/api/secrets/fetch"
DATE="$(LC_ALL=C date -u '+%a, %d %b %Y %H:%M:%S GMT')"

SIGNING_STRING="$(printf '(request-target): post %s\ndate: %s' "$PATH_" "$DATE")"
SIGNATURE="$(printf '%s' "$SIGNING_STRING" | openssl dgst -sha256 -hmac "$KEY_SECRET" -binary | base64)"

curl -s "https://$HOST$PATH_" \
  -H "Date: $DATE" \
  -H "Authorization: Signature keyId=\"$KEY_ID\",algorithm=\"hmac-sha256\",headers=\"(request-target) date\",signature=\"$SIGNATURE\"" \
  -H "Content-Type: application/json" \
  -d '{"name": "app-db", "field": "password", "reason": "nightly backup job"}'
A successful call returns:
{ "accountId": 6365, "field": "password", "value": "<secret-value>" }The HMAC key is the key secret exactly as it was shown when the key was issued (used as a text string, not decoded).