
Keycyte PAM 3.2 · Administrator Guide
Using the Admin Panel
You manage Keycyte PAM from the Admin Panel, a web console that you open in a browser. This topic describes how to sign in and how the panel is laid out.
Signing In
Before you begin, make sure that:
- Your account has the MASTER or ADMIN role. For details, see Administrator Types.
- If your account has the ADMIN role, a MASTER has assigned at least one permission profile to it. An ADMIN account without a profile that grants access to any module can sign in, but sees only the message You have no permissions.
To sign in to the Admin Panel:
-
In a browser, open the address of Keycyte PAM, for example
https://pam.example.com. The sign-in page opens. -
Enter your Username and Password.
For a domain account, enter the user name in the form that your directory service accepts, for example
jsmithorjsmith@example.com. -
If the sign-in page shows a terms of service check box, read the terms and select the check box. The check box appears when a user agreement is enabled in Settings > General.
-
Click Sign in.
-
Complete any additional step that Keycyte PAM asks for:
Step Description MFA Code Your account uses multi-factor authentication. Enter the code from your authenticator application, or the code that was sent to you by e-mail or SMS. QR code Multi-factor authentication was enabled for your account and you have not set it up yet. Scan the QR code with an authenticator application, or enter the secret key shown under the code, then enter the 6-digit code in MFA Code. New Password, Confirm Password You must change your password. The new password must be at least 8 characters long and contain an uppercase letter, a lowercase letter and a number. Select Application Your account has both an administrator role and the USER role. Click Admin Panel.
The Admin Panel opens at https://pam.example.com/admin/ and shows the Dashboard, or the first page that your permissions allow.
If Microsoft Entra ID sign-in is configured, the sign-in page also shows Sign in with Microsoft. For details, see Authentication Settings.
Note
After too many failed attempts, the sign-in page shows Too many attempts. Try again in n s and disables the Sign in button until the countdown ends. Repeated failed attempts can also lock a local account, according to the local user password policy; an administrator can unlock it on the Users page. For details, see Adding Users.
To sign out, click the sign-out icon at the right end of the top bar. Signing out ends your session on the server, not only in the browser.
Admin Panel Layout
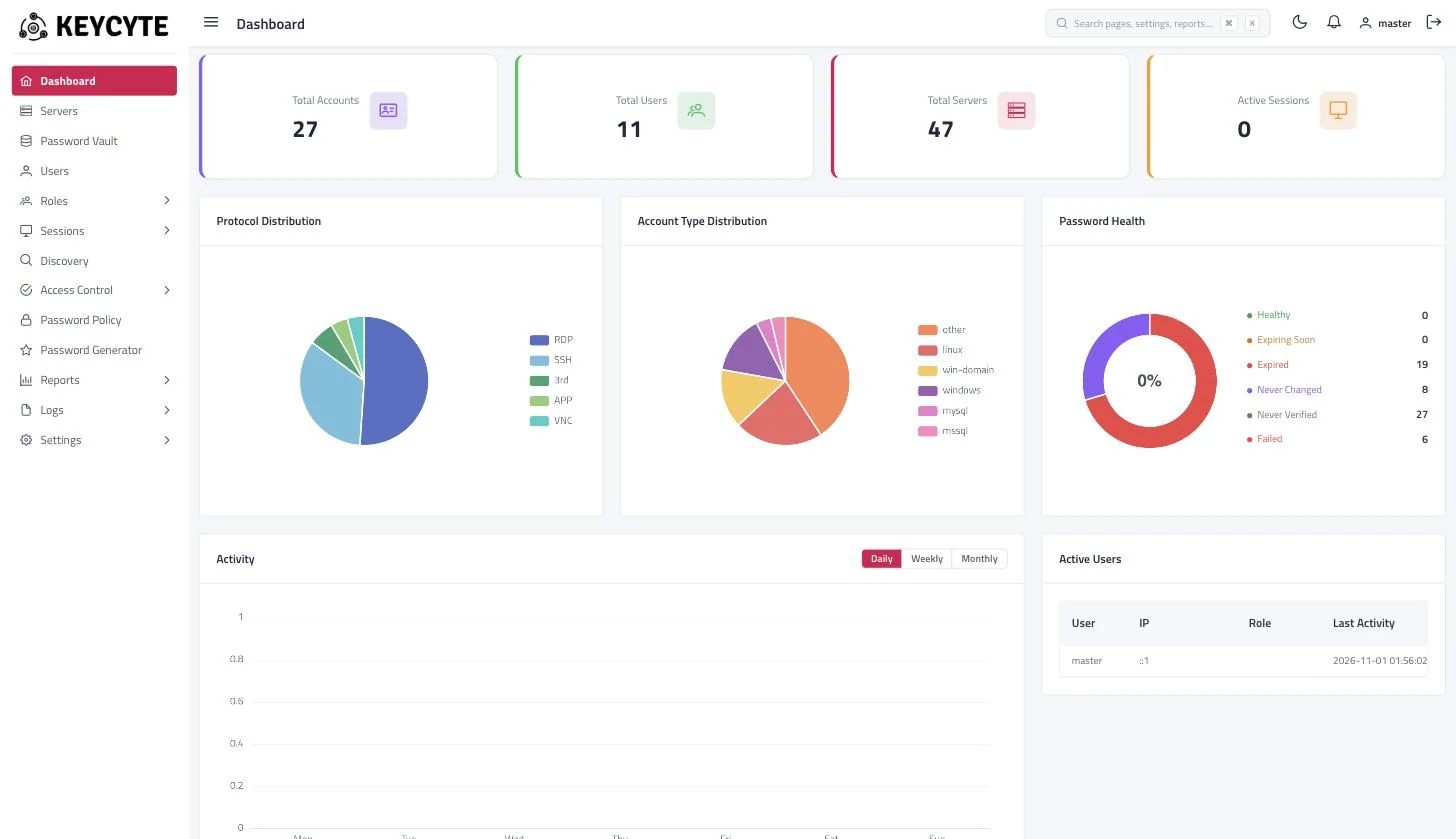
The Admin Panel has the following areas:
| Area | Description |
|---|---|
| Sidebar menu | Pages of the Admin Panel, grouped by subject. Click a group, for example Roles, to expand it. The menu shows only the pages that you are allowed to open. |
| Top bar | From left to right: the button that collapses or expands the sidebar, the name of the current page, the search box that opens the command palette, the theme button, the notification bell, your user name and the sign-out button. |
| Content area | The page that you selected. Most pages show a table with a toolbar above it. |
| Footer | Product logo and the Keycyte PAM version. |
The sidebar menu contains the following items:
| Menu item | Description |
|---|---|
| Dashboard | Overview of resources, sessions, password health and alerts. See Dashboard. |
| Servers | Systems that users connect to. See Servers. |
| Password Vault | Privileged accounts and other secrets. See Password Vault. |
| Users | Keycyte PAM user accounts. See Users. |
| Roles | Server Roles, Password Roles and User Roles. See Roles. |
| Sessions | Active Sessions, Session History, Command History and File History. See Sessions. |
| Discovery | Discovery templates. Shown to MASTER users only. See Discovery. |
| Access Control | Resource Rules and Command Filters. Command Filters is shown to MASTER users only. See Access Control. |
| Password Policy | Password policies for vault accounts. See Password Policies. |
| Password Generator | Generates a random password according to the options that you select. |
| Reports | Account and Session reports. See Reports. |
| Logs | Client, System, Access, Access Control and Password Manager logs. See Logs. |
| Settings | System settings. Shown to MASTER users only. See Settings. |
Common Table Operations
Most pages that list objects work the same way:
- Search Keyword in the toolbar filters the rows that are already loaded as you type.
- Advanced Filter (filter icon) opens a dialog with field-level filters. Clear Filters (crossed-out filter icon) removes them.
- Export to Excel (Excel icon) downloads the rows that match the current search and filter.
- Click a column header to sort by that column.
- Select the check boxes at the start of rows to show the bulk actions for the selected rows, for example Delete Selected.
Command Palette
The command palette lets you jump to a page by typing part of its name.
To open a page from the command palette:
- Press Ctrl+K (on macOS, ⌘K), or click the Search pages, settings, reports… box in the top bar.
- Type one or more words of the page name or group, for example
session history. - Use the arrow keys to select a result and press Enter, or click the result.
To close the palette without opening a page, press Esc.
The palette offers only the pages that your permissions allow. It lists the main pages of the menu and the following settings pages: General, Connection, Web TLS Certificate, Authentication, Permission Profiles, Reporting, Notification, Syslog Settings and License. Other settings pages are reached from the Settings menu.
Notification Bell
The bell in the top bar shows access requests that are waiting for a decision. A red badge on the bell shows how many requests are pending. The list refreshes every 60 seconds and each time you open it.
The bell is shown only to administrators who have the Edit permission for Resource Rules. You see the requests for the servers and accounts that you own.
To approve or reject an access request from the bell:
-
Click the bell. The Notifications panel opens and lists the requests under Access Permission Requests.
Each request shows whether it is for a Server or an Account, the requesting user, the requested Start Date and End Date, the time of the request and the Reason that the user entered.
-
Click Approve or Reject.
For details, see Access Requests.
Color Theme and Language
To switch between the dark and the light theme, click the sun or moon icon in the top bar. The theme is saved in your user profile and applies the next time you sign in. New accounts use the dark theme.
The interface language (English or Turkish) is also saved per user. You can change it in the Client Panel settings; a MASTER can also change it in Settings > General.